One of the earlier kits of the mighty Raptor, Italeri’s offering has often been accused of representing the YF-22 which it totally isn’t. In case the Italian company made a scale model of the prototype this kit is NOT it – the fuselage shape shows well in the images below.
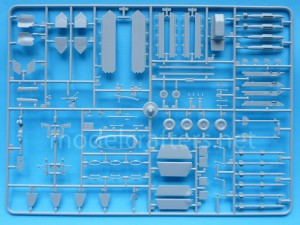
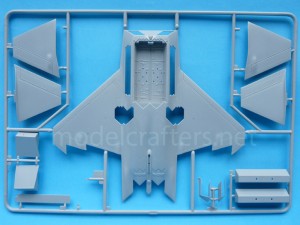
Sprue A has most of the smaller details, as well as the armament on it. Nothing spectacular here, but those separate weapon-bay doors are designed with them posed open in mind. And whether you pose the bays closed or not – use all the parts to increase the strength of the model – after all it’s some 23 cm long and you don’t want it twisted.
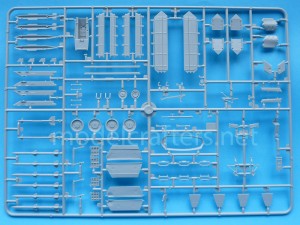
The other side shows the details on the inside of said doors. BTW gluing the two-part flaps will imminently result in a step. You can also see the wing pylons, for which no tanks are provided.
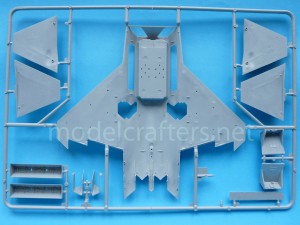
Sprue B has the fuselage top parts and lower nose, as well as the horizontal stabilizers, and the lower aileron halves. The two parts missing on the pic represent the engine intake trunkings (or whatever is easily seen from them – not really believable) – taking a walk somewhere in the box. Last, but not least is the closed arrestor hook cover, which is sure to teach you filling and sanding, as its shape is nothing like the opening it’s supposed to fit.
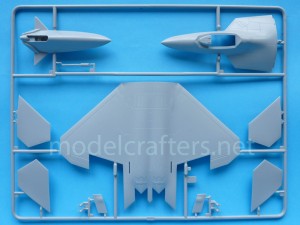
I have to admit that I completely ignored the opinions of several builders which blamed the kit engineering on the distinctive brokeback appearance Italeri Raptors have. If and when building this kit – glue the top nose to the top fuselage part and attach that to the lower fuselage AFTER that. Align lower nose LAST.
While I am totally cool with Italeri’s soft plastic has the advantage of being easier to work with than most other companies out there it has a very big issue with modelling glues. Gluing two parts together might as well result in a real pothole – the plastic literally melts and forms cavities which you will need to fill and sand later on. Imagine that on a stabilizer’s edge and you get the idea…
The bottom view will unveil two more issues this kit has:
– the very small area in which the upper and lower nose have contact in the LERX/top intake leading edge area;
– the driller nose cone tip, which has the option of accepting an instrumental probe. Mine collapsed upon gluing as if I put over a heat source.
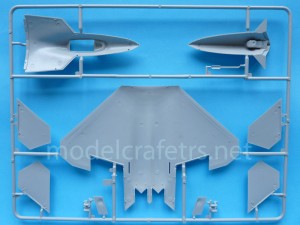
Sprue C has the lower fuselage, main landing bays, Sidewinder bays, main weapon bay spar, vertical stabilizers, intake inlets and engine back ends (another self-separated part – seen further down).
Italeri’s attempt at detailing the weapon and landing gear bays is feeble at best due to the pipes/cables looking 2D, but they still get points for trying. Main thing to watch here is the alignment of the vertical stabilizers – dry-fit and tape their halves together, then check their fit against top fuselage. I’ve had both my attempts at the kit plagued by the “different angles vs. large gaps” syndrome.
Bottom view shows Sidewinded and MLG bays. These latter ones actually align well with the tabs, but don’t really fit the fuselage’s inside. Unless you peek through the exhaust you will never notice, though. If this bother you anyway – use filler down the seams.
Speaking of exhausts – here’s the part. I am at a loss how is one expected to fill a rectangular hole with a part that has rounded edges, but I never studied engineering anyway, so…
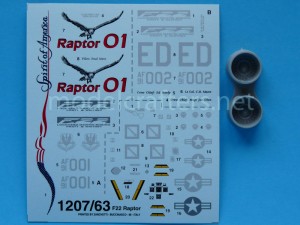
I liked the decals – in register with nice, rich colors, and not translucent at all. Italeri probably missed couple of hundred stencils, but WTH. By the end of the build I was so frustrated with it anyway that wanted the model off my table ASAP and I’d only put on the basic decals anyway.
Clear parts include a short-shot canopy and a real thick HUD with massive supports (not pictured here).
So there you have it – simple model, probably targeted to younger modellers who’d like to have the Raptor in scale. It looks like a production F-22 in the end, but getting there is no easy task. I’d think that this impressive machine deserves a better attempt at kitting, and would certainly NOT recommend this one. Looking at the Revell offering it looks based off Italeri’s model, but I sure hope the positive reviews the German kit gets are not in vain – I actually bought one. Tackling it would be delayed a few years, probably…