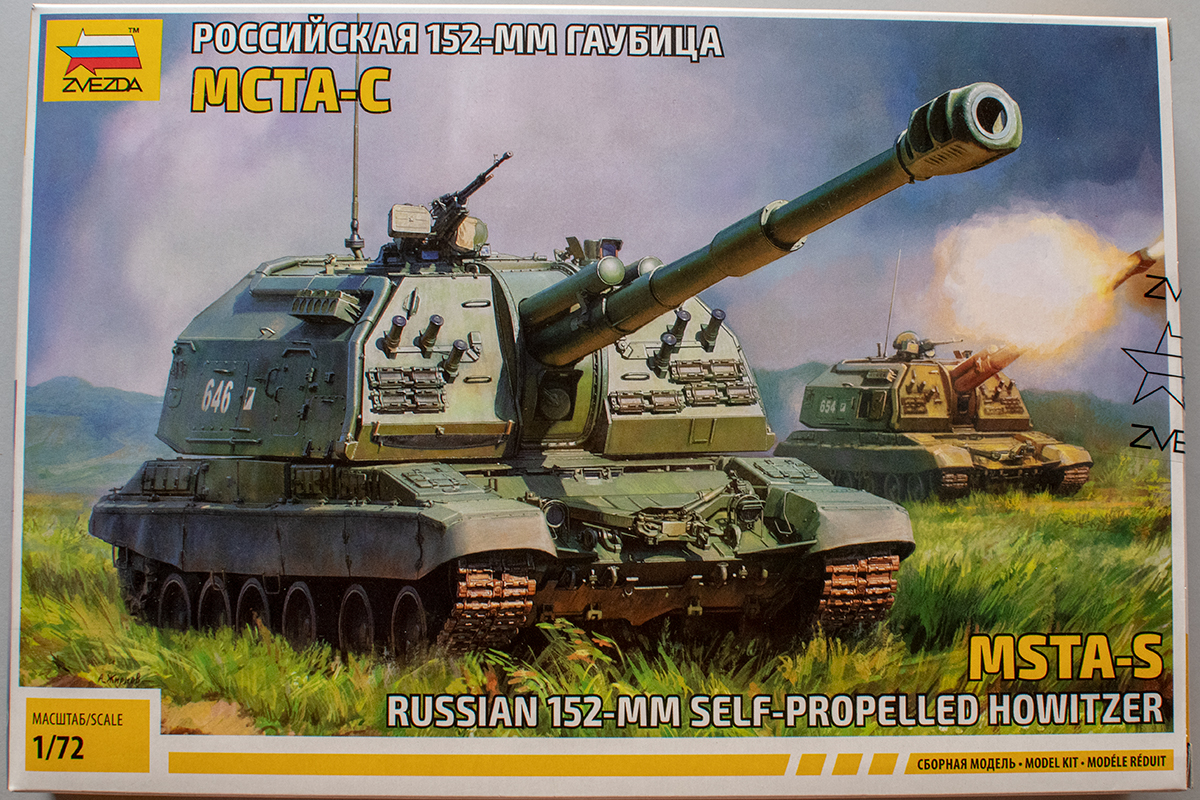
The king of battle (artillery) is not well represented in this blog, and I plan to rectify this starting with the (relatively) recent Msta-S kit from Zvezda in 1/72. The 2S19 self-propelled howitzer was developed during the 1980s to replace the aging 2S3 “Akatsiya” SPG of the same caliber (and much shorter range + lower rate of fire). It uses a modified T-72 hull as well as torsion bars, wheels and track from T-80 to carry a large turret with a 7 meter-long barrel. The resulting product finally brought the level of Soviet SPG up, nearer to the then-current M109 variants in NATO armies. An interesting feature at the back of the turret is an elevator for transporting shells and propellant charges from the ground up into the turret. This means the howitzer can be continuously fed from the ground instead of relying on the limited ammo supply stored onboard alone. Zvezda has already produced an 1/35 kit which proved popular among modellers. Despite knowing the 1/72 kit is expected a year in advance and the official announcement came on June 1, 2019 – picking the actual article up was exciting.
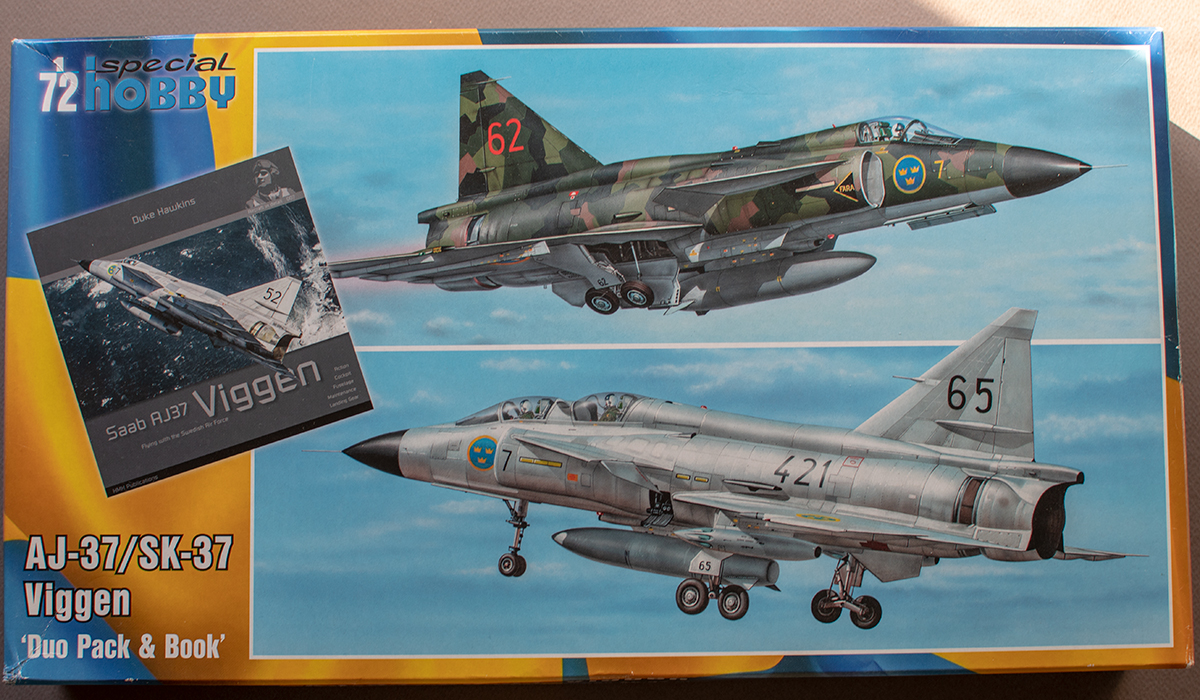
Sweden has always been a very special country in my book with its peculiar machines, and the Viggen is no exception. For the longest time the only kit in the scale has been the Heller one, so when Special Hobby announced their joint project with Tarangus I was excited. As I had seen a two-seater flying some time before that – and was suitable impressed by both appearance and performance – I opted to purchase the twin pack, attracted by the number of versions AND the photo book.
The box is BIG, in fact it is bigger than most 48th kits I have, as well as some 35th scale kit boxes in my collection. There are 2 transparent bags with parts, 2 instruction booklets (1 for each the single and double seater), a decal sheet, and the book. The last 2 items are fixed within the box with cardboard inserts, stapled to the box sides. Except for the instructions all items are packed in separate plastic bags.
The Panther is one of the most recognizable tanks of WWII, right up there with the slow and boxy but feared Tiger I. With ~6,000 examples per Wikipedia the Panther is the third most produced tracked German AFV after the Stug III (9,408 built), and the workhorse of Panzerwaffe, the Pz IV (8,298 made).
No wonder that number of kits on the market follows closely the other 2 vehicles. Naturally there are various renditions of the vehicle and its details, with the tracks varying from flat to highly detailed. Below are a few examples from 6 different kits:
a Zvezda Ausf D, which I’ve previously featured here and here.
a Zimmerit-clad Dragon Ausf G previously see here and here.
a late Ausf A again of DML pedigree.
a Trumpeter Late production Jagdpanther
an ESCI early Jagdpanther in Italeri box (the only one on the market with early engine deck)
Revell’s early/late Jagdpanther combo kit 03111
1/72 Panther and Jagdpanther kits
I’ve also included 2 resin sets for comparison: early and late tracks from OKB Grigorov. Here’s the full line up:
8 examples of Panther tracks
Cast – in order of appearance (left to right) and track width:
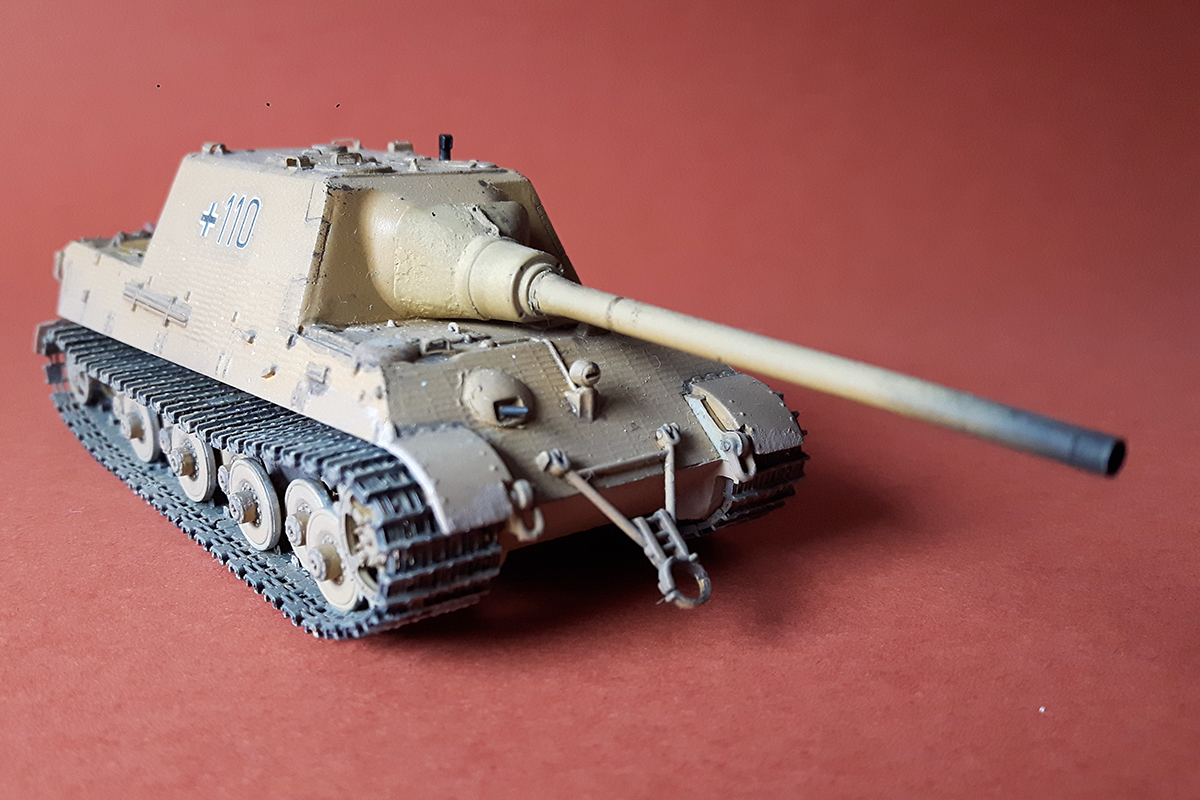
The Jagdtiger was a last-ditch weapon, a self-propelled anti-tank bunker, that had zero impact on the outcome of WWII. Regardless, a lot of model companies offer both variants of this machine. My main reason for getting the Trumpeter set with Porsche suspension was the small number of parts and the related ease of construction. It promised a rather uninvolved build as I imagined a straight OOB project done over the weekend. Yeah, right 😀
The first session was promising, I managed to remove the main components from the sprues, clean up and assemble the bogies in a couple of hours. Instead of going full AMS I decided to plug the locating holes for the spare track hangers, and go “bald”.
After toying with the idea of replacing the molded-on tools I decided against it, as that would severely affect the Zimmerit coat. I really wasn’t impressed by the molded-on Zim either, but elected to keep it. Still, I cut off the vision blocks/guards (molded solid) and built new guards instead.
The gun mantled was stippled with diluted Basic Tamiya putty to simulate the cast texture, then lightly sanded. The gun barrel was replaced with a turned aluminum one from RB models.
My first thought about the Trumpeter tracks was “That’ll do for a quick build.” But then I looked up some build reviews and wasn’t so convinced anymore. Comparison with the OKB Tiger II tracks is below.
As you can see the kit track is missing the internal set of guide teeth, plus the level of detail on the resin one is… a bit higher dare I say?
I also used the corresponding sprocket set to save myself some trouble on adjusting the kit sprocket to fit the aftermarket tracks. I was rather pleased with how the replacements look. To add a bit more character I split out the gun support ring, and re-glued it as if the entire suport was just dropped rather than neatly stowed around the front light (as directed in the instructions).
I used some of the mesh screens from the Flyhawk King Tiger PE detail set on the engine deck to at least partially cover the inverted grills Trumpeter provides.
Continuing with the “KISS” approach I went for the monochromatic Dunkelgelb paint job, and the decals from the Revell Hummel. A bit of mud using colorized wood putty, and a simulated stripped paint in the area where the gun support would wrap around the barrel complete the build.
Details are highlighted with a dark brown wash.
Overall the Trumpeter Jagdtiger has been an easy, even pleasant build. The parts fit well, and if you go with the spare tracks on the superstructure – it will require no filling at all. Unless you decide to replace parts/details I am sure it can be built and finished in a day. Its main weakness are the tracks, which – even on a weekend build – are worth replacing with an aftermarket set. This will add a bit more detail and character to the rather boxy appearance of this massive machine.read more
Big machines have always been a thing in the USSR, and that is definitily true for both aircraft and tanks before WWII. In April 1941 some 20 proposals for a super heavy tank competed within the Kotin design bureau. War interrupted this madhouse, all guns built for the design were destroyed. However since men continue to obsess with heavy tanks that were never built in metal – what you will see below is the winning one in resin.
On to the sturdy cardboard box keeping the parts safe.
Boxart for Duhov’s KV-4 from OKB Grigorov
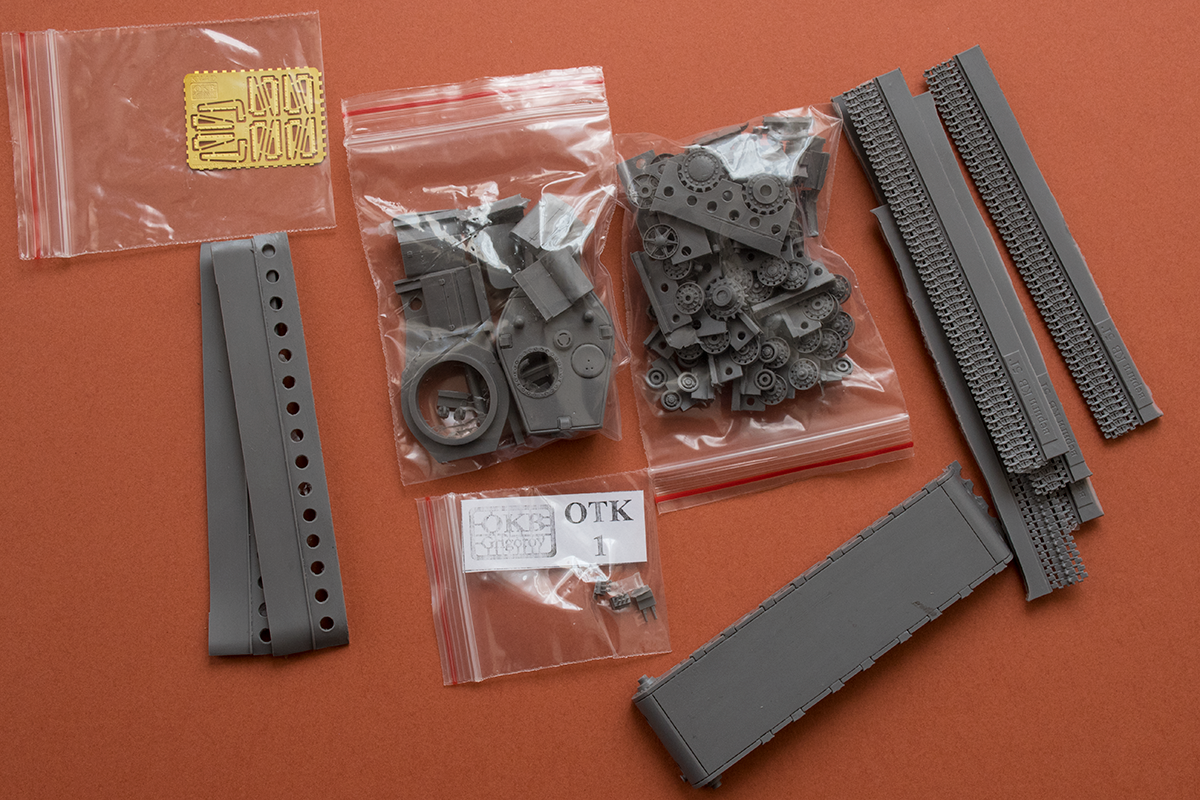
Inside you will find zip-lock bags with parts, all neatly tucked into a large sheet of bubble wrap, and the typical minimalistic instructions on a single folded sheet.
While the kit is not branded as “heavy metal” or “Hard-o-big” as e.g. the SU-122-54, this KV-4 can’t be considered not as “simplified” either. The kit fenders alone are nearly 11cm long, and with 8 road wheels per side, separate suspension arms, bump stops, return rollers and what have you, there’s still some 150 parts in the trademark grey resin.
Parts for KV-4 (Duhov) by OKB Grigorov
Something I am not used to in OKG kits is the minimal number of PE parts – just 12 of them in a small shiny fret, all supports for the fenders with hex bolthead detail. Naturally – you will need to fold them 🙂
PE fender supports for KV-4 (Duhov) by OKB Grigorov
These are glued to the sides of the 1-piece upper hull, which has the driver, engine and transmission hatches molded shut. It is by far the largest and longest part in the kit.
There are openings for the main turret and the engine air intakes, which are supplied as separate parts.
KV-4 (Duhov) engine intakes
There is no mesh or PE parts to cover the openings in the intakes themselves.
Next in line is the hull pan with numerous openings and locations for various parts on the sides, and positions for the tow hooks at either end.
Admittedly I have no idea what could tow the 80+ ton behemoth other than another such tank with no turret – or a “Russian troyka” of 3 turretless KV-1s, attached to a monstrous tow bar.
One-piece fenders for each side – nothing to bend here. You are already familiar with the 6 lengths of highly detailed 700mm KV tracks.
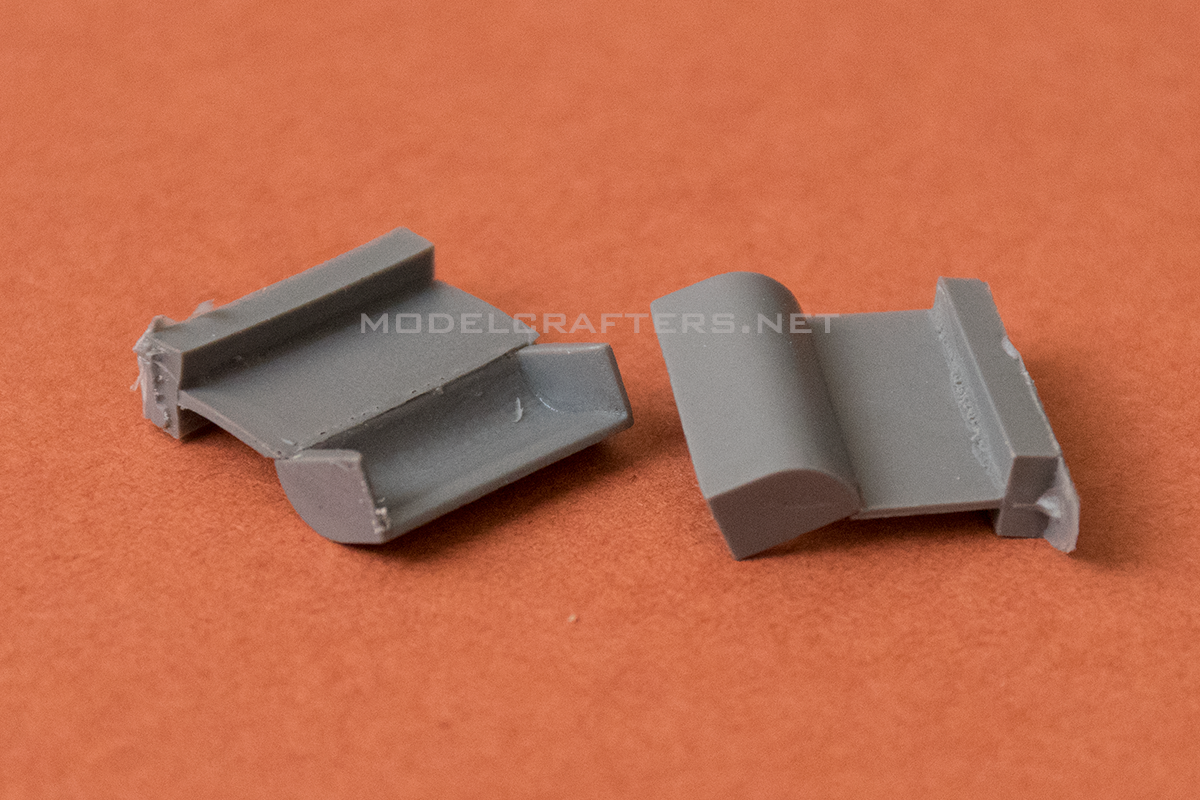
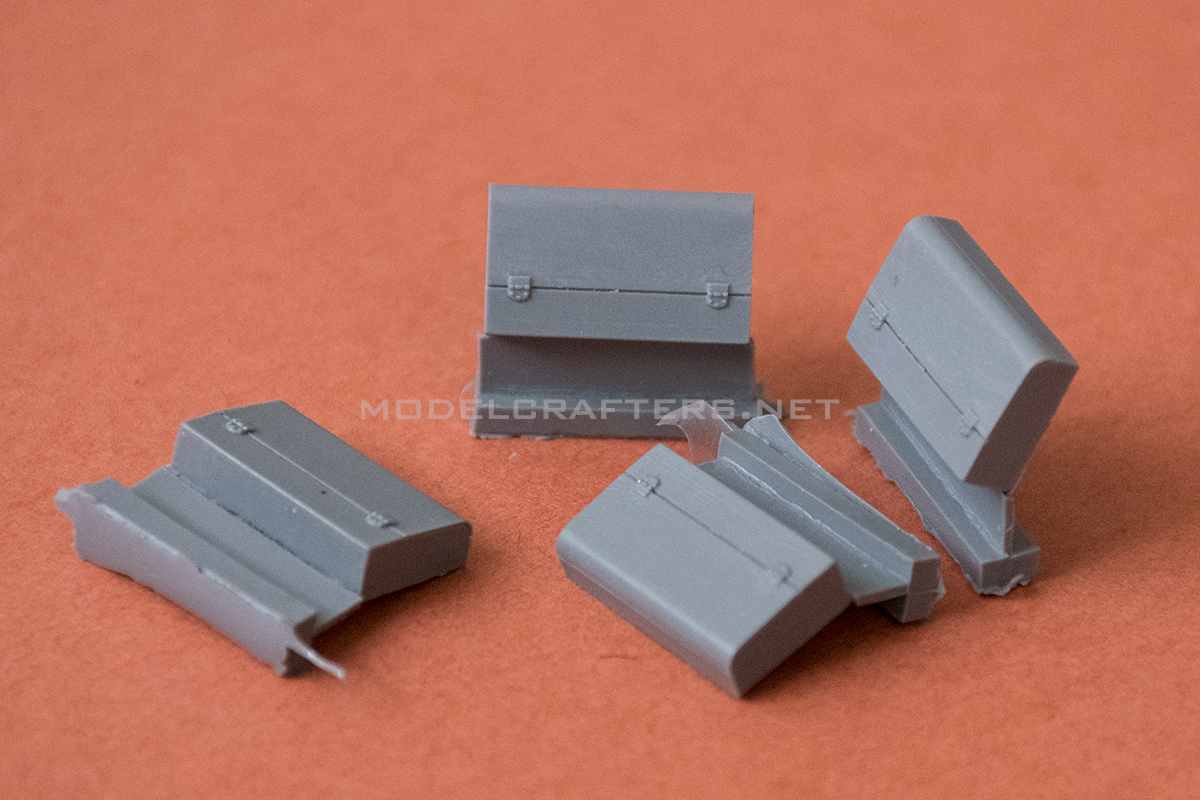
There are 4 equipment bins that sit on top of the fenders. They are cast hollow, but closed, and are supplied as individual parts with raised hinge detail and recessed hinge line:
KV tool boxes
An item you can’t miss is the monstrous main turret, complete with periscopes, fan detail, armored gun sight housings, detailed hatches.
Nice detail on the mantlet, too: the armored bolts with conical heads are beautifully reproduced.
You’ve already noticed the turret is hollow. The large circular opening on the top is the base for a secondary turret armed with a DT machine gun. The smaller turret completely covers the ring bolt detail when installed, but you’ll know it’s there 😉
The kit includes the secondary turret with a DT machinegun, as well as open-bore resin barrels for both the 107mm and the 45mm gun.
While the 1-piece resin casting already looks good enough and will require minimal cleanup due to the minimum attachment points to the casting stub, OKB Grigorov offers a machined brass 107mm ZiS-6 gun barrel as well. The turned barrel is smooth inside and out, no visible tracks from the lathe knife’s point, and is a drop-fit replacement of the resin one. OKB has already offered several opportunities to get the metal barrel for free with your KV-4 order.
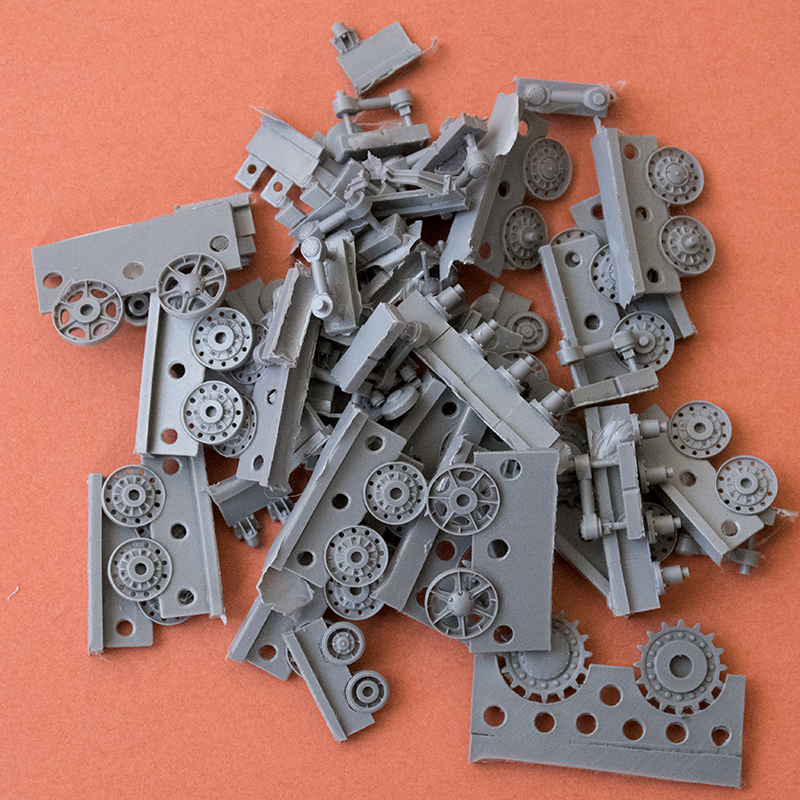
The running gear of the kit is where the bulk of the parts is. Behold:
Running gear parts for the KV-4 (Duhov) kit by OKB Grigorov
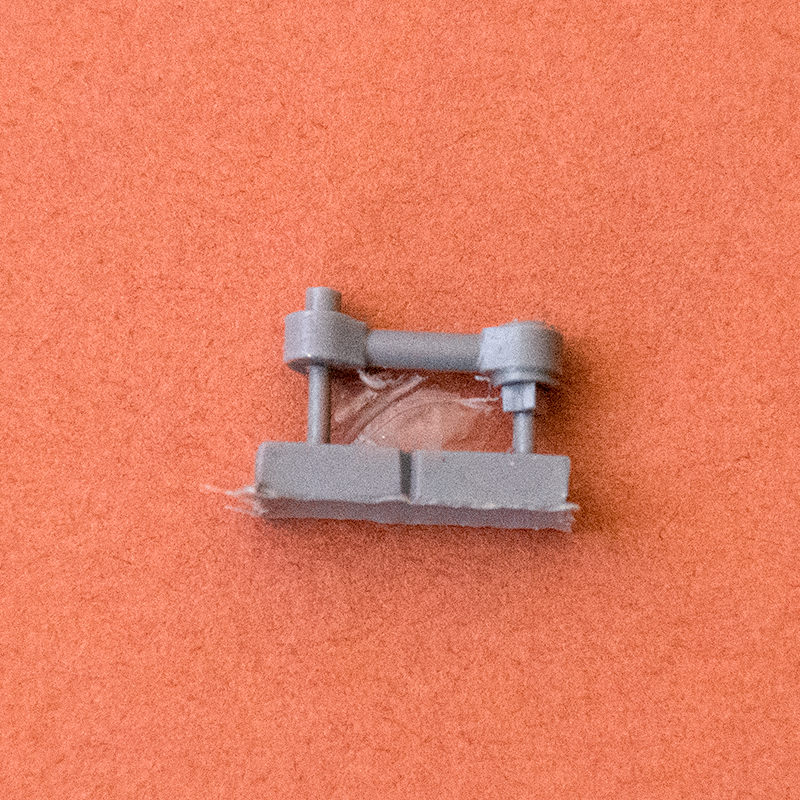
The suspension arms for the roadwheels are separate parts. Note the arms are handed (different parts for left and right side of the hull), so do check the fit before gluing these in place. The circular pin obviously fits in the wheels themselves, while the square key is intended to lock the arm into position in the hull.
Suspension arm for KV-4 (Duhov)
Of curse you can simply drill out the opening for that key and have the running gear posed.
Other than the suspension arm each roadwheel corresponds to a bump stop – an assembly that is intended to limit the travel of said arm so the tank does not lie flat on its belly. Parts are delicate and highly detailed, take a look:
Next you have the return rollers, 4 on each side, as well as their bases that need to be glued to the hull tub first.
You can clearly see the bolt detail on both part types.
Sprockets – your usual large KV two-part affair with a massive center cap and a lot of bolts on the perimeter.
The parts on the second image are the mud scrapes – these were intended to remove the mud deposits accumulating inside the massive sprocket.
Next are the idlers, the track tension adjustment mechanisms and their bases. You can actually see the bolt thread on the tensioner parts.
Additional details: towing and lifting hooks, opened KV exhaust.
DT machninegun tips (one for the bow gunner, and another for the small turret up top), lifting hooks for the engine and transmission decks (that will need some work on their openings), transparent resin headlight.
DT machnineguns, lifting hooks, headlight
Basically you have everything you need to build this Soviet “paper” super heavy in the box. This is an impressive, very well detailed release, and with the excellent properties of the medium OKB uses it should pose no problem for an experienced modeller to obtain an excellent result.read more
In the past couple of weeks I’ve reviewed, built and now completed a pre-production example of OKB Grigorov’s first full plastic kit, the US light tank M24 Chaffee.
As I have demonstrated in the posts so far, the pre-release communication from the company and some of its friends and loyal customers has been 100% correct: what you see is a complete plastic kit with high level of detail, representing particular features of the actual vehicle, and with minimal compromise with fidelity despite the small scale.
I am particularly pleased with the way the upper hull rests over the hull tub – just like on the real vehicle. The kit parts mostly self-align, so despite the seemingly complicated breakdown my pre-production sample does not “limp”, and stands on all its 10 road wheels. Impressively, I only removed flash from 3 parts, meaning the factory is very well versed in kit molding. The sprue gates on parts, including individual track links, are really thin and easy to clean up. Yes, there have been some molding lines (you can see them on my idler wheels) you may have to take care of, but nothing you have not done before.
You can see bolts, panel join lines, hatches, periscopes, cooling louvres, etc. are all present, as are details such as the cooling vents of the two 30 cal barrels. The M2 on the turret is possibly the best in the scale I’ve encountered so far. Track segments and individual links are thin and feature uniform detail. Perhaps the only item I would replace are the headlamp guards, which are already available in the PE set from the previous article.
Without further ado – the finished article. Note I have not modified stock parts aside from drilling the gun barrel and cutting out the rear left segment of the side skirt, which was not completely molded on my sample. As no decals were available in my sample – I did not apply any.
Here is the M24 with its closest competitor (in my view) – a Pz III. This is an Ausf. L by DML I built a few years ago.
You can see the M24 is about the same size, but carries a 75mm (vs 50 on the Pz III) and an extra heavy MG.
In conclusion the kit has been a pleasure to build (it took me 3 evenings to assemble and a weekend to paint), and my next project would be the Mammoth edition, with all metal parts available from OKB.read more
As you are aware OKB Grigorov is also offering the so-called “Mammoth edition” of their injection molded M24 Chaffee. There are several PE frets and a machined brass gun barrel included in that boxing.
First off are the side skirts. You’ve noticed in my original review of the plastic parts that the skirts are represented in styrene, and that their edges are beveled to appear visually thinner. For those of us who are not satisfied a fret numbered P72017 offers replacement side skirts complete with fastener detail.
P72017 Side skirts for M24 Chaffee
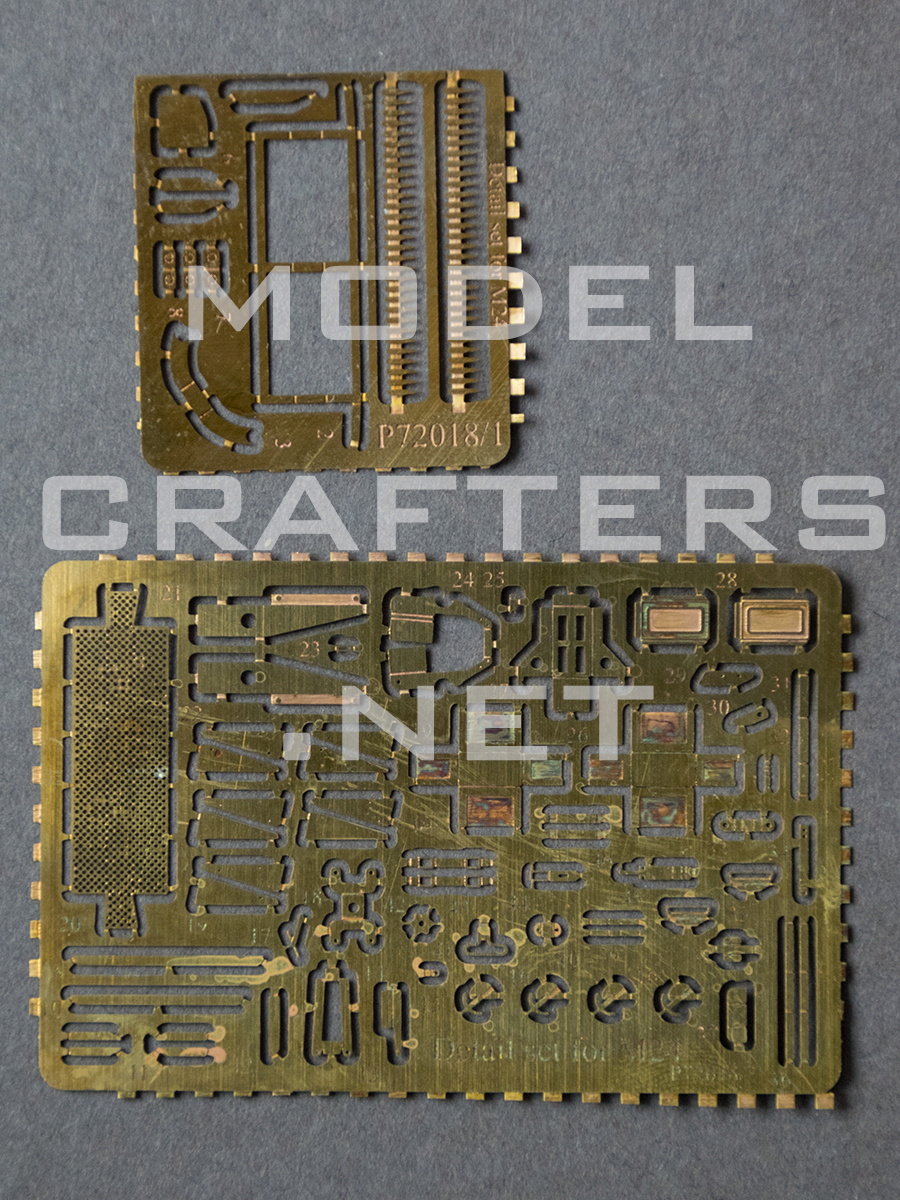
Another additional set includes hull, turret and machine gun detail. There are front steps for attached to the final drive housings at the front, fender supports, M2 tripod, handles, ammo bells, boxes and support, etc. on 2 thin brass frets. The set is coded P72017 and looks like so:
Hull and M2 Details set
I don’t have the complete understanding of all the parts yet, but these renders should help (orange denotes PE parts):
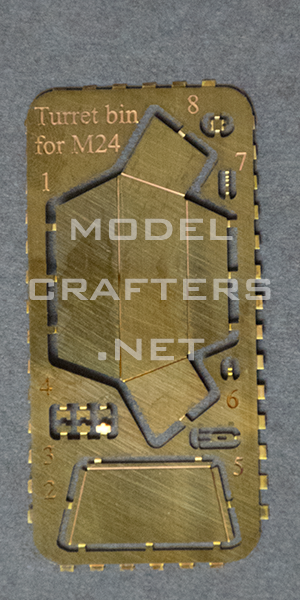
Another fret hosts the turret bin – it features no OKB SKU:
M24 Turret Bin
When assembled it should directly replace the plastic assembly at the rear of the turret like so:
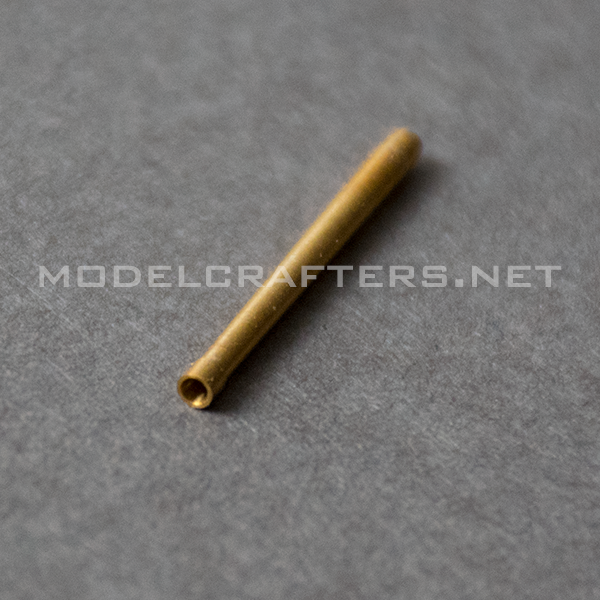
Last but not least is the machined brass gun barrel. Note the shape of the muzzle ring, and the overall taper towards it. At the rear end there’s reverse taper to help you install the gun into the mantlet, so looked from the top the part sort of resembles a baseball bat.
M24 Chaffee Turned Brass M6 Gun Barrel
It kind of suits the Chaffee, as the tank was no stranger to actual gun duels with enemy armor. Note the M6 was fitted to M3 Lee and M4 Sherman medium tanks, so the M24 packed a significant punch for its size.
In conclusion this set of metal upgrades will further enhance the appearance of your M24 kit, and the bin will add one more poseable element to your build.read more
Last time I reached the point where suspension arms were set in place but no wheels were added. First let me take you back a little and show you the bottom of the hull with some suspension detail.
As you can see we have a pretty busy suspension set and this is positively something you want to take your time on. Consult your references on the position of the arms, as I had mine too folded in which caused negative consequences with track runs as you will see shortly.
The main point is this is a very detailed kit, and the only ejection pin mark you’ve seen so far is on the inside of the commander’s hatch. There are no more, period.
Getting back to the build I moved on to the wheels. I started with the return rollers, gluing their inner halves to the conical posts on the sides. They were a little tight. I then glued the outer halves and squeezed the hull between the 2 bottles of Tamiya glues to align the wheels properly while cleaning the roadwheel halves.
I first added just 4 roadwheels – one at each end of the hull – to verify (yet again) that I got the hull alignment correct. The remaining wheels were then added and I moved onto the track.
Make sure the middle line of all your wheels is aligned on each side, or you will obtain bent track as I did. On my build the return rollers are further out than the est of the wheels, which made for less that stellar fit – that’s what you get when you don’t pay attention.
Referring directly to mr. Grigorov himself I marked part position on one of his renders to help me in the track assembly process. I glued the longest parts first, then the shorter groups, and finally the single tracks.
Once you clean up the sprue gates correctly track segments and links will fit as they should and you can obtain seamless track run. The plastic is just hard enough to allow you to file the edges without bending or breaking them, it doesn’t chip or leak around your file.
If you cleaned up the sprocket teeth properly you will allow them to enter the links at exactly the openings. I made it on the left site, but teeth seemed too thick on the right one so I had to unglue and modify on a few tracks. I still have 16 individual track links left over after both runs were completed.
There are a heap of parts I added using the renders as a reference. The lifting hooks (all 10 of them) were the easiest, the 4 periscopes are very hard to NOT lose (I lost 1 trying to add it to the ocmmander’s cupola). Note the separate tools that also have a 2-piece rack they are set on. The rear fender supports are done like inserts that are self-aligning – very useful! The .30 caliber machine guns have a small “droplet” at the tip which I removed and shortened the barrel of the mantlet MG. The .50 cal looks very good for a plastic piece, so do the antenna bases and the rear lights.
In my example (test shot, remember?) the left rear of the fenders is not completely molded, and there are some other areas where the edges are not exactly straight. However all parts are really easy to align, and they’ve sat on there without glue for a while. Even the driver/radioman hatch stops are represented as separate parts which have their slots on the side wall.
The only part I made change to was the right fender. It had attachment points just like the left one, so I cut those out.
My impressions:
very well detailed kit with smart part breakdown,
intuitive assembly, useful molded-in guides for part alignment,
great fit,
no ejection pin marks (well… one),
optional/posable parts (hatches, periscopes).
Overall great kit, pending for it to hit the market after few minor updates.read more
Last night I shared some details of the test shot. Tonight I am posting a few images of the build process.
As you have already noticed this is a complete kit, not a short run one, with a lot of parts and excellent detail. Despite being a test shot the set that I have fits very well. What you see here is bare plastic and glue with the minimal cleanup required so parts fit. No filler or primer was used.
I started with the turret. The locating pins and the shape of the guiding surfaces helped mate the upper and lower part nearly perfectly. I used a bit too much glue, so needed to clean up a bit.
The turret bin lies flat against the rear turret wall. The lid is a separate part you can pose open if you so wish. I closed the gunner’s hatch as it’s too large an opening on such a small turret (and I have no figures I can fit in there anyway). The hinges need a bit of thinning to persuade the hatch to fit, some Tamiya Extra Thing would also be helpful.
Next I took on the hull. I started by fitting the sidewalls to the bull bottom, and proceeded with the rear wall. I then added the lower glacis. These were all assembled using regular Tamiya cement as it dries a bit longer, which helped align the parts properly, especially once the hull top was added.
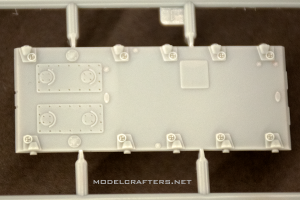
Look closely at the image from the top. Note the hull top part B30 is cut the exact same way as the actual tank, and fits the following way:
the upper lip of the bottom front armor plate plate sits HIGHER than the upper glacis plate (where the transmission hatch is) – sort of “bulldog bite”.
the upper glacis lies OVER the sidewalls.
starting with the driver/radio operator’s hatch plates, and back to the rear wall – the edges of the side armor plates are HIGHER than the hull roof plate.
the engine deck is FLUSH with the rear wall’s edge.
Moving to the suspension the algorithm is to start at either end and glue the suspension arms WITH shock absorbers. This will align the 4 stations correctly, so then you can add the arm at station 3 to align to the rest of them.
There are 2 tiny hooks (part C18) that fit next to station 4 – I am sure many of you will be looking for it in the kit 🙂
Complete operation by adding the track tension mechanism/idler wheel axle. You have a spare for each of them, still be careful to not remove anything but the sprue gates, and to not bend the connecting rods.
Just like on the real thing – there are cutouts in the sprocket stub that are not symmetric:
To conclude the first part of the build – a few images of the work completed so far.
Plenty more details to add – see you guys soon!read more
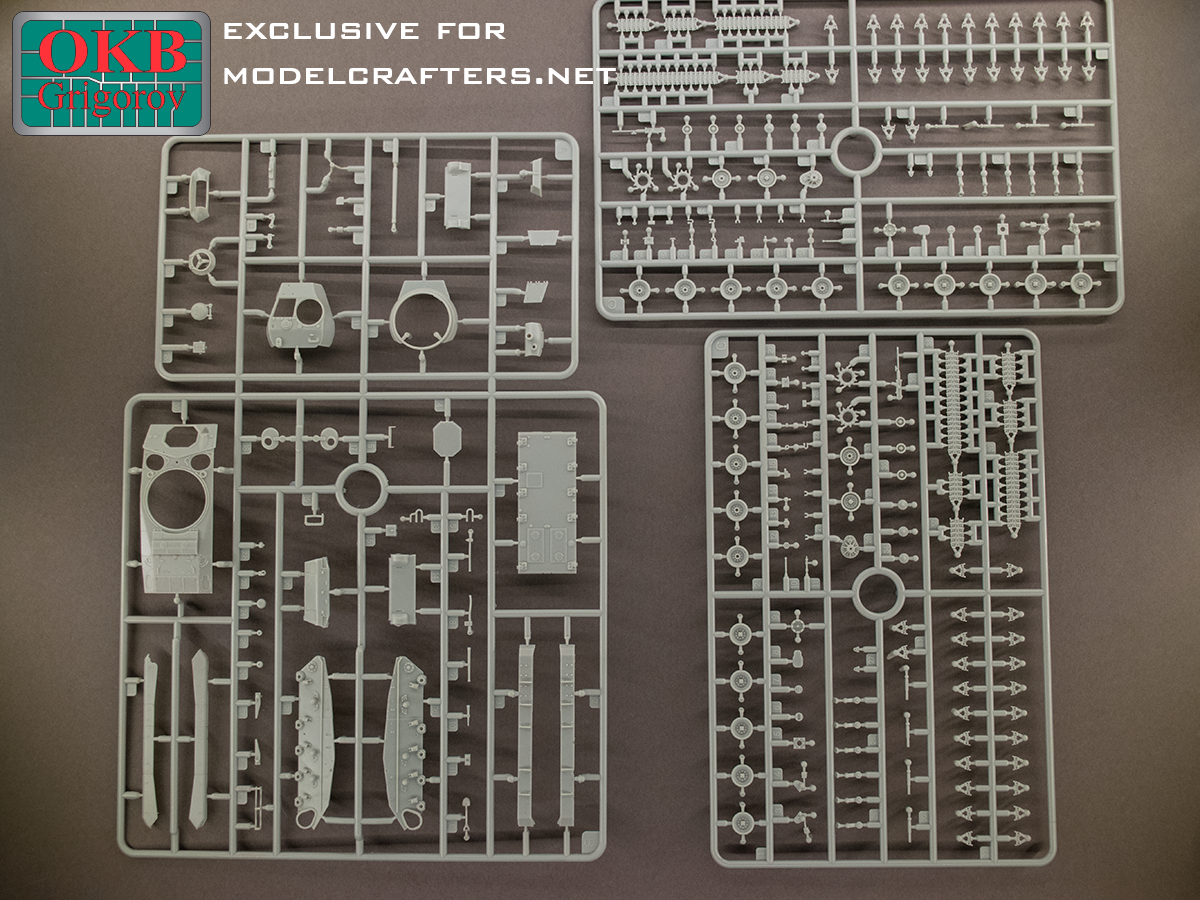
This post is a special treat, as it’s the first time I am getting a kit that is not available in the market yet. In fact I am lucky to have been the first to get a copy of OKB Grigorov’s Chaffee outside the factory and OKB themselves.
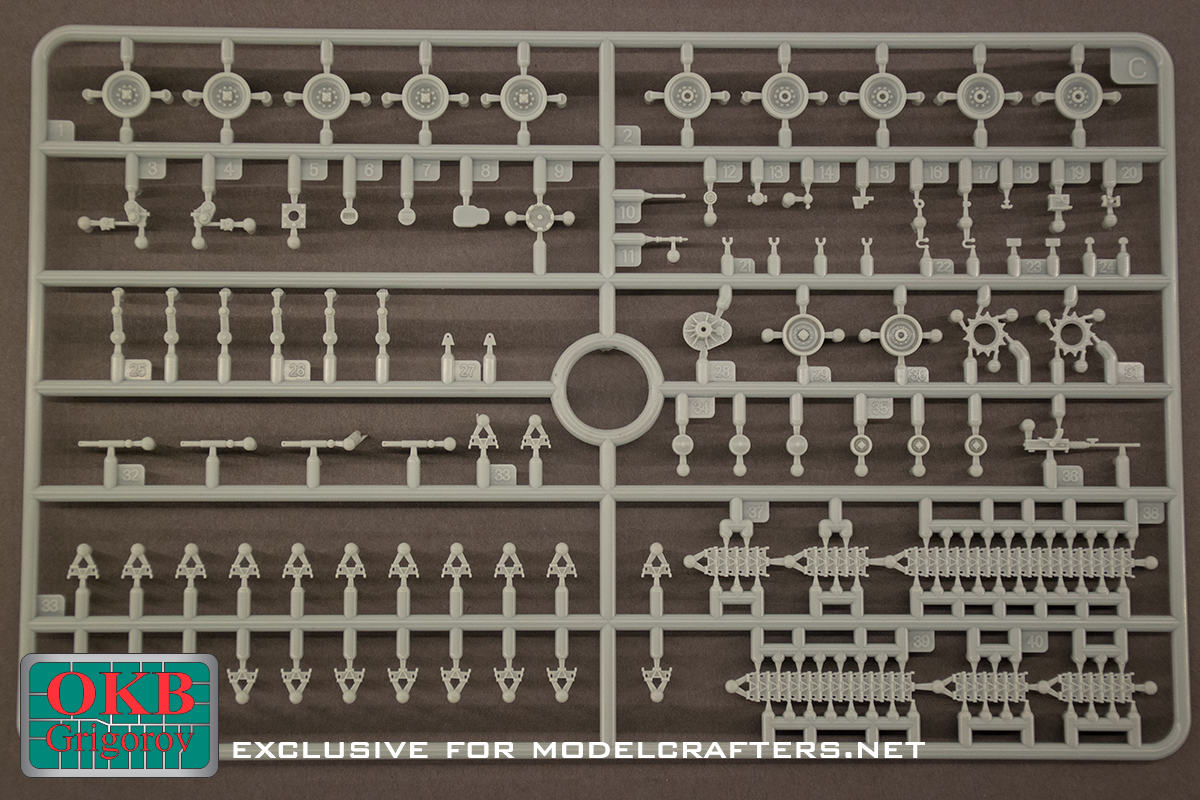
Part overview
Onto the shots. 4 grey sprues, well over 200 parts, some great detail, all hatches open, separate OVM tools and a lot more!!!
Let’s start with the hull parts.
Note detail on the conical return roller bases, the suspension arm sockets and bump stops, the shock absorber attachment points. The suspension arms are separate parts as are the final drive housing covers.
Hull top: separate crew and transmission hatches, fine rainguards around the hatches and barbette, sockets and slots for various attachments, and the hinges and cooling louvres on the engine deck.
You might have noticed some fine red streaks here and there, this is usual for the test shots.
The crew hatches and some of the OVM tools:
Next: two types of lower glacis plate, and the hull rear. The late type glacis features additional plates for attaching a dozer blade over the final drive housings.
Hull bottom. Note alignment semi-circular alignment pins that fit with hull sidewalls, and staggered suspension arm slots.
Hull bottom
Next – sprue C (there are 2 of them in the set) with suspension, wheels and tracks.
Suspension, wheels and tracks
Starting with the wheels the kit items represent the curves of the original + excellent bolt detail.
The idler – which looks like a smaller roadwheel – is also done to a high standard:
Sprockets are made up of 3 parts: 2 crowns with bolt details and a center piece to simulate the openings on the real vehicle. Note the teeth shape on the crowns – similar to those on M4 tanks.
Individual suspension arms: note they are curved and feature attachment pins for the individual shock absorbers, as well as semi-circular pins for gluing into the sockets on the hull sides.
The shocks themselves:
Track tensioners are detailed on both sides:
T72 metal track segment and an individual links:
The turret – note a lot of locating openings for additional parts, including M2 tripod:
Turret front piece, mantlet, pistol port insert:
The commander’s cupola and its hatch are separate, as is the “turret door”, as the gunner’s hatch is officially referred to. Note detail on the inside of the commander’s hatch, including teethed ring as its upper part rotates using a hand crank to provide wider field of vision for the commander thru his main periscope.
The commander’s hatch is the only part in the kit that has a visible ejector pin mark – that is if left open. All other parts were molded in such a way that these marks are either on the sprue gates/feeders near the part, or will always be on the inside of the build model.
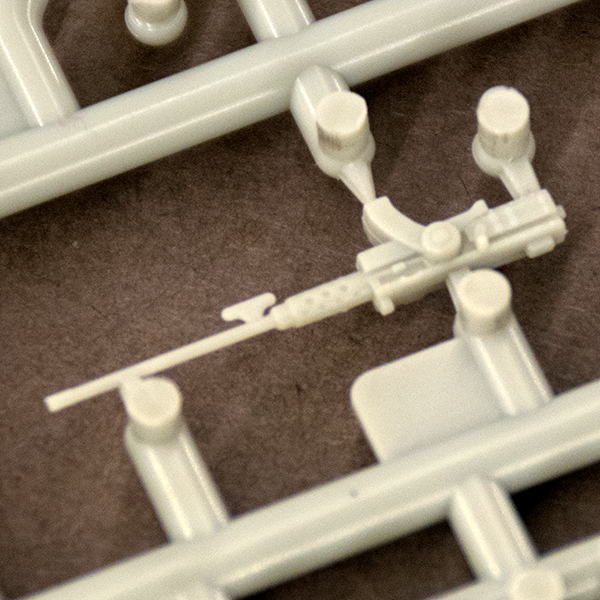
M2 machinegun. There are 2 pieces in the kit, 1 on each of the suspension sprues:
M2 machinegun
There are probably a hundred more small parts that I have yet to show you in detail, including antenna bases, lights and their guards, 30 cal machinegun barrels and what have you. The side skirts were not completely molded on this example – probably a matter of cleaning up the molds after the test.
Next step will be to build this kit out of the box.