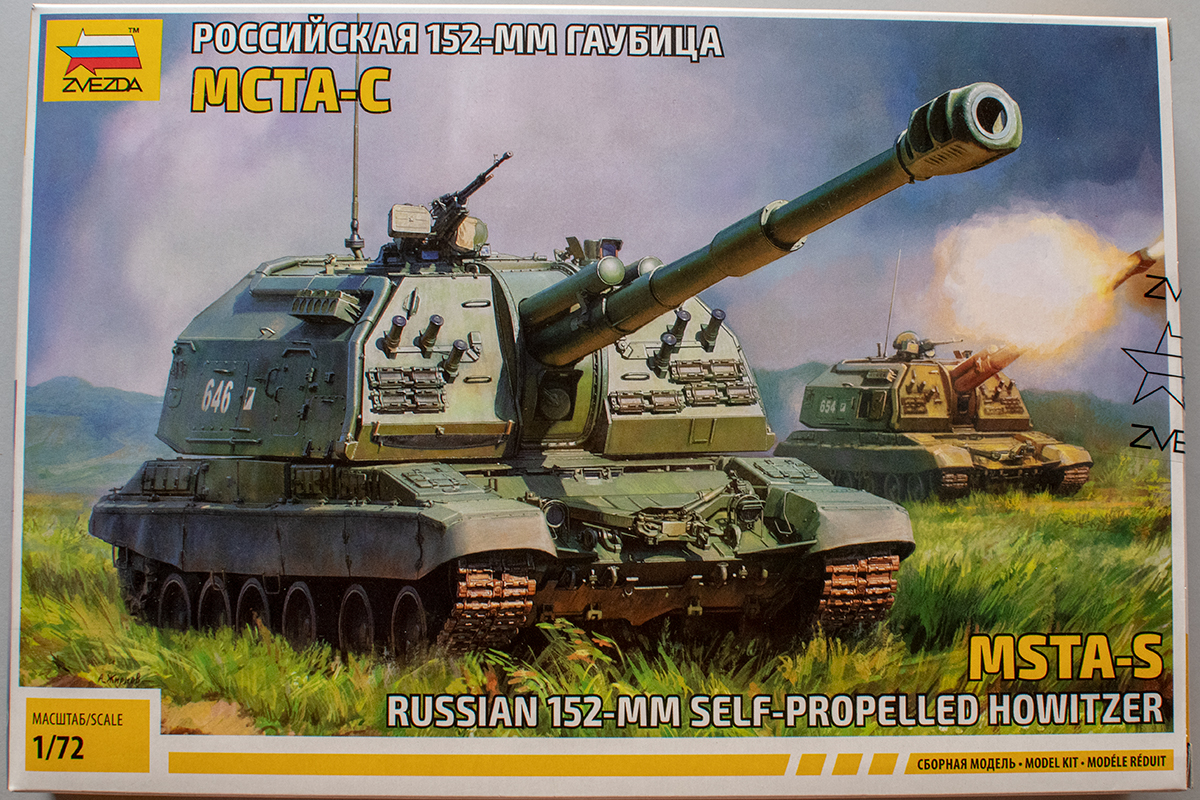
The king of battle (artillery) is not well represented in this blog, and I plan to rectify this starting with the (relatively) recent Msta-S kit from Zvezda in 1/72. The 2S19 self-propelled howitzer was developed during the 1980s to replace the aging 2S3 “Akatsiya” SPG of the same caliber (and much shorter range + lower rate of fire). It uses a modified T-72 hull as well as torsion bars, wheels and track from T-80 to carry a large turret with a 7 meter-long barrel. The resulting product finally brought the level of Soviet SPG up, nearer to the then-current M109 variants in NATO armies. An interesting feature at the back of the turret is an elevator for transporting shells and propellant charges from the ground up into the turret. This means the howitzer can be continuously fed from the ground instead of relying on the limited ammo supply stored onboard alone. Zvezda has already produced an 1/35 kit which proved popular among modellers. Despite knowing the 1/72 kit is expected a year in advance and the official announcement came on June 1, 2019 – picking the actual article up was exciting.
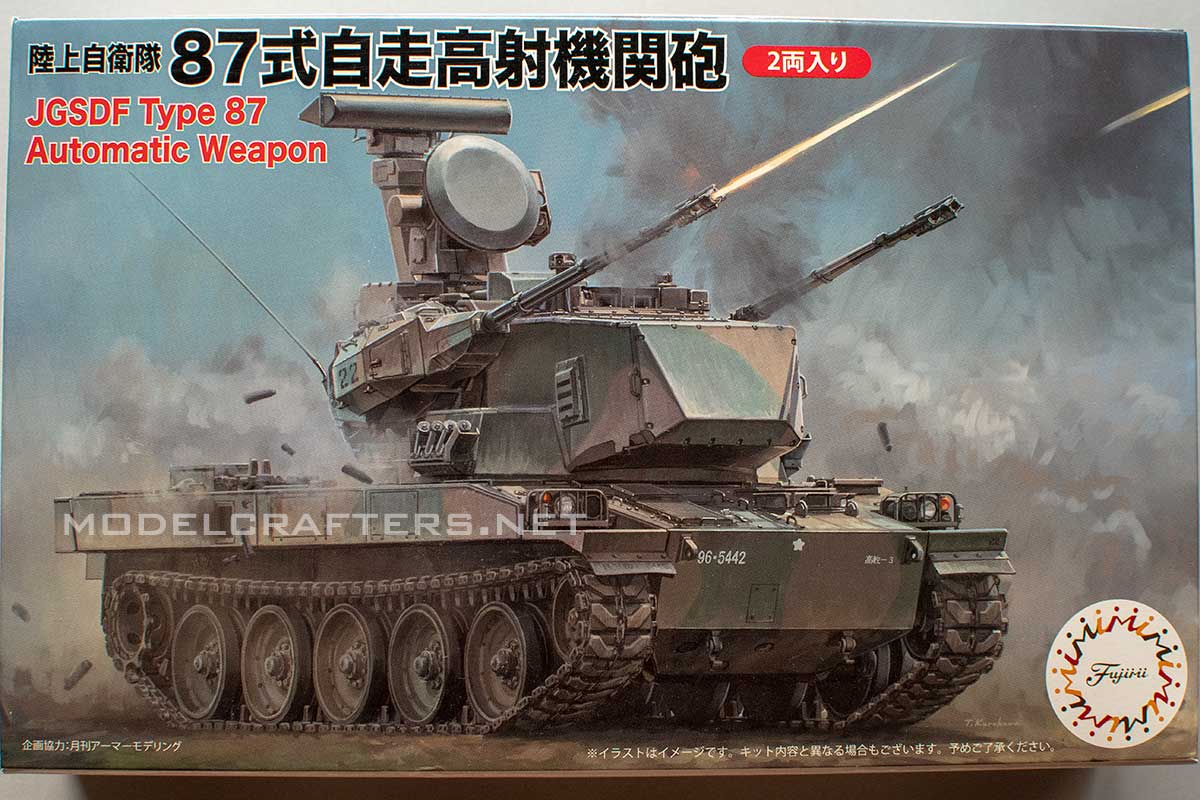
The Type 87 is a mobile air defense system, armed with two 35mm automatic Oerlikon cannons. While very similar to the German Gepard SPAAG it uses the Type 74 tank’s chassis as a base, locally-produced acquisition and fire-control radars as well as other systems in a different turret.
As my father served in an air defense unit – such systems have always fascinated me, and when the opportunity came up I ordered this kit directly from Japan.
Fujimi tooled the Type 87 SPAAG in 2018, and offers 2 kits in 1 box with a number of decal options included in the decal sheet – you can build 23 individual machines from 7 different units. (Yes, I realize it’s the same camo scheme!) Decals appear well-printed, in register, with saturated color, and even the gradient on the eagle head decal is “smooth” (there is no raster/pixelization). The decal film is cropped close to the borders of each design, so I don’t think you’d need to trim it. Despite the overall flat surfaces I sure hope the Fujimi decals will work properly – I’ve never dealt with them to date.
Well – happy post #100 to me 🙂
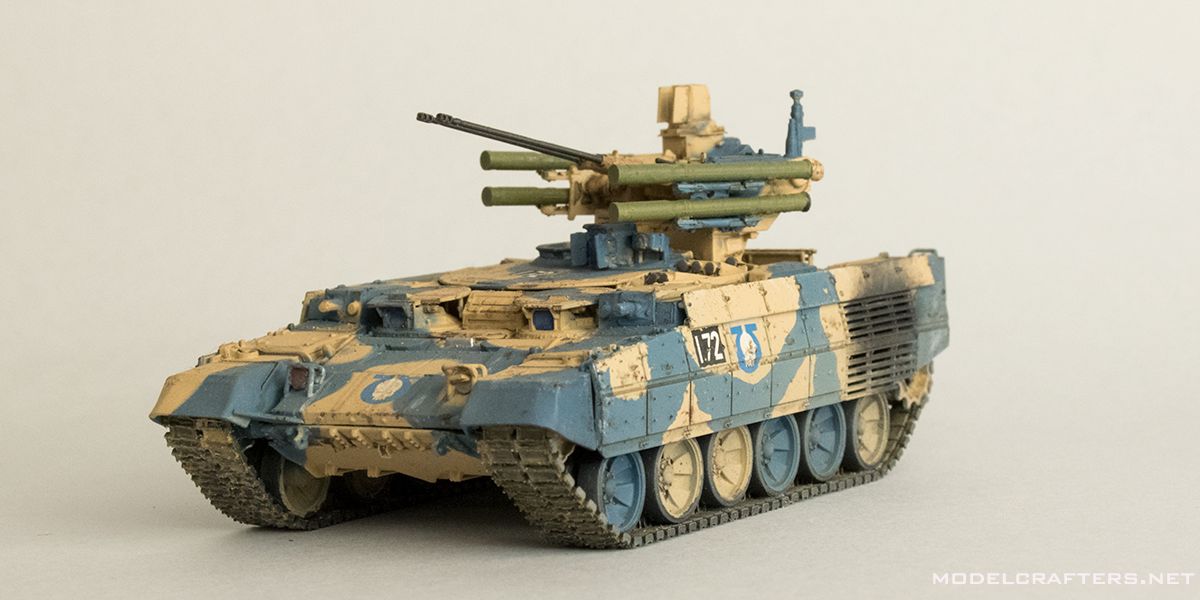
Zvezda BMPT “Terminator”, kit 5046
The BMPT (marketing callsign “Terminator”) is a Russian fighting vehicle, based off a T-72/T-90 chassis with a 5-man crew. It is intended as an urban warfare vehicle supporting main battle tanks and infantry. Armament consists of
4 Ataka ATGMs on the turret sides (up to 6km range),
two 30 mm 2A42 cannons (known from the BMP-2) in the center,
and a PKTM machine gun (7,62x54mm) at the top.
Two AGS-17 grenade launchers in the front sponsons further add to the firepower.
The machine is clad into reactive and bar armor from all sides, and the kit represents that very well. Not everyone “gets” the vehicle (even the Russian MoD hasn’t ordered any), so the only customer to date is Kazakhstan. Since I am tired of seeing the same 2 examples in reports from arms expos and the thing looks a bit too post-apocaliptic – I devised a scheme of my own. Markings come from Dragon Humvee set and a Space Marine set.
The rest is from the box – no filler was required to build this kit. Fit is so precise the guns are still moving up and down after a coat of primer, all the camo and sealing work. Just awesome.
I wish the panoramic sights were molded separately to further increase the visual appeal of this already very attractive machine.
2 years later than the actual completion date I am finally uploading a gallery of my rendition. It was an absolute joy to build bar the tracks which can be easily broken when trying to bend them around the wheels.
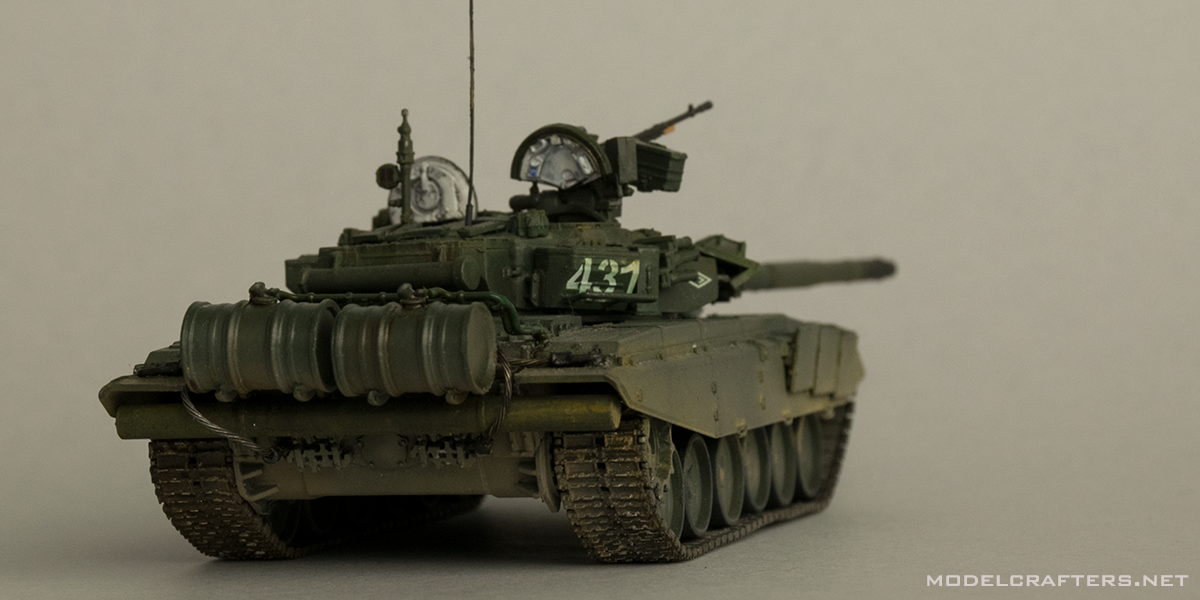
Zvezda 1/72 T-90, kit 5020
The kit is built mostly OOB except
OKB Grigorov’s T-90 tracks,
copper cable for the lower rims of the fuel drums on the back,
decals from New Penguin’s Airborne Combat Vehicles Markings set 72002,
and 0,3mm brass rod antenna, which I bent numerous times during the first week. I got so angry I placed the model in a box so I don’t do it again.
Finishing media are my typical set of:
Revell enamels,
MM Gun Metal for the track base color,
GSI Creos Chrome Silver laquer for a few chips,
a mix of acrylic clear gloss with red and black for the IR light and sight lenses,
clear blue for vision blocks,
oils to highlight hundreds of plains of the various blocks on the machine,
The Soviet union started the war with the F-22 and USV divisional guns as the mainstays of its artillery. In 1942 they were replaced by the lighter, faster-firing and more modern ZIS-3 design that was more suited to war time production and maintenance capabilities of the vast country. Over 45,000 guns were built during war years; many were towed, some served on anti-tank SPGs like the SU-76 and SU-76M.
Italeri and UM have already produced kits of the subject, the first one even included crew in winter uniform. My personal opinion is that either kit suffer from oversimplification, so the kit from Zvezda is a welcome addition to the market despite positioned as the wargaming piece that the Italeri rendition is.
The kit is molded in dark on two sprues, and includes a 3-man crew plus base.
However the model appears to be well-enough detailed for a no-glue assembly one, there is no mold shifting or flash. The detail on the gun shield is cleanly molded, as are the teeth of the elevation mechanism. The macro shots don’t actually do the molding justice.
No doubt the thickness of the shield is far from being to scale (~0.7mm). There are 2 storage boxes and a separate gun sight, elevation and traverse handwheels.
To be fair, I must admit that the greyish spots scare me a bit – that is despite being unable to feel them when touching the kit surfaces. Looks like the plastic got overcooked either on this shot or a previous one and the molds were dirty. Oddly enough they are mostly evident on the shield, gun barrel and sprues themselves – I did not observe spots on the crew.
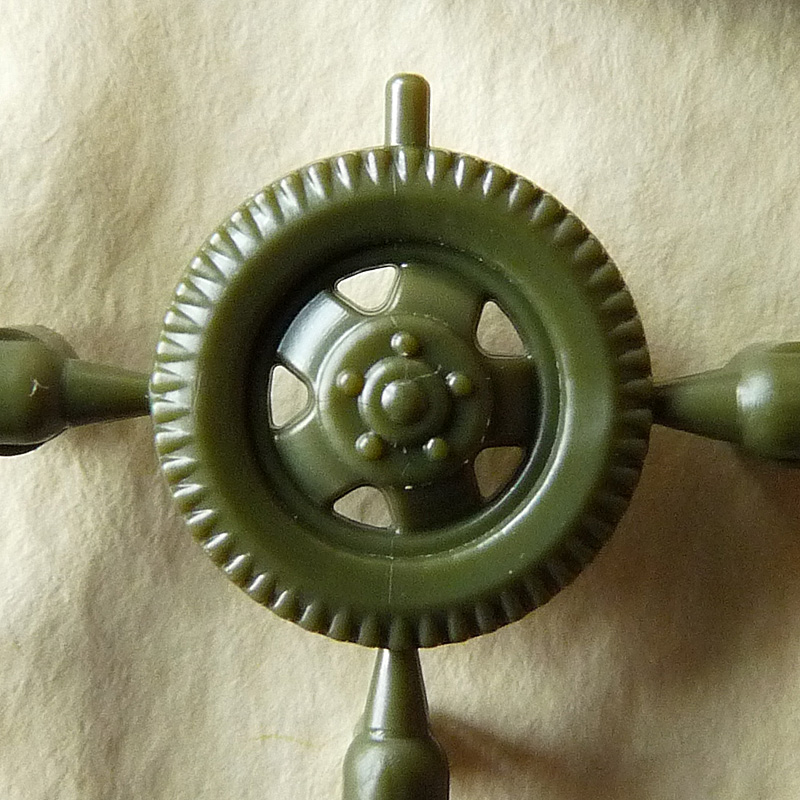
The wheels are the same for the GAZ-AA truck, and good enough for an $3 wargame kit – note hexagonal bolt head detail.
Italeri, Heller, and more recently Roden and Dragon have released PAK-40 in 1/72. There have also been wargaming models in the scale.
Italeri’s crew are softer plastic than I like, Dragon’s “bundle” with the PAK-36 and 5 crewfigures is excellent, but hard to find and expensive. Preiser’s 5-member gun crew is similarly elusive, but tops all of them.
The cons above – along with aggressive pricing of about $3 – puts Zvezda’s new set at a very competitive position, despite the crew consisting of just 3 figures. The two sprues are molded in grey and reasonably well-detailed.
It’s still marketed as a part of Zvezda’s “Art of tactics” game system, but this time around there is no wargame card – you can download and print the card off the company’s website.
Let’s have a look at the gun and figures.
Our gun crew’s faces certainly bear the marks of war fatigue with seriously pronounced cheek bones and hard stare. They appear to be dressed and equipped in pre-1943 gear. Figures are suitably busy, and despite details on pockets and webbing being a tiny bit softer than I’d like them to be – they are still impressively well done for their market niche. The part breakdown has allowed for the poses to be nicely animated as opposed to one-piece figures we’re used to in the scale. You can see the field shovel and the Kar98 are also pretty nicely molded for parts that are under 1 cm.
The gun is not bad either.
The shield is relatively thin, with bolt and other details represented on either side. There is no attempt at simulating it being two-layer affair as on the real one, but it sill looks rather good. Some of you might want to replace the molded-on storage boxes with pieces of thin sprue to represent them as the cylinders that they were on the actual gun. The locating holes on the inside might be a bit big – we’ll see if the cradle and barrel assembly hides them when assembled. Note a part of the elevation mechanism is also represented.
The lower gun shield is deployed, which suggests the gun is only intended to be displayed in the firing position. Again there are hinge and bolt detail on either side, and a full-sized shovel is molded on its outer face. One of the main letdowns of the kit is the gun barrel, which becomes too thin before the muzzle brake. As another modeller put it this must be the 75/37mm squeeze-bore model…
Admittedly it will be very easy to replace the barrel with either a turned RB metal barrel, or one of the two spare barrels from your Dragon PAK-40 kit. This will also save you the required drilling out of the muzzle brake.
Same applies for the wheels – they look a bit cartoonish to me. The spokes appear fine, but the hub detail is non-existant, and the rubber bandage doesn’t seem to match the wheel type.
Anyway it still appears to be a great kit, and a recommended one.read more
Admittedly I couldn’t wait to start building the kit, so here’s a bit of progress.
Detailed add-on armor for the upper glacis with wave deflector and towing hooks added.
On the second image notice the edge that aligns the add-on armor with the upper glacis (parts reversed to showedges).
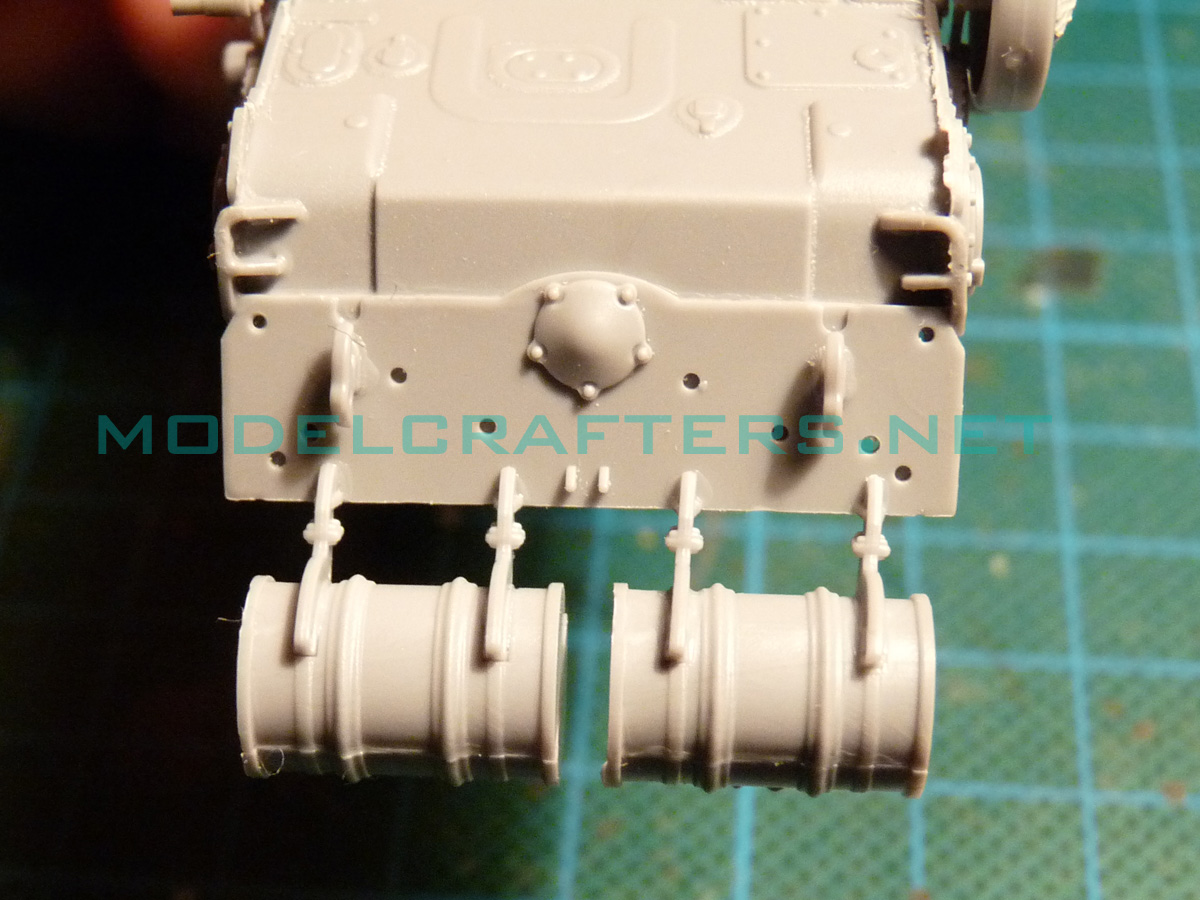
Exhaust (3 part assembly) glued in place. Another 2-part assembly (fuel tank for laying smoke screen) covers the exhaust on top.
The bulldozer blade added to the lower glacis. The sprue gates are mounted between the actuating arms, so I broke one of them trying to clean the part up…
Building Zvezda 1/72 T-90, part 1
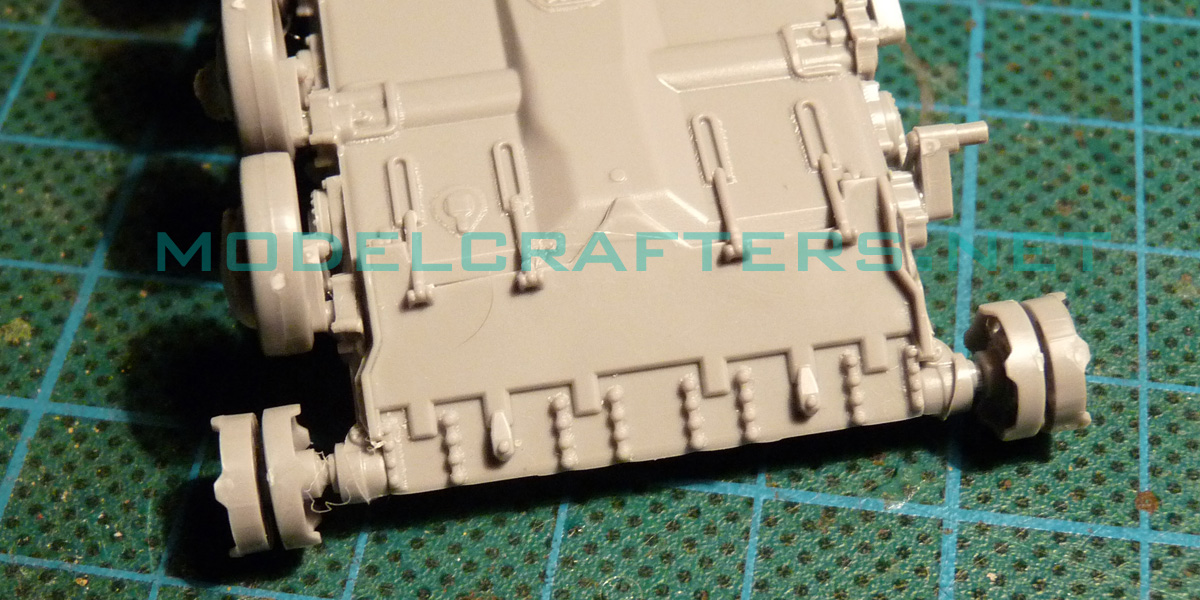
Rear armor plate with fuel drums and supports. I glued the supports, but they only had 1 (one) positive locating pin each, so to align them I added the fuel drums themselves.
Building Zvezda 1/72 T-90, part 1
Suspension arms are very easy to install and align on edges molded in the hull pan. You must observe the instruction and mount a different type of suspension unit on station 3: it has a semi-circular pin for a special roadwheel.
Note: be careful while separating the special suspension arms details for stations 1, 2 and 6 from the sprue. They are particularly fragile, a bit too much tension will easily brake them off.
Drive sprockets: 3-part affair, don’t forget the slotted disk in the middle that fits as a collar around the mounting hole.
Use a long pin or an edge to align the teeth properly.
The temporary mockup with upper and lower hull + turret. The wheels are stuck on using UHU tack to see the silhouette and check for adjustments.
Note the position lights are mounted on the upper glacis – I did that BEFORE gluing the add-on armor.
Both front light guards (parts C37 and 79) are about 2 mm short on the right-hand side on my example. You will need to extend them using stretched sprue (note this is NOT done on these pics yet).
Turret fits just fine, be careful with the position of parts C18 and C19. If reversed the entire assembly will not fit.
Consult reference about the angles of the smoke canister launchers. The tanks on this years Victory parade appear to match the kit’s layout. Same applies for the ERA layout (not added yet).
If you want to rotate the commander’s hatch you will have to shave off the bolt detail on the turret itself.
It is possible to reverse-mount turret side walls and rear armor, please observe the instructions carefully.
The main gun does feature a mold parting line, sand it away with 800-grit. The line is offset from the thermal sleeve seam, so if you are careful you will not lose detail. The gun tube only gits one way in the receptacle.
Mount the coaxial machine gun at least after gluing the 125mm, otherwise you might end up handling the turret in such a way that you will bend or brake its barrel.
Onto the Shtora cubes. Each of them is 8-part assembly: 6 parts for the sides of the cubes, and 2 mounting supports. Be careful when cleaning parts up for each cube. The simulated support frame transforms into a sprue gate on both sides of each part, so you might end up with gaps like the ones below:
Naturally I broke one of the pantograph linkages and replaces it with stretched sprue. You also noticed my joints are less than stellar – using small amounts of slow-setting glue will be helpful here.
More turret detail storage bins 1, 2 (antenna guard) and 3 (with the snorkel tube):
The tube has small locating pins at the top of the 2 bars it hangs on. If you observe the instruction, they will fit in tiny holes at the end of the pins extending from the bin lid.
A spare KORD ammo box; note on actual machines the feed opening faces DOWN for obvious reasons. The instruction will have you mount it with the feed up instead.
The other image shows the gunner’s secondary sight, still not mounted in place.
KORD .50 cal machine gun with ammo box and spent casings chute. Looks like a few handles are missing – notably the one for quick barrel change and the firing one.
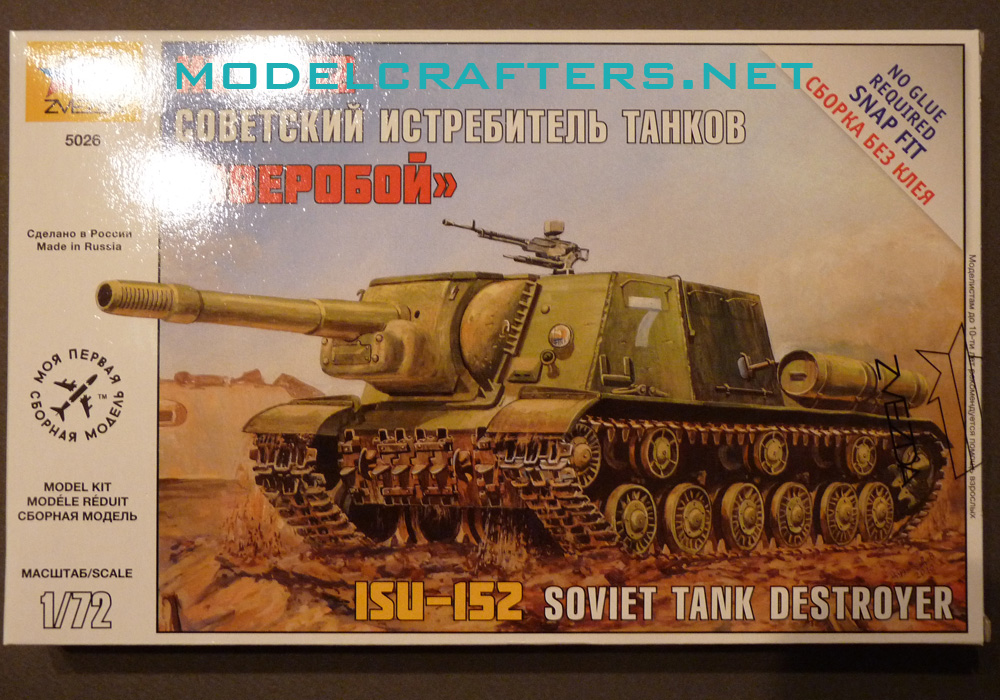
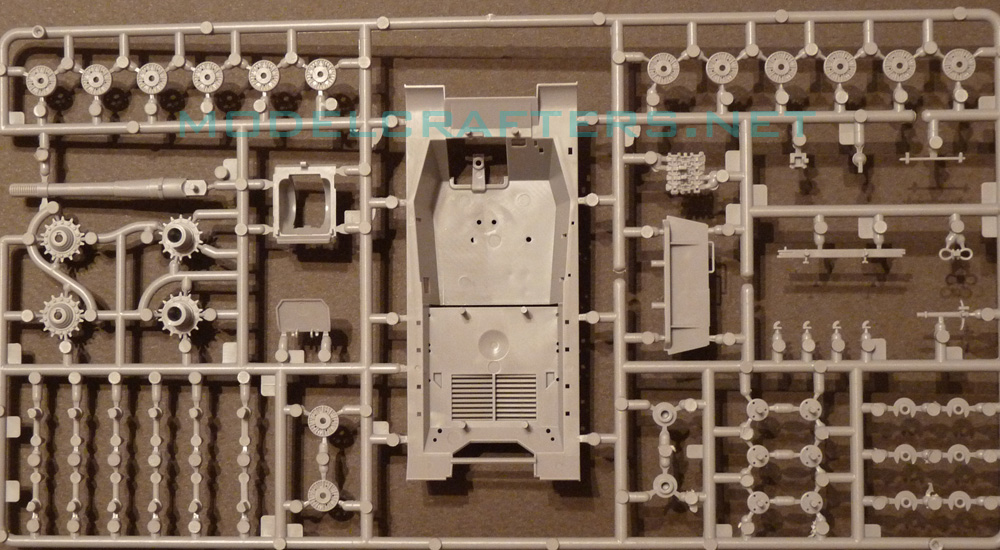
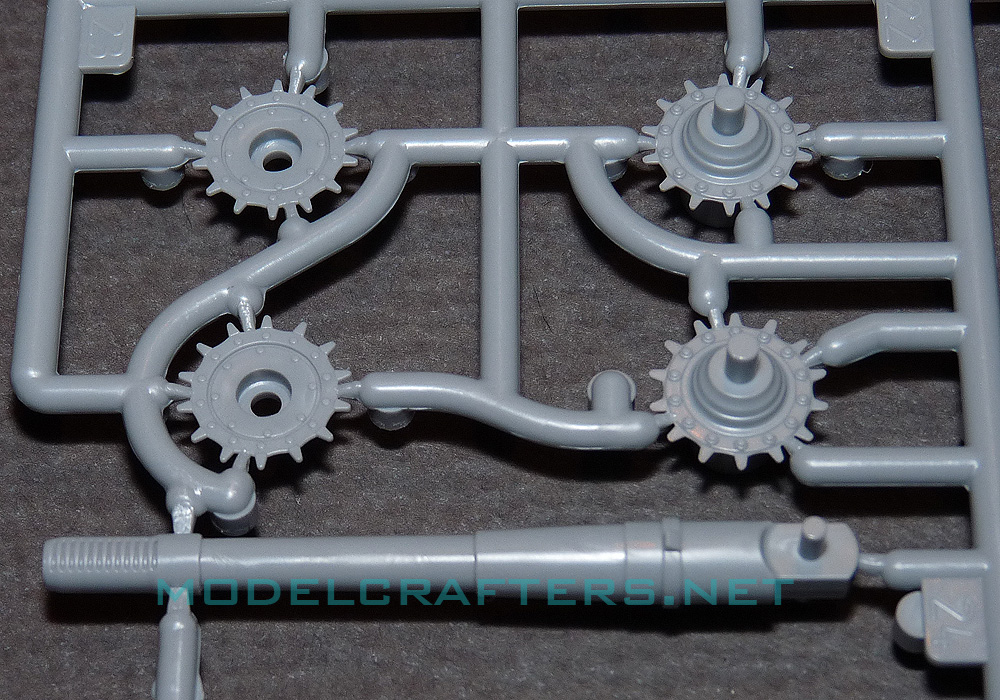
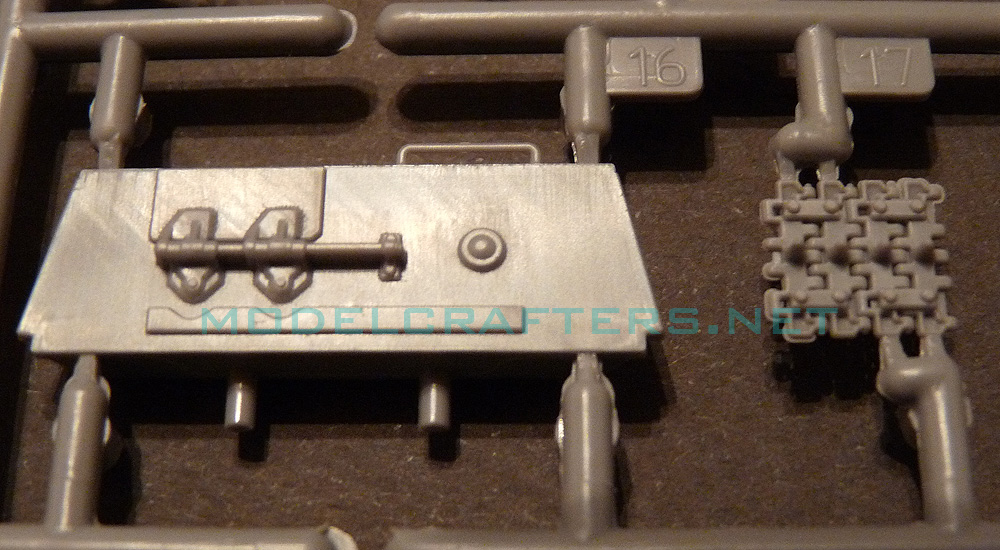
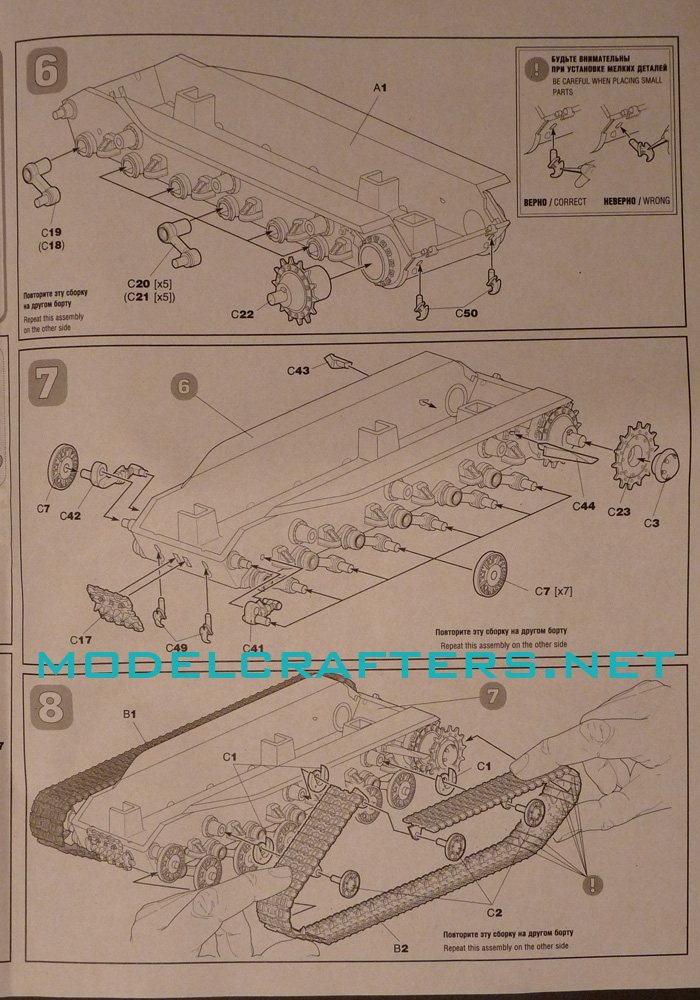
Announced back in 2013 (or was it 2012?) the expected development of IS-2 is finally here. Please welcome ISU-152 by Zvezda!
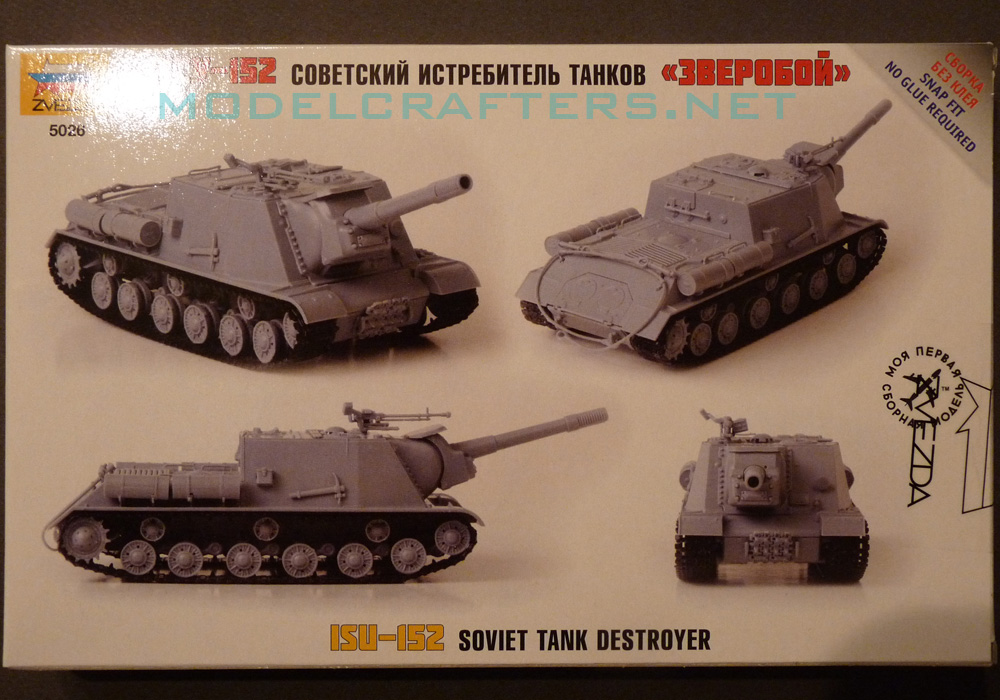
Zvezda’s 1/72 ISU-152, kit 5026
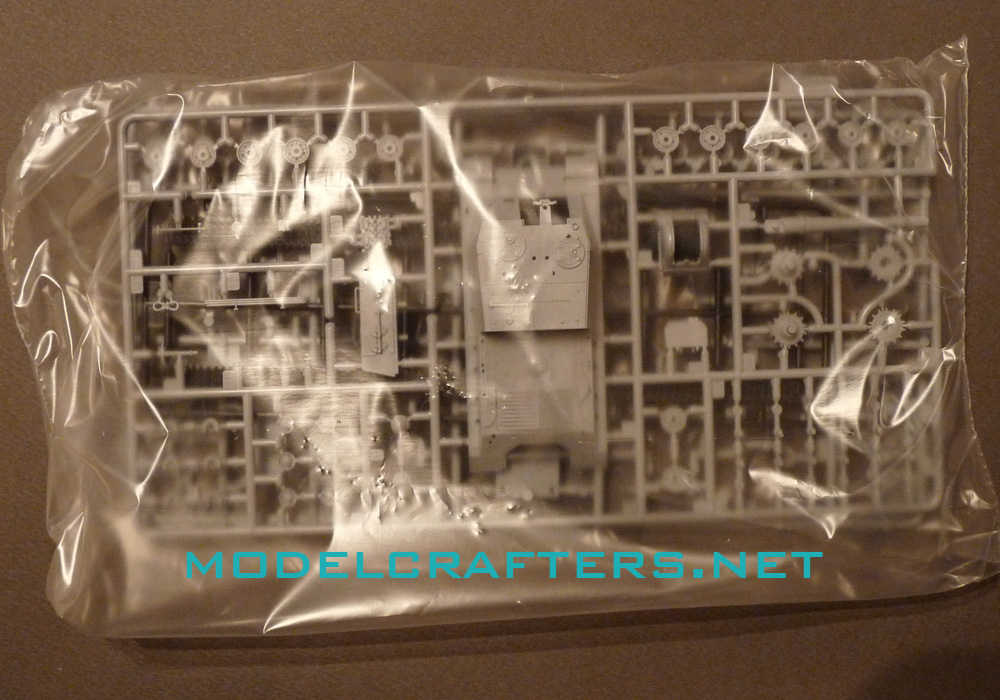
Previous Zvezda kits in the scale had sprues on their own inside the box. That made each sound like a baby’s rattle. Parts here are sealed in a soft plastic bag, which prevents parts loss, and makes plastic less prone to breaks.
Zvezda’s 1/72 ISU-152, kit 5026
The ISU-152 is big, grey and bad@$$, and at first sight appears to have a very small amount of parts in common with the IS-2 kit from the past year (which is a very good one if I may say). That’s sort of misleading because there is still a lot from the IS-2 – the sprues are simply re-done and parts are re-arranged for the new machine.
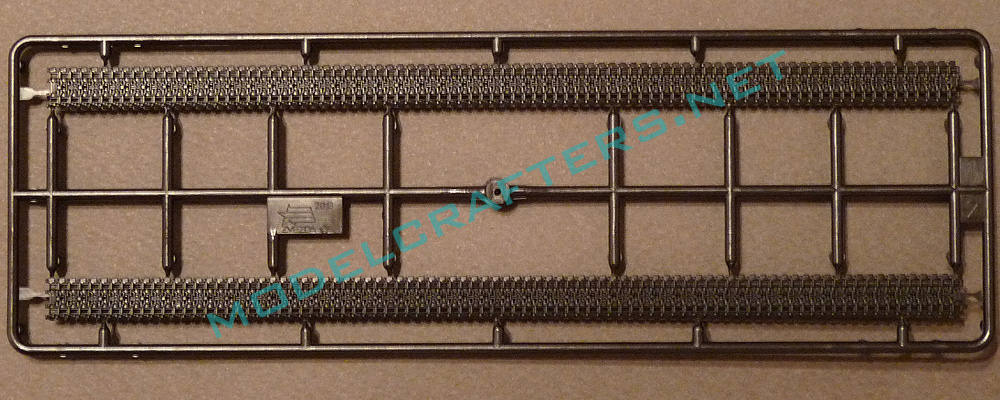
Let’s start with the common parts. First up: the tracks.
Zvezda’s 1/72 ISU-152, kit 5026
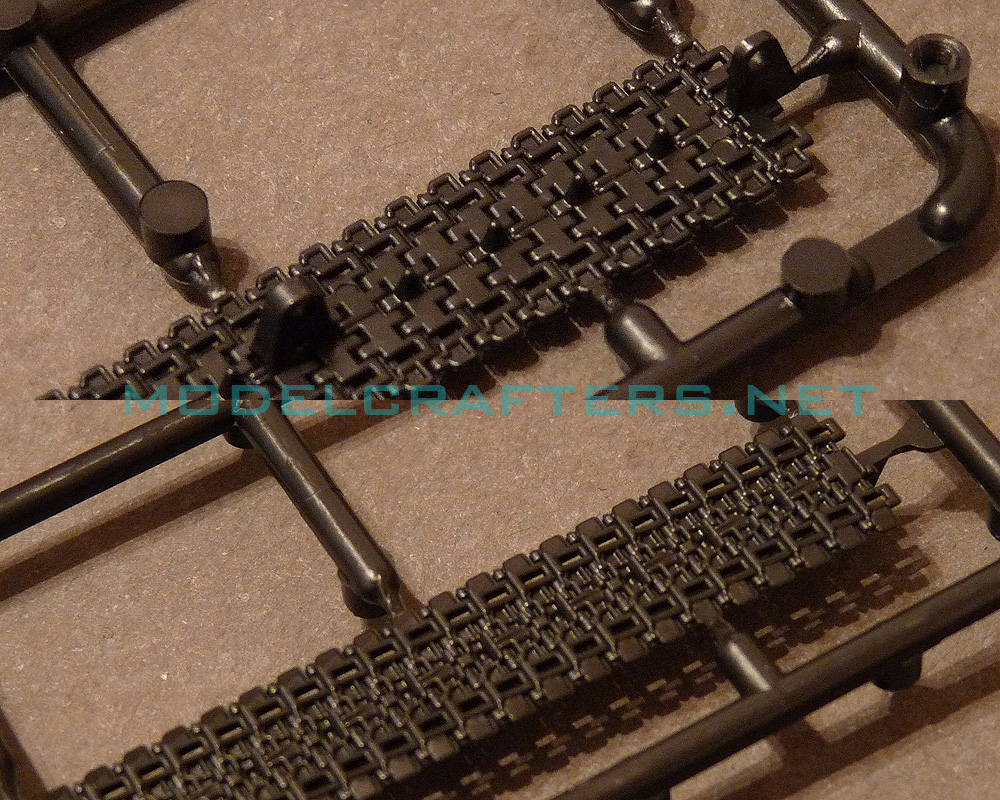
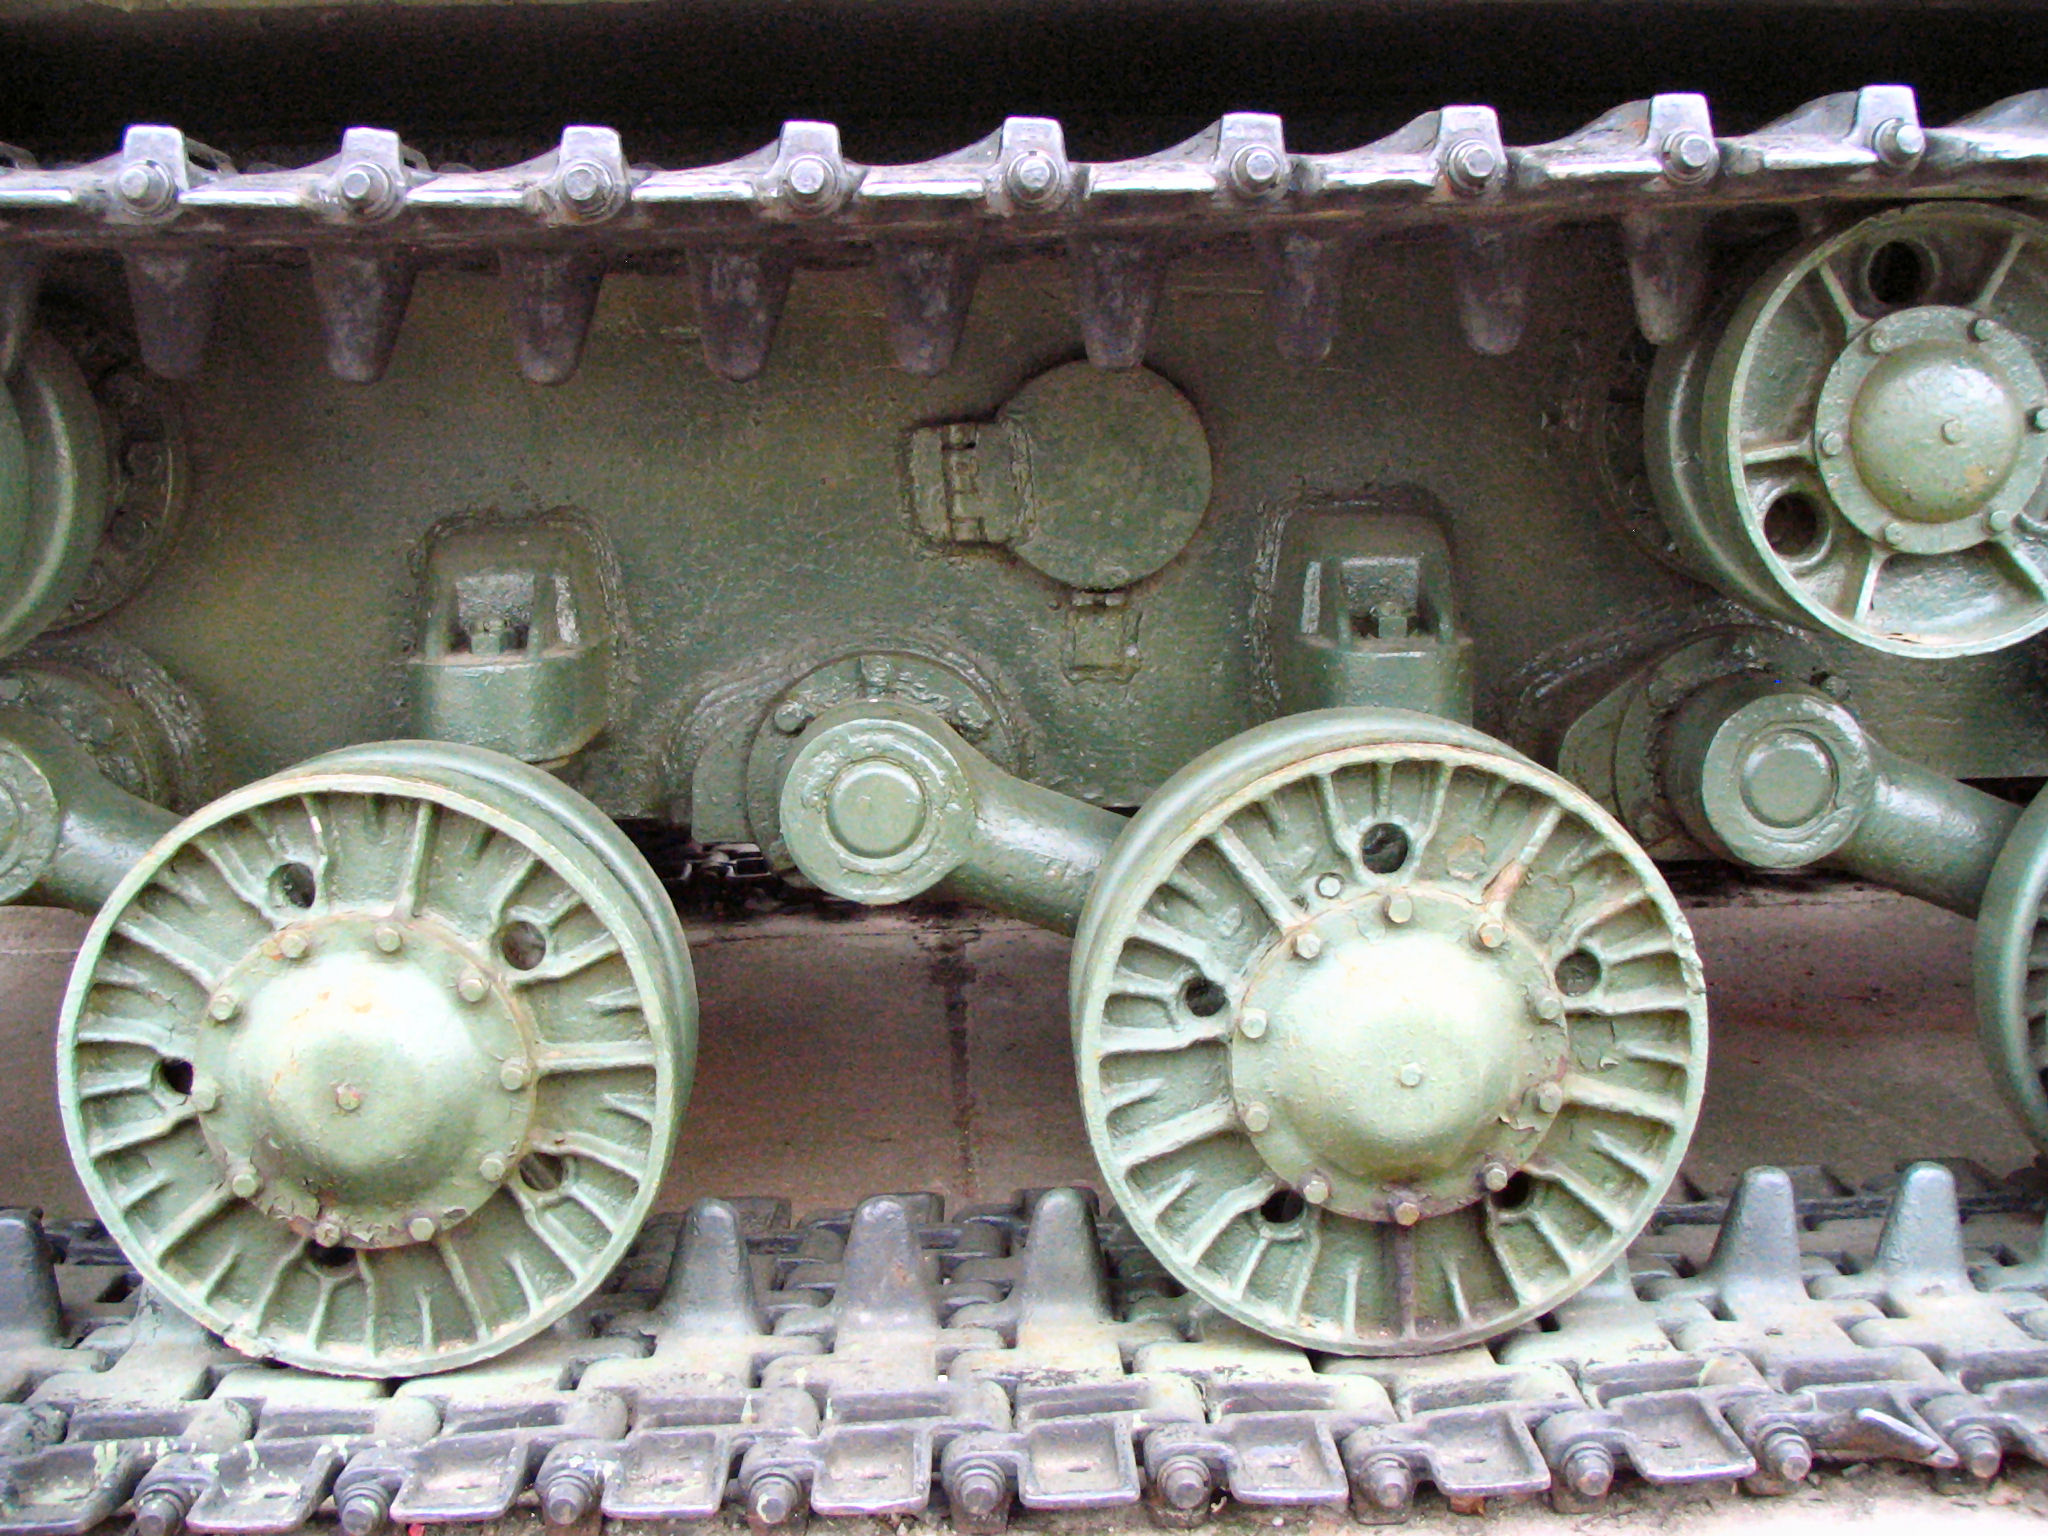
We already know how they look like, and that they are the proper late-war variant that was common to SPGs of 1944 production. We also know that the guide teeth are too sharp and pointed, and perhaps a bit lower than they have to be.
Zvezda’s 1/72 ISU-152, kit 5026
For comparison see this image of (quite possibly) a post-war example with guide teeth on all tracks and 10-bolt covers.
Then there’s the familiar hull tub – or is it? It took me 2 days to notice that the seemingly identical hull now features the ammo loading hatch over wheel station 3 on the left side (seen on the image below) – kudos to Zvezda!
Zvezda’s 1/72 ISU-152, kit 5026
I’ve only ever seen fixes done in 48th and 32nd scale aviation models. I am beginning to like these Zvezda guys even more now 😉
Zvezda’s 1/72 ISU-152, kit 5026
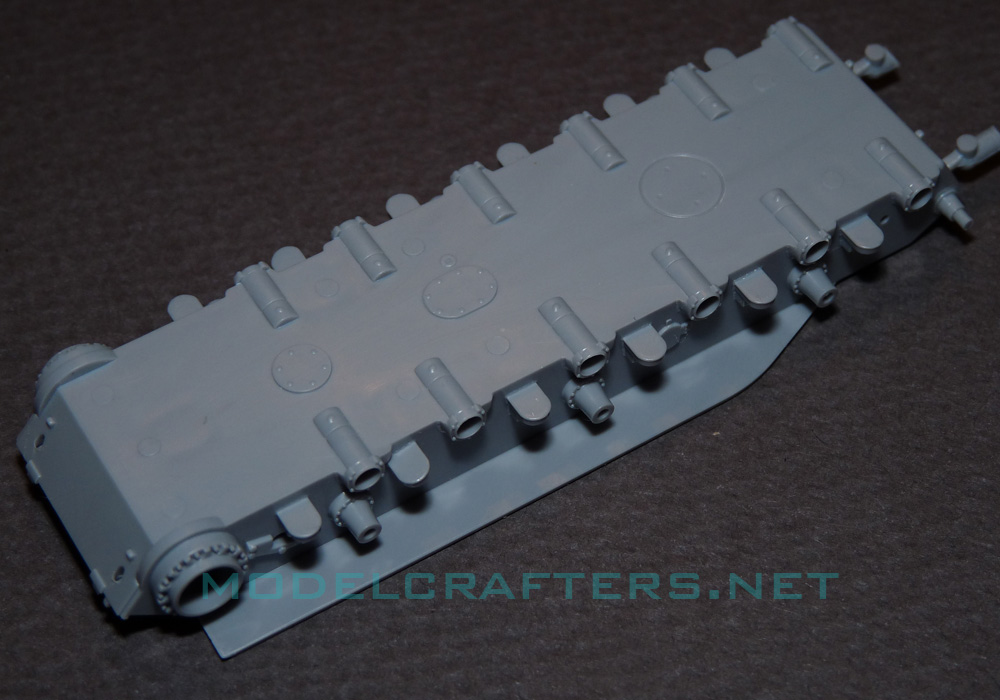
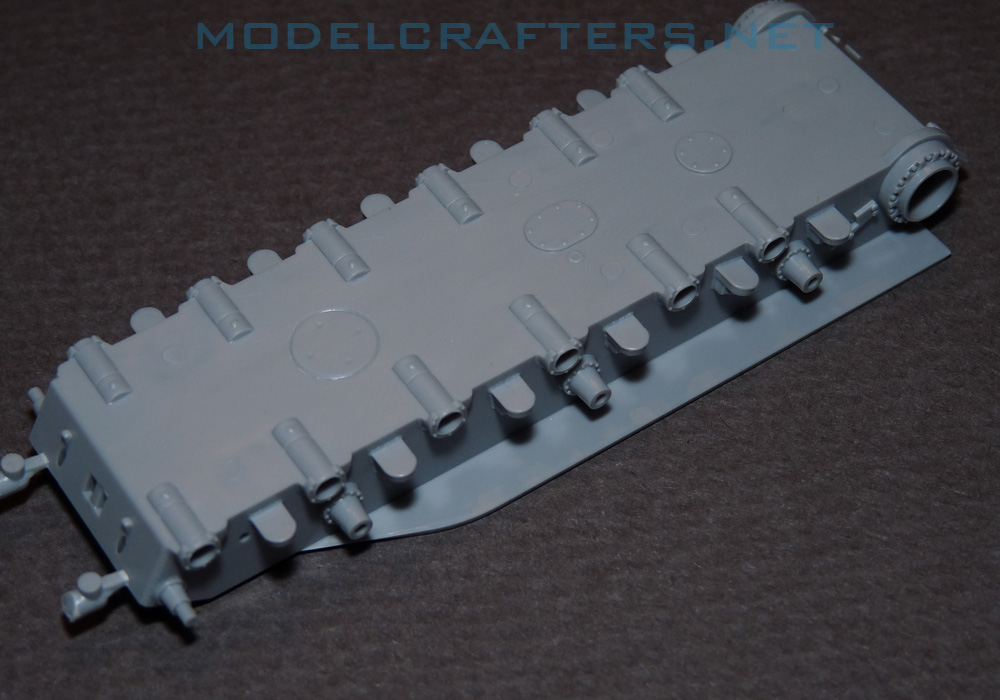
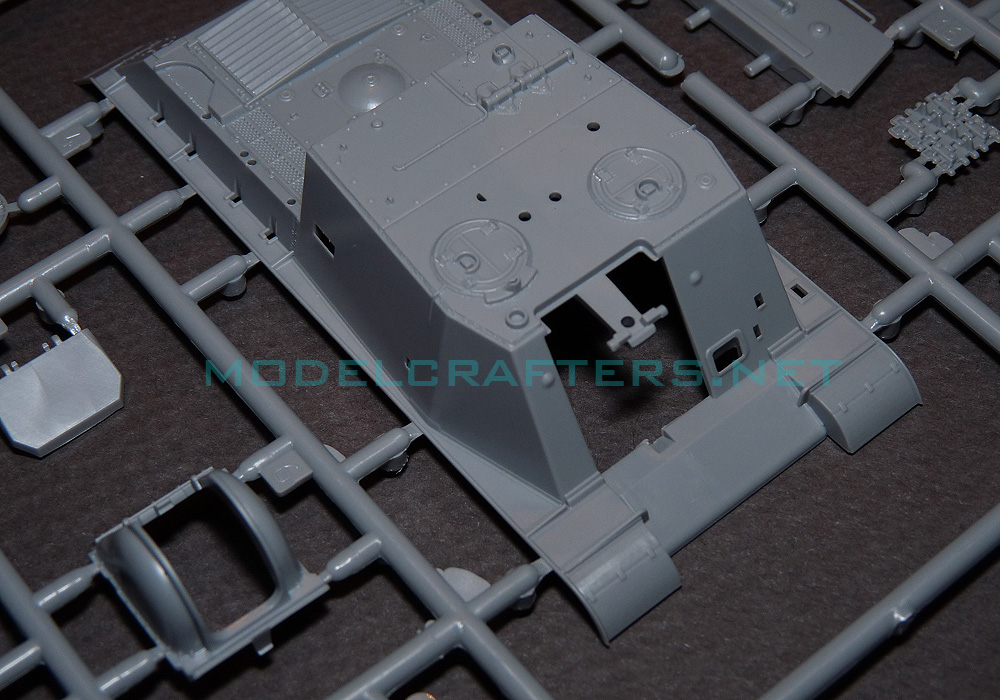
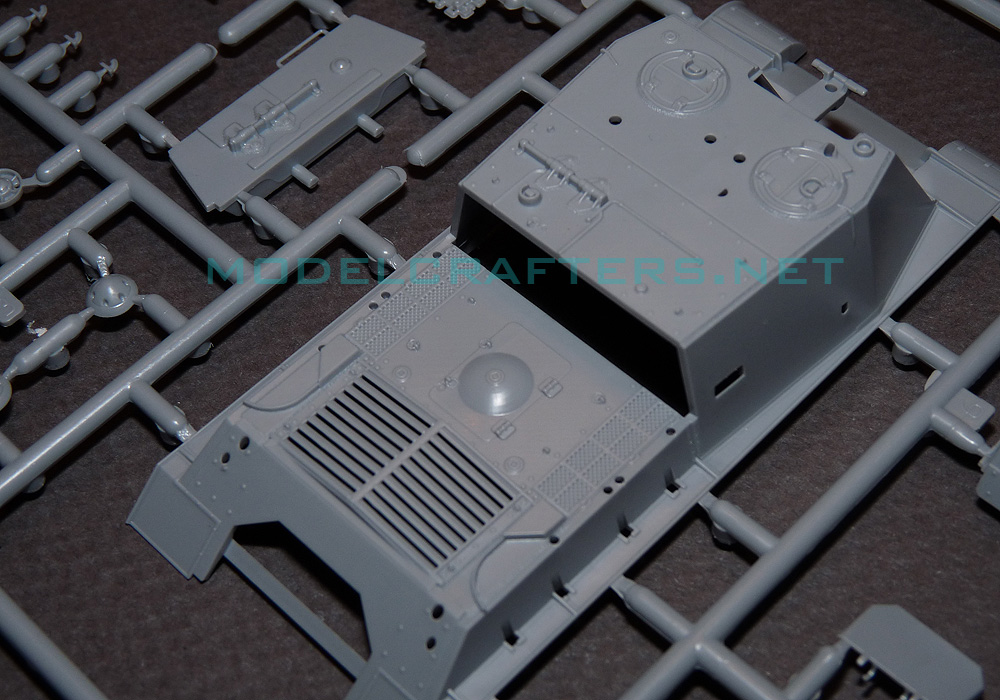
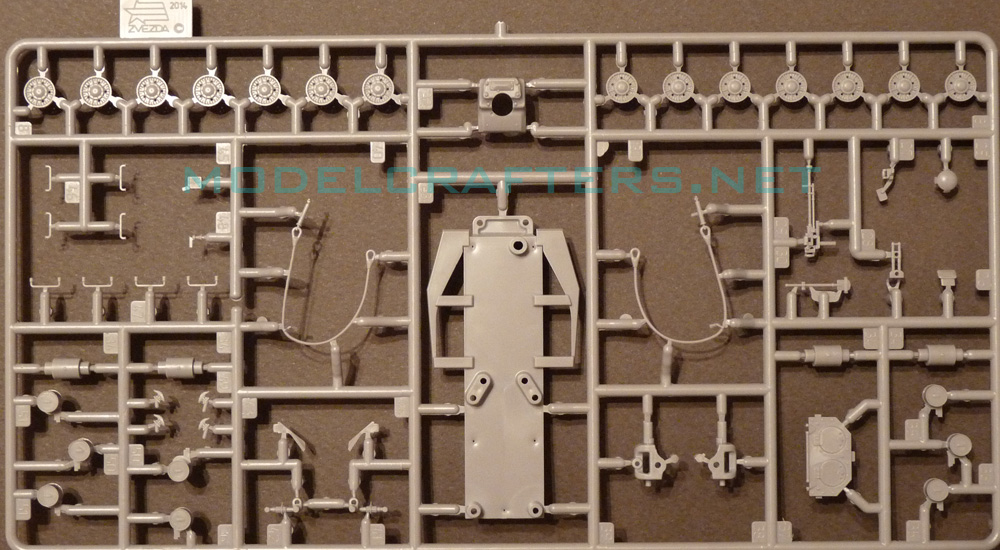
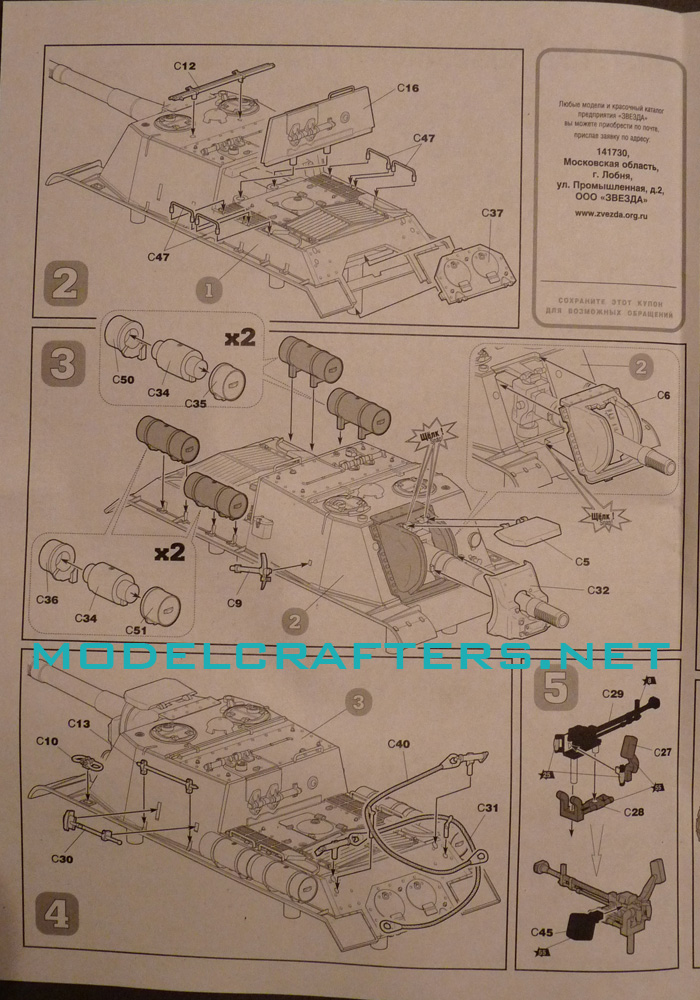
Sprue A (named so for convenience by yours truly) holds the one-piece upper hull and armored superstructure. The large casemate is based on the one from SU-152. Because the IS-2 hull is visibly shallower than the KV one – the superstructure on the ISU is much higher on the ISU.
The wheels and suspension arms on the sprue are taken directly from the IS-2 kit, as is the engine deck, apparently.
Zvezda’s 1/72 ISU-152, kit 5026
The protrusion you notice at the front of the superstructure roof is supporting the gun pivoting “mechanism” and allows you to traverse the gun horizontally on your kit. To the left of the upper hull you can see the rear wall with the crew entry door molded shut. There is an armored protrusion for one of the fans to the right of the hinge of said door. The gun barrel is one-piece affair with solid muzzle brake and notable seam on either sides. The recessed detail on the muzzle brake still makes the barrel eligible for replacement with the RB turned barrel. At about 3 Euro a piece the metal parts are a drop-fit upgrade that will instantly upgrade the looks of your Braille scale Zveroboy.
Zvezda’s 1/72 ISU-152, kit 5026
There are also 4 lifting hooks for the gun mantlet. The parts for the mantlet itself are smooth, with no casting texture. That can be added by either
– stippling Mr. Surfaces 500 or other filler,
– or brushing “hot” glue over the plastic, let it soften the parts for a few seconds, and then use metal-bristle brush to add the effect.
Zvezda’s 1/72 ISU-152, kit 5026
The hinge details and the supports for the front fenders are visible on the image above. Both hatches on the roof are closed , and the Mk. IV-inspired tank periscopes appear a bit low and soft-edged to me. The hinge details on the hatches themselves are good good enough for the scale. They also feature weld seams where appropriate.
At the back there are still the see-through louvers over the engine. It is my opinion that the locating holes are much too big, though if you come to think of this kit as a snap-together then they are fairly good.
Zvezda’s 1/72 ISU-152, kit 5026
The initial interpretations of the box art spoke of bolt-on mantlet as on the first prototype, but the kit part is correct for the production model. The cutout for the driver’s visor is present, too. The top cover will apparently be hinged to allow the gun to elevate and depress together with it.
Zvezda’s 1/72 ISU-152, kit 5026
Some bolt detail up top, the hinged cover fits in the slot in front of that area.
Rear casemate wall – note delicate handhold. Also directly from the IS-2 kit we have the spare tracks for the lower glacis.
Zvezda’s 1/72 ISU-152, kit 5026
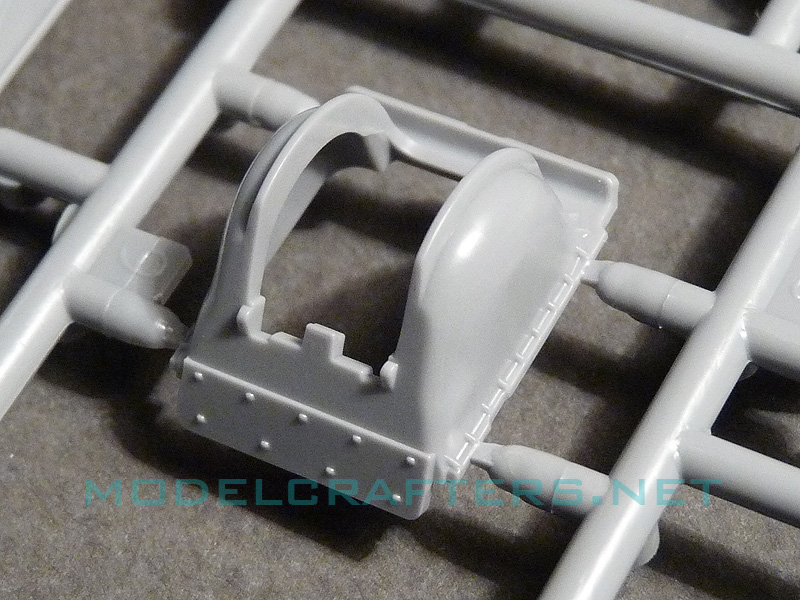
The mantlet hooks + other details.
Zvezda’s 1/72 ISU-152, kit 5026
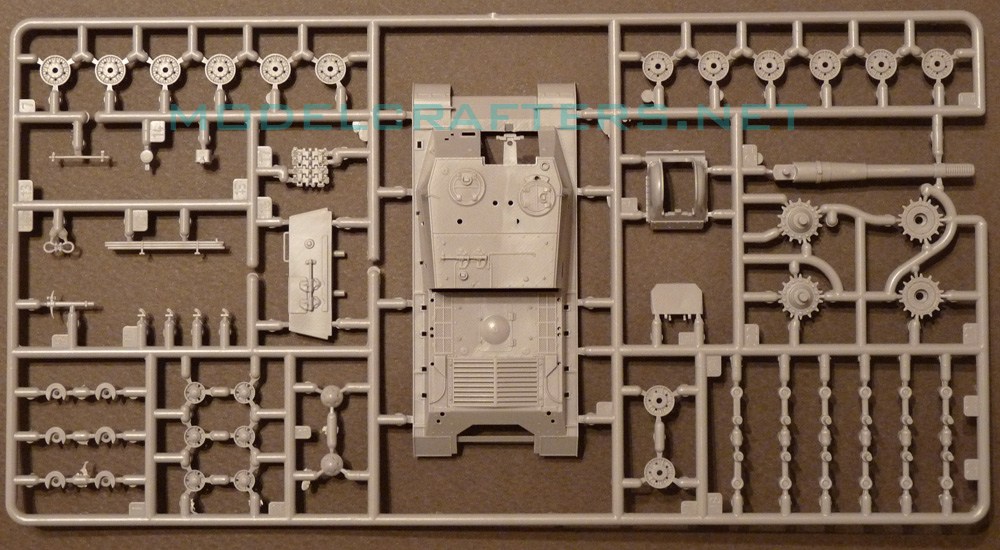
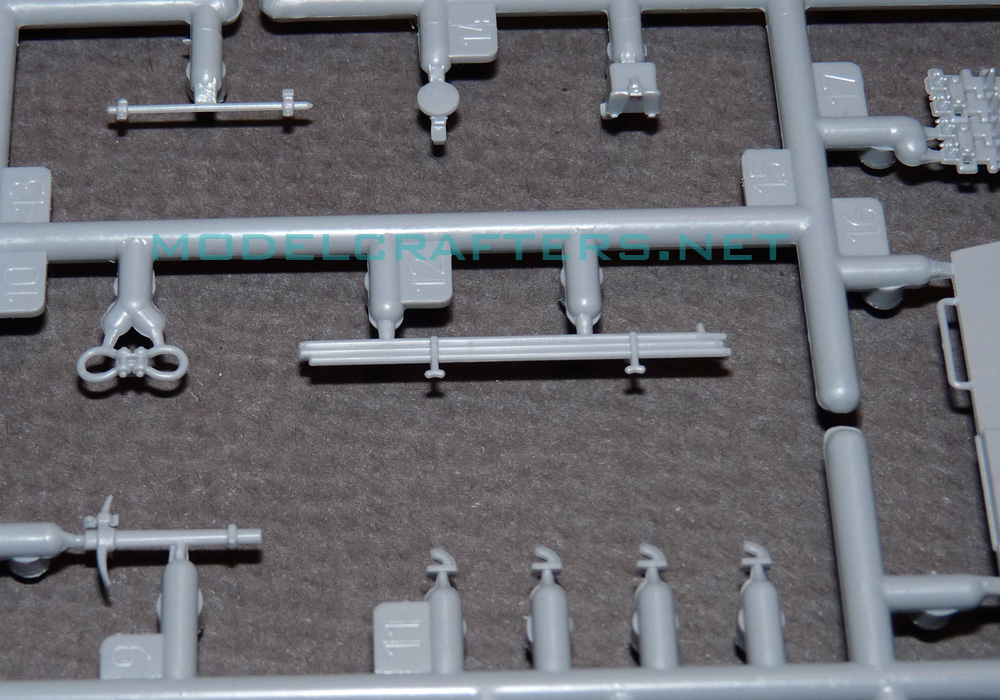
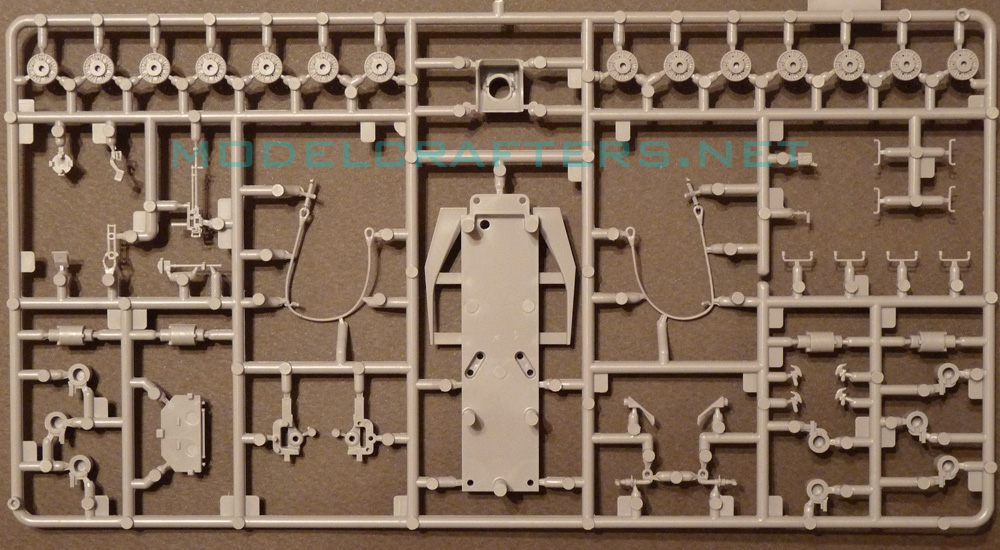
Sprue B – notice the connector plate for upper and lower halves and TWO pre-shaped towing cables (yay!). Wheels, mud scrapers, hooks, hand rails, fuel drums and the DShK fill up the rest of the sprue – most of them you are familiar with from the IS-2 kit.
Zvezda’s 1/72 ISU-152, kit 5026
Notice the asymmetric opening at the top of the connector plate – this is where the lower pivoting point of the horizontal traverse will fit in. The two halves of the elevation/traverse assembly are to the right of the plate, below the tow cable.
The other side.
Zvezda’s 1/72 ISU-152, kit 5026
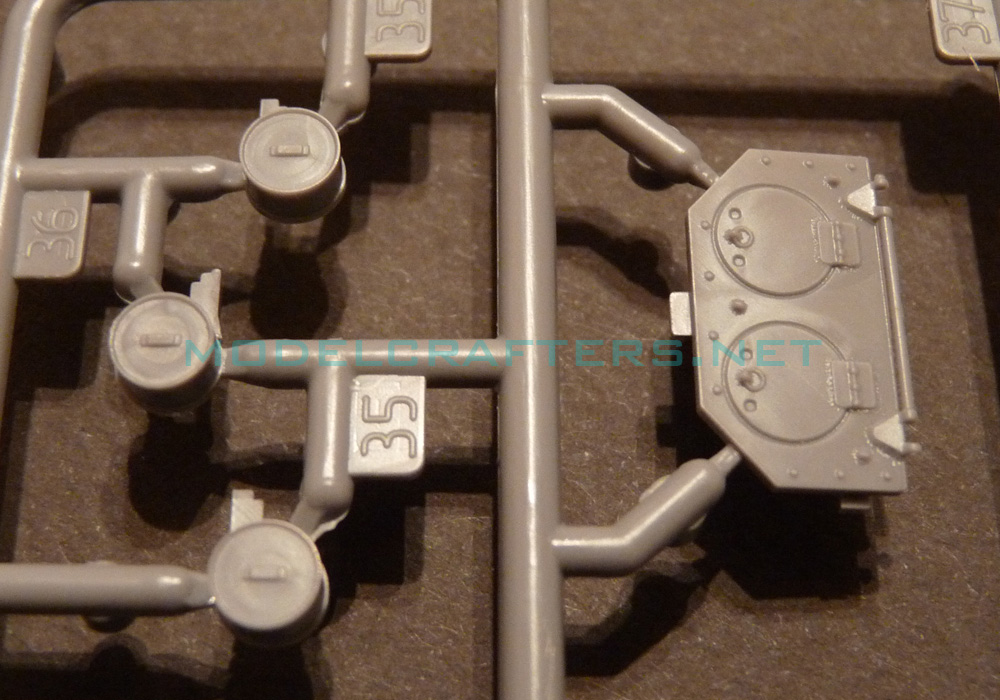
Gun mantlet with bolt detail. The complicated shape of the casting appears well reproduced.
Transmission hatch + fuel drum ends.
Zvezda’s 1/72 ISU-152, kit 5026
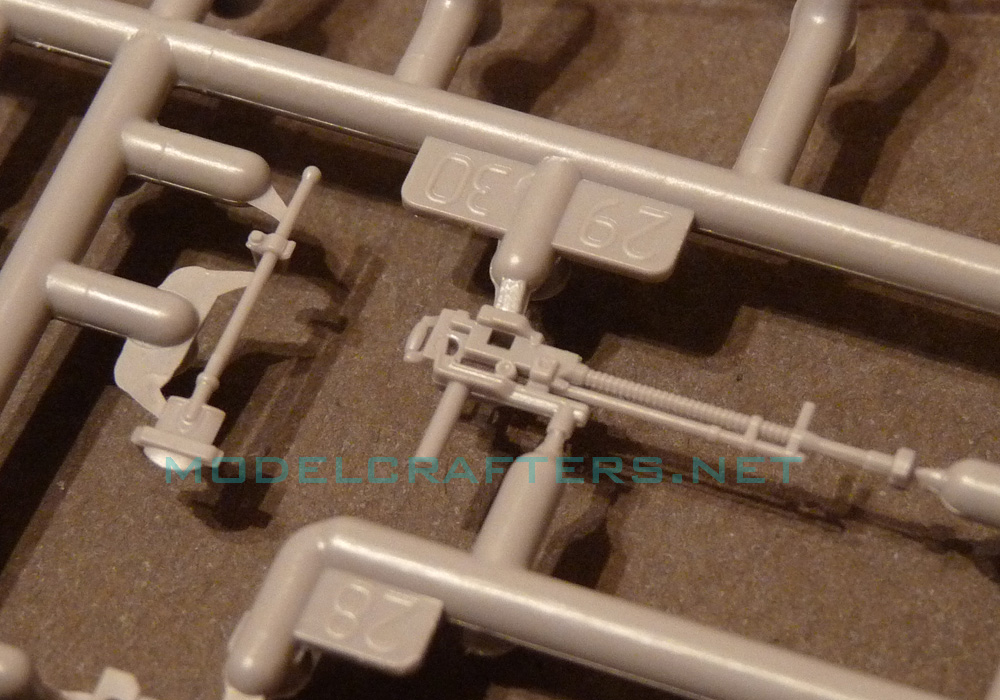
DShK and the omnipresent army shovel.
Zvezda’s 1/72 ISU-152, kit 5026
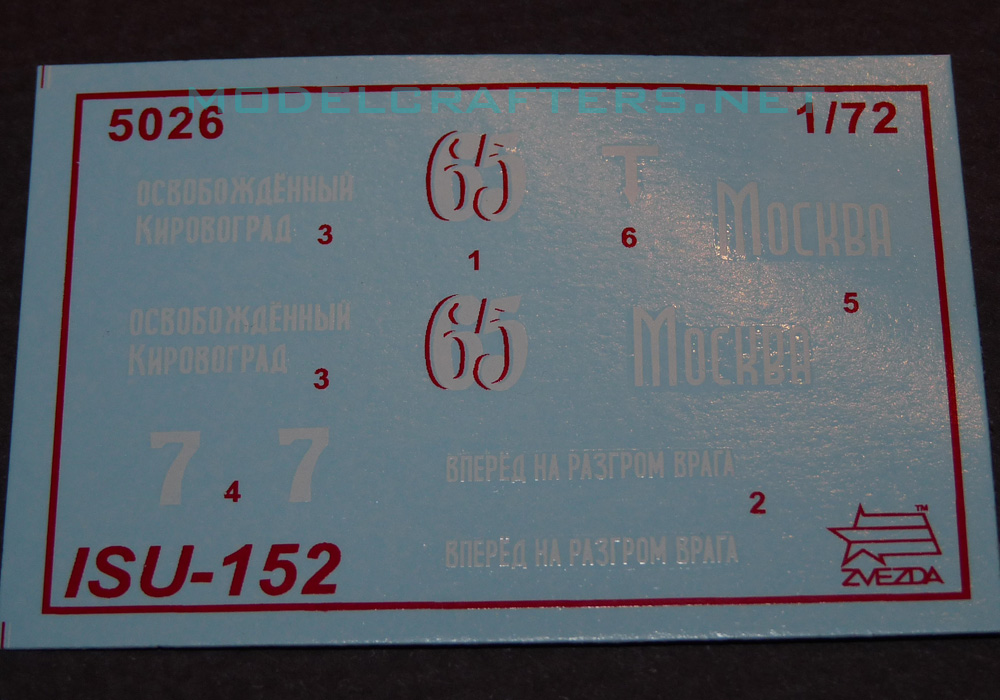
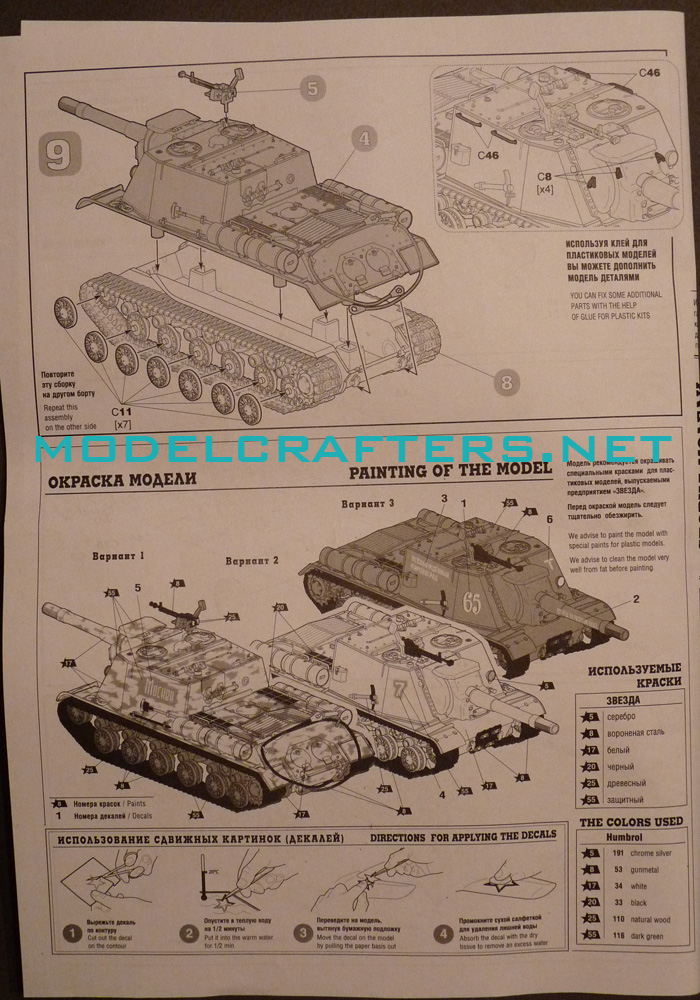
Decals for 3 machines.
Zvezda’s 1/72 ISU-152, kit 5026
Instructions – simple and effective.
Zvezda’s 1/72 ISU-152, kit 5026
Note ammo hatch not visible in the instructions – could be it was updated after the instructions were done.
Zvezda’s 1/72 ISU-152, kit 5026
Zvezda’s 1/72 ISU-152, kit 5026
Overal 9 logical, well-defined steps, upgrading step by step what you’ve already done.
Zvezda’s 1/72 ISU-152, kit 5026
I must admit I like the way Zvezda has made this kit. Yes – there are large openings that will probably need filling.
Yes, there are places where you will need to add texture.
Yes, gun needs replacing (badly), but you have the barrel for the Italeri kit anyway. (or will simply buy one more).
Yes, there are problems with the track guide teeth, and plastic track is hard to bend even with the grooves.
Yes, sprocket shape is a bit doubtful.
Yes – the mesh screens on the engine deck will still be better off replaced with PE.
Using OKB Grigorov’s resing parts has been very easy. In fact with the help of a hair drier I was able to bend the track run around the wheels and get some sag on the track. The track run retained its shape so well it could hold the wheels in place with no glue whatsoever!
After the track was painted I started weathering the wholes assembly, and added some “volumized” mud on the hull, which requires some pigment powders to look like the real deal (dry mud).
A small detail – Albion Alloys copper tube used for the exhaust pipes:
Copper tube exhausts
Despite being relatively soft, I would still recommend that you anneal the copper tube by holding the section you want to bend over a gas cigarette lighter. This will help further soften the metal, and of the tube got squashed/flattened in the process of being bent – you will be easily able to fix this using an awl. The unruly edges were used to hold the pieces for painting and weathering and were later trimmed to ease insertion in the exhaust guards (which as you remember were hollowed out in the beginning).
Next – some paint and weathering over the vehicle.
Mudguards are made from aluminum baking pan, painted and scuffed to show some metal underneath.
The finished article, now complete with Elf headlights.
Well, even though it is not really accurate, and is missing a lot of details, building and finishing this kit was certainly fun 🙂
OK, after showing what’s in the box let’s see how to build this beast of a kit.
First, I glued together the hull halves and added the main fenders. They are way too thick for the scale and after being measured were chopped off.
Next step – fill the trenches where the former fenders join the upper hull, and sand the sides down until they are smooth.
Hull filled and sanded
Details will have to be restored…
Fabricate the new fenders from scrap metal – here 0,1mm brass sheet cut to size and bent. The bend is sort of uneven, which is fine considering this is a tank.
Replacement fenders from 0,1mm brass scrap
The turret, ah the turret as the Russians say “is a different song”. It’s split VERTICALLY, with the roof and the main hatch being separate pieces. What this results in are two prominent sinkholes on either side of the gun trunnion, a 1mm step at the top of the turret, and a bad seam at the back end. Off with Mr. Dissolved Putty.
Turret prepared for mods
As you can notice there is a nasty trench around the perimeter I cut using a circular saw. Its purpose (once cleaned up) is to accept some stretched sprue to simulate the weld used to add the flat roof piece to the otherwise cast cupola. I would later go on to cut off the armored fan cover, glue a plastic disc and re-glue the cover on top of it to simulate the “mushroom” side view of said cover. The armor for the sight was replaced with a piece of brass tube.
The wheels are pathetic. Not only is the disc detail very soft, the rubber-like material for the bandages is known for its ability to melt plastic. Wheels were therefore replaced with OKB Grigorov’s set, eloquently named named Wheels for T-34,10 bolts, early production with reinforcement ring, bandage with pattern and 42 holes cat. no. S72011. A sample wheel can be seen below coated with Mr. Surfacer 1200:
The wheels are finely detailed, the correct diameter and correct shape. All you need to do is drill the wheels so the thinner UM axles fit snugly in the wheels.
Since the track run in the kit appears to be from a later period, and too thick, I picked up another resin set from OKB: the Tracks for T-34 mod.1940, third variant, coded S72008.
Very fine detail, scale thickness, strong and flexible enough to allow me to shape them over the wheels, glue and paint them separately, then simply slip them on the model.
Some details on the hull:
Some putty and weld detail applied
– Stretched sprue from Zvezda’s Panther, softened with Humbrol Liquid Poly, and poked with a hypodermic needle.
– Same treatment around the MG position in the upper front glacis. Also added were two armored plugs for the electrical wires to the front lights.
– Thin strip of Tamiya tape was added and covered in superglue to simulate the mounting flange of the gun mask (seen in yellow below).
– Stretched sprue simulates the mounting bolts for the mask.
– The rear turret wall was rebuilt using a 0,5mm plastic sheet. The armored bolt heads are 0,6 and 1,2 mm Lion Roar plastic rod sanded to shape.
– The stock PE mesh over the radiator was removed; only the frame was left. The mesh was simulated with coffee filter mesh.
– Two radiator cover locking clasps were simulated with thin plastic sheet (they were lost during the hull sanding).
– Two toolboxes for the left fender were built from scrap plastic.
– A shovel was shaped from a piece of brass and given a stretched sprue handle.
– The handles of the saw were improved with pieces of network cable insulation.
– The gear-retaining hoops were made from thin copper wire.
Then the whole thing was giver a primer coat and a number of greens followed:
Hull and turret after basic paint
I then glued the painted wheels and tracks, and formed the front and rear fenders out of a Aluminum baking dish. Next the whole model was weathered and a couple of details were added – stay tuned.read more


