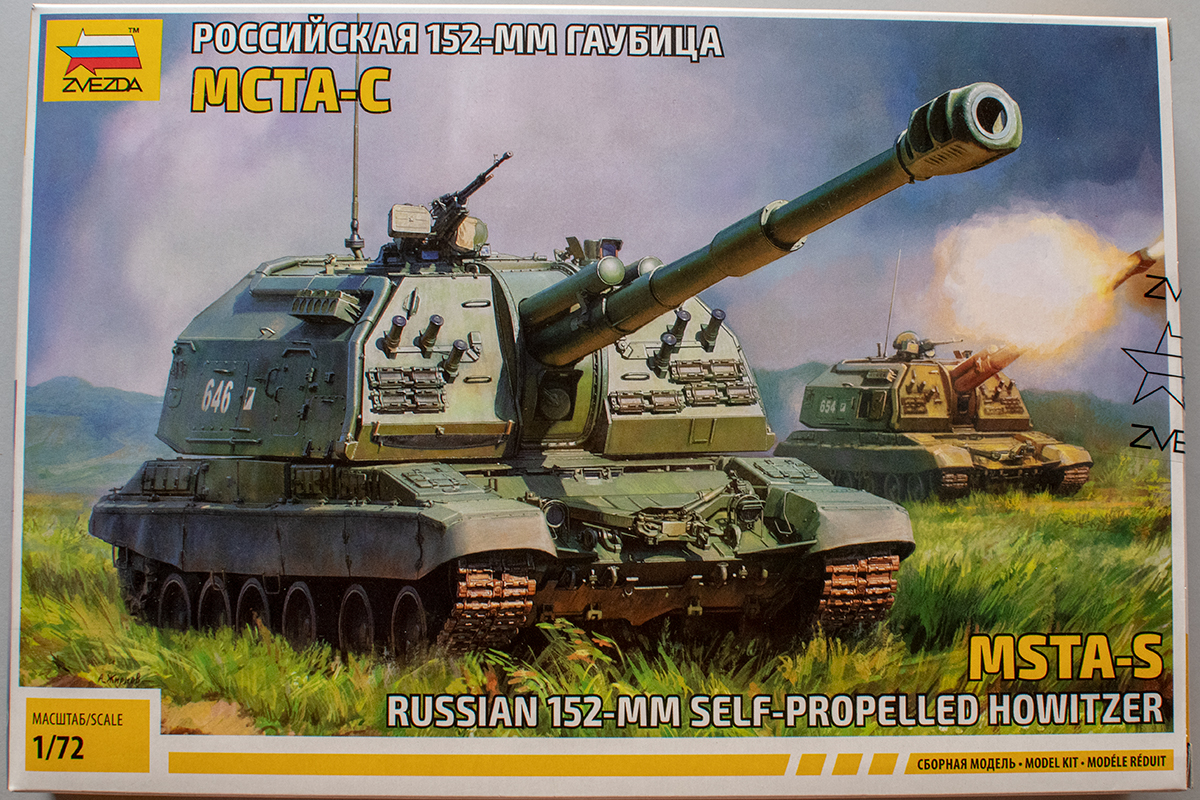
The king of battle (artillery) is not well represented in this blog, and I plan to rectify this starting with the (relatively) recent Msta-S kit from Zvezda in 1/72. The 2S19 self-propelled howitzer was developed during the 1980s to replace the aging 2S3 “Akatsiya” SPG of the same caliber (and much shorter range + lower rate of fire). It uses a modified T-72 hull as well as torsion bars, wheels and track from T-80 to carry a large turret with a 7 meter-long barrel. The resulting product finally brought the level of Soviet SPG up, nearer to the then-current M109 variants in NATO armies. An interesting feature at the back of the turret is an elevator for transporting shells and propellant charges from the ground up into the turret. This means the howitzer can be continuously fed from the ground instead of relying on the limited ammo supply stored onboard alone. Zvezda has already produced an 1/35 kit which proved popular among modellers. Despite knowing the 1/72 kit is expected a year in advance and the official announcement came on June 1, 2019 – picking the actual article up was exciting.
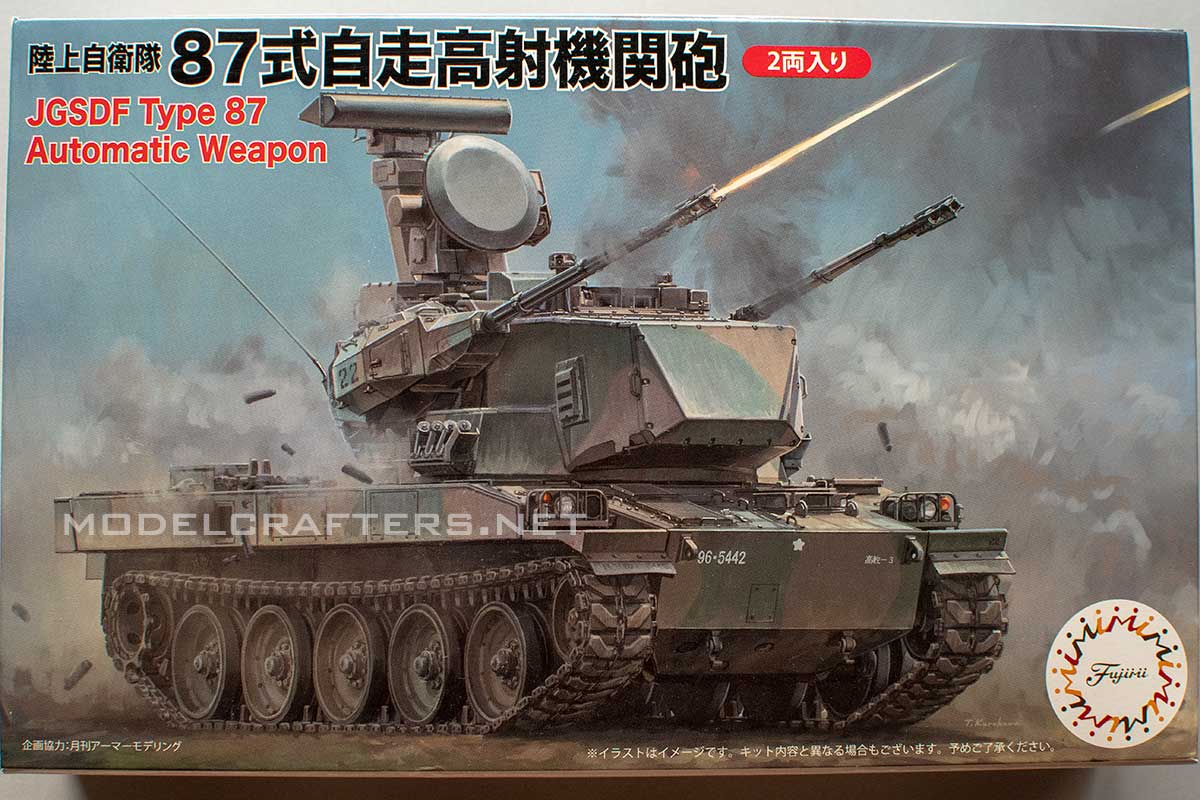
The Type 87 is a mobile air defense system, armed with two 35mm automatic Oerlikon cannons. While very similar to the German Gepard SPAAG it uses the Type 74 tank’s chassis as a base, locally-produced acquisition and fire-control radars as well as other systems in a different turret.
As my father served in an air defense unit – such systems have always fascinated me, and when the opportunity came up I ordered this kit directly from Japan.
Fujimi tooled the Type 87 SPAAG in 2018, and offers 2 kits in 1 box with a number of decal options included in the decal sheet – you can build 23 individual machines from 7 different units. (Yes, I realize it’s the same camo scheme!) Decals appear well-printed, in register, with saturated color, and even the gradient on the eagle head decal is “smooth” (there is no raster/pixelization). The decal film is cropped close to the borders of each design, so I don’t think you’d need to trim it. Despite the overall flat surfaces I sure hope the Fujimi decals will work properly – I’ve never dealt with them to date.
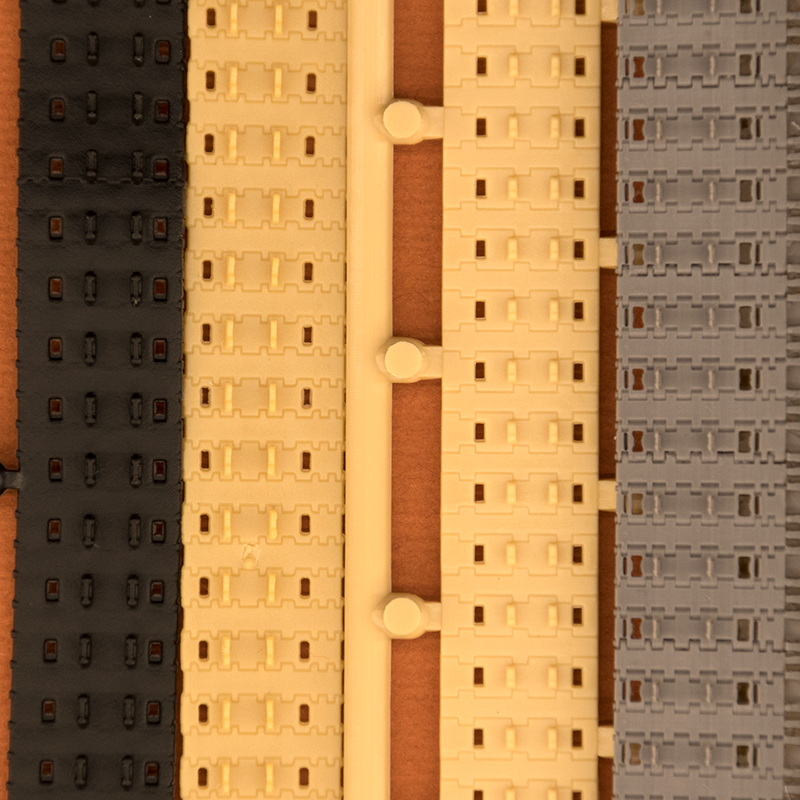
The Panther is one of the most recognizable tanks of WWII, right up there with the slow and boxy but feared Tiger I. With ~6,000 examples per Wikipedia the Panther is the third most produced tracked German AFV after the Stug III (9,408 built), and the workhorse of Panzerwaffe, the Pz IV (8,298 made).
No wonder that number of kits on the market follows closely the other 2 vehicles. Naturally there are various renditions of the vehicle and its details, with the tracks varying from flat to highly detailed. Below are a few examples from 6 different kits:
a Zvezda Ausf D, which I’ve previously featured here and here.
a Zimmerit-clad Dragon Ausf G previously see here and here.
a late Ausf A again of DML pedigree.
a Trumpeter Late production Jagdpanther
an ESCI early Jagdpanther in Italeri box (the only one on the market with early engine deck)
Revell’s early/late Jagdpanther combo kit 03111
1/72 Panther and Jagdpanther kits
I’ve also included 2 resin sets for comparison: early and late tracks from OKB Grigorov. Here’s the full line up:
8 examples of Panther tracks
Cast – in order of appearance (left to right) and track width:
The Jagdtiger was a last-ditch weapon, a self-propelled anti-tank bunker, that had zero impact on the outcome of WWII. Regardless, a lot of model companies offer both variants of this machine. My main reason for getting the Trumpeter set with Porsche suspension was the small number of parts and the related ease of construction. It promised a rather uninvolved build as I imagined a straight OOB project done over the weekend. Yeah, right 😀
The first session was promising, I managed to remove the main components from the sprues, clean up and assemble the bogies in a couple of hours. Instead of going full AMS I decided to plug the locating holes for the spare track hangers, and go “bald”.
After toying with the idea of replacing the molded-on tools I decided against it, as that would severely affect the Zimmerit coat. I really wasn’t impressed by the molded-on Zim either, but elected to keep it. Still, I cut off the vision blocks/guards (molded solid) and built new guards instead.
The gun mantled was stippled with diluted Basic Tamiya putty to simulate the cast texture, then lightly sanded. The gun barrel was replaced with a turned aluminum one from RB models.
My first thought about the Trumpeter tracks was “That’ll do for a quick build.” But then I looked up some build reviews and wasn’t so convinced anymore. Comparison with the OKB Tiger II tracks is below.
As you can see the kit track is missing the internal set of guide teeth, plus the level of detail on the resin one is… a bit higher dare I say?
I also used the corresponding sprocket set to save myself some trouble on adjusting the kit sprocket to fit the aftermarket tracks. I was rather pleased with how the replacements look. To add a bit more character I split out the gun support ring, and re-glued it as if the entire suport was just dropped rather than neatly stowed around the front light (as directed in the instructions).
I used some of the mesh screens from the Flyhawk King Tiger PE detail set on the engine deck to at least partially cover the inverted grills Trumpeter provides.
Continuing with the “KISS” approach I went for the monochromatic Dunkelgelb paint job, and the decals from the Revell Hummel. A bit of mud using colorized wood putty, and a simulated stripped paint in the area where the gun support would wrap around the barrel complete the build.
Details are highlighted with a dark brown wash.
Overall the Trumpeter Jagdtiger has been an easy, even pleasant build. The parts fit well, and if you go with the spare tracks on the superstructure – it will require no filling at all. Unless you decide to replace parts/details I am sure it can be built and finished in a day. Its main weakness are the tracks, which – even on a weekend build – are worth replacing with an aftermarket set. This will add a bit more detail and character to the rather boxy appearance of this massive machine.read more
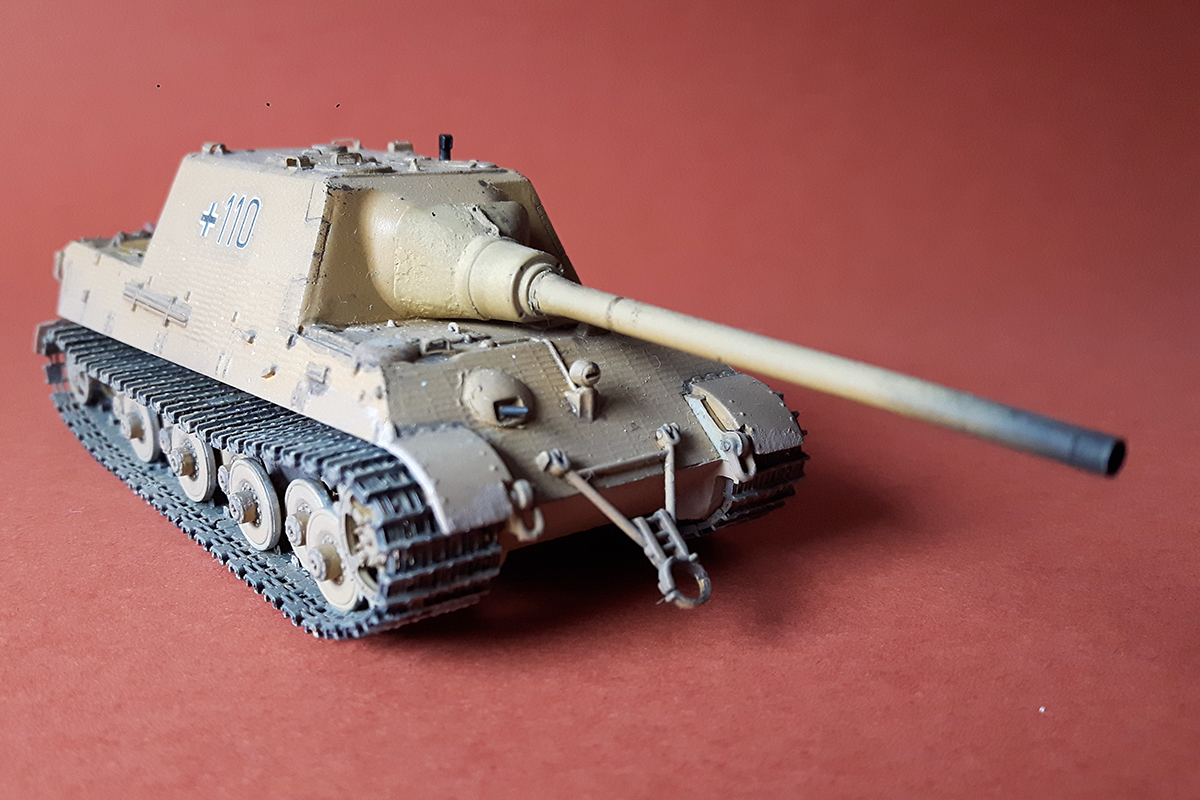
There was only ever one E-100 chassis built, but this project for super heavy armored vehicle continues to capture modeller minds across the world in all scales. Years ago the only 1/72 kit was the Dragon one, which went missing for nearly a decade. When re-released it disappeared from the market in 2 (two days).
Then along come Trumpeter and Modelcollect, and here we are with two more competitively priced 1/72 kits.
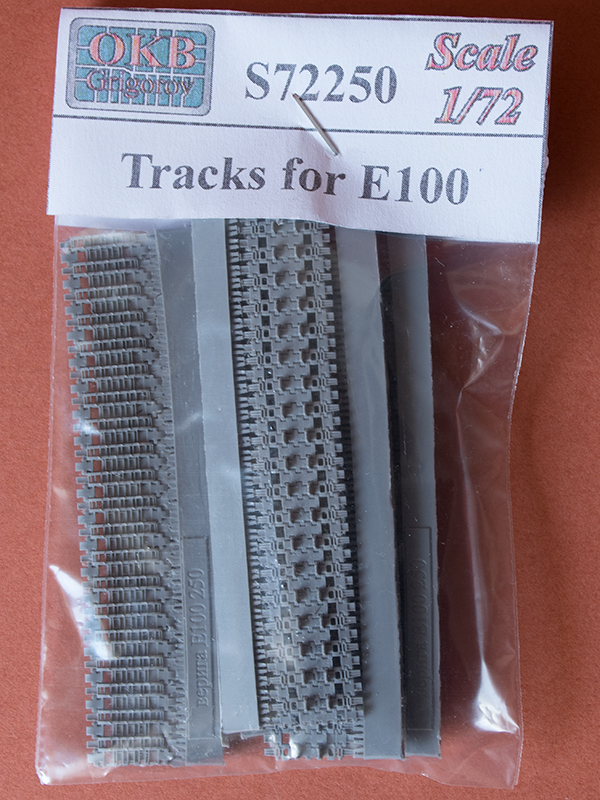
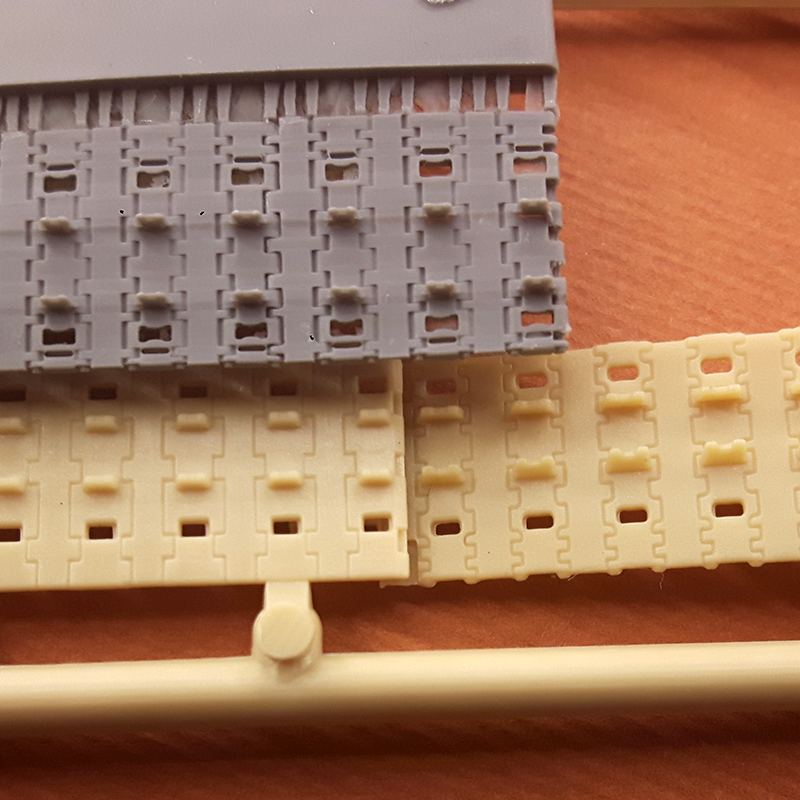
What’s common for all 3 of them? The tracks are far from good. Negative experience with DS tracks and the underwhelming releases from the younger competitors drove my interest to, well, OKB, and their E-100 resin track set.
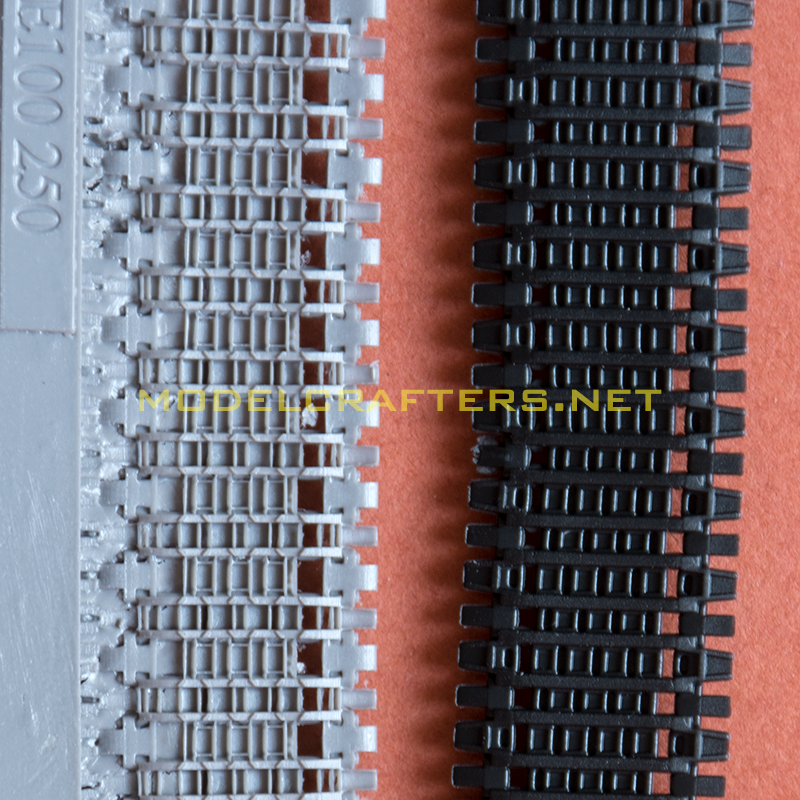
The pack contains 6 light grey lengths of E-100 tracks on the casting block. Here are a few images to compare with the Modelcollect E-100 track (in black). I’m planning to build the E-100 chassis with its tracks exposed, so the track will add the WOW! to the otherwise bland vehicle.
E-100 tracks, OKB vs MC
The OKB track will require some careful separation and cleanup of the excess resin (note this is probably on my example only as I’ve seen other sets reviewed and they are OK), but the extra detail is just worth it. Note diagonal detail on track ridges on the resin part, the better defined individual links and segments.
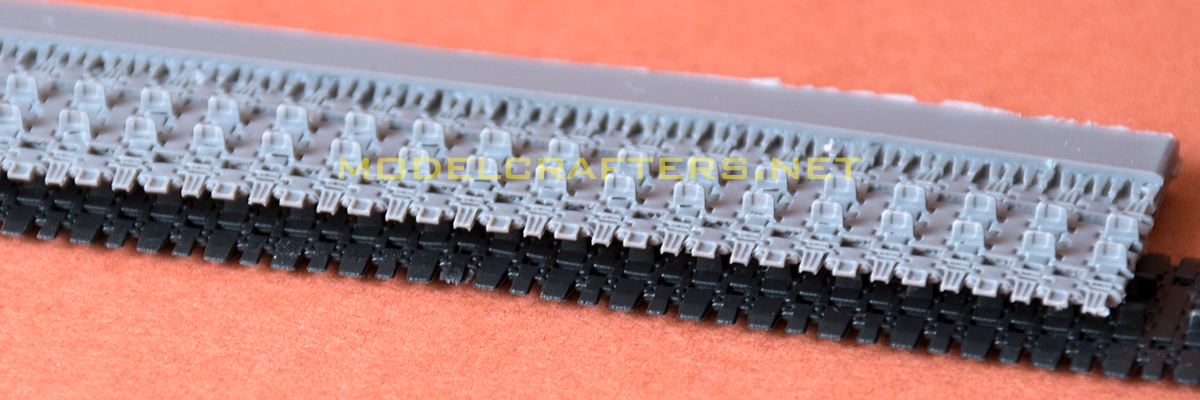
E-100 tracks inside, OKB vs MC
A comparison between the “paddle” details:
E-100 tracks detail, OKB vs MC
And finally – check the guide teeth of the kit track vs the resin replacement.
E-100 tracks, guide teeth
The OKB E-100 tracks are highly recommended for your E-100 projects!read more
The “King Tiger” tiger needs no introduction, and there’s hardly a company that has not issued a kit of it. While the angles and sizes of various armor plates would rarely be the subject of scrutiny in 1/72 (and even less often are corrected on models), tracks remain an important detail of the kits.
There are several types, including multiple patterns of the wider “combat” and narrower “transport” ones – a situation similar to the first generation of Tiger tanks.
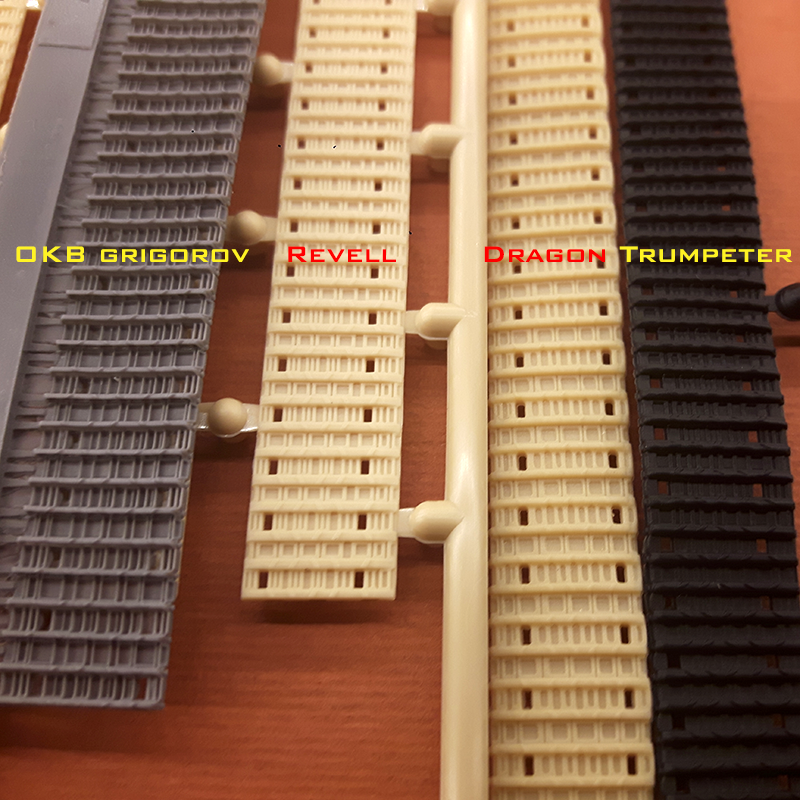
I will compare the tracks of the 3 most easily accessible kits of the production model: the Revell, Dragon and Trumpeter ones, with OKB Grigorov’s Kgs26/800/300 resin track. First – “mug shot” of the contenders.
King Tiger 1/72 tracks comparison
Revell tracks are “link and length” hard plastic tracks, Dragon offers their favorite DS contraptions (that were stuck to each other when I removed them from their original plastic packaging), and the “rubber”, “can be glued with model glue” Trumpeter black tracks.
Two more shots – at a lower angle, and directly above, so you can judge the face detail by yourselves.
To me personally the companies using softer material – Dragon and Trumpeter – are always on the losing side due to the properties of the medium they chose. You can see the thick borders of the square apertures/track patters on the 2 manufacturers. The Revell tracks seem a degree more delicate. However they are visually narrower than the rest of the gang.
Revell: 10.8mm
OKB, Dragon: 11.4mm
Trumpeter: 11.5mm
Scaling down the actual width of 800mm shows the 1/72 track should be about 11.1mm wide, so we do not have a perfect solution.
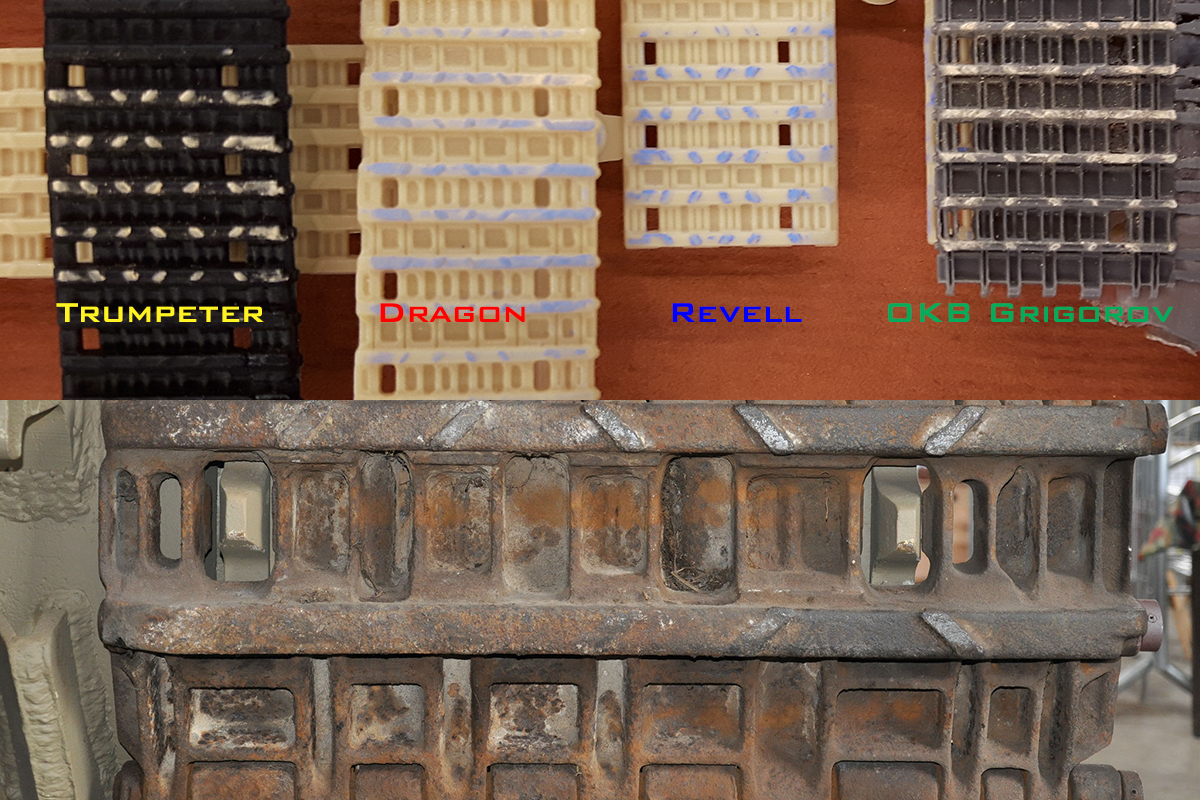
Let’s see how track patterns compare with the real thing.
Comparison with actual King Tiger track
Looks like all manufacturers got the basics of the pattern, with the Trumpeter track showing the most oversized detail, followed by DML and Revell’s simplifications.
Let’s turn the tracks over and check the other side.
King Tiger: comparing 1/72 track reverse details
I wouldn’t call this an even fight because:
Trumpeter tracks have no inside detail aside from the thick guiding teeth,
Revell only has half the hinge lines,
Dragon seems to be closest, but is still missing the additional openings of the “toothy” link.
Let’s have a guiding teeth profile comparison real quick:
King Tiger tracks in 1/72: guide teeth comparison
Note the simplified tooth profile on the Revell track, and that instead of thinner “neck” between its two edges the teeth on the Dragon track are simply cut down to an overscale effect similar to what you’d see on Leopard 2 tracks.
My personal favorite among the kit options would be the Revell track, as it’s made of quality, durable polystyrene. True, it’s fiddlier to put together, and it does have simplified details, but you know it will be in the box in the same state 10 years later and in your display case for another 30 when done.
However availability and durability is sometimes not enough, and that is when OKB aftermarket sets for King Tiger come in handy. As a result all my KTs are getting the resin treatment, which I would recommend to you as well.read more
Big machines have always been a thing in the USSR, and that is definitily true for both aircraft and tanks before WWII. In April 1941 some 20 proposals for a super heavy tank competed within the Kotin design bureau. War interrupted this madhouse, all guns built for the design were destroyed. However since men continue to obsess with heavy tanks that were never built in metal – what you will see below is the winning one in resin.
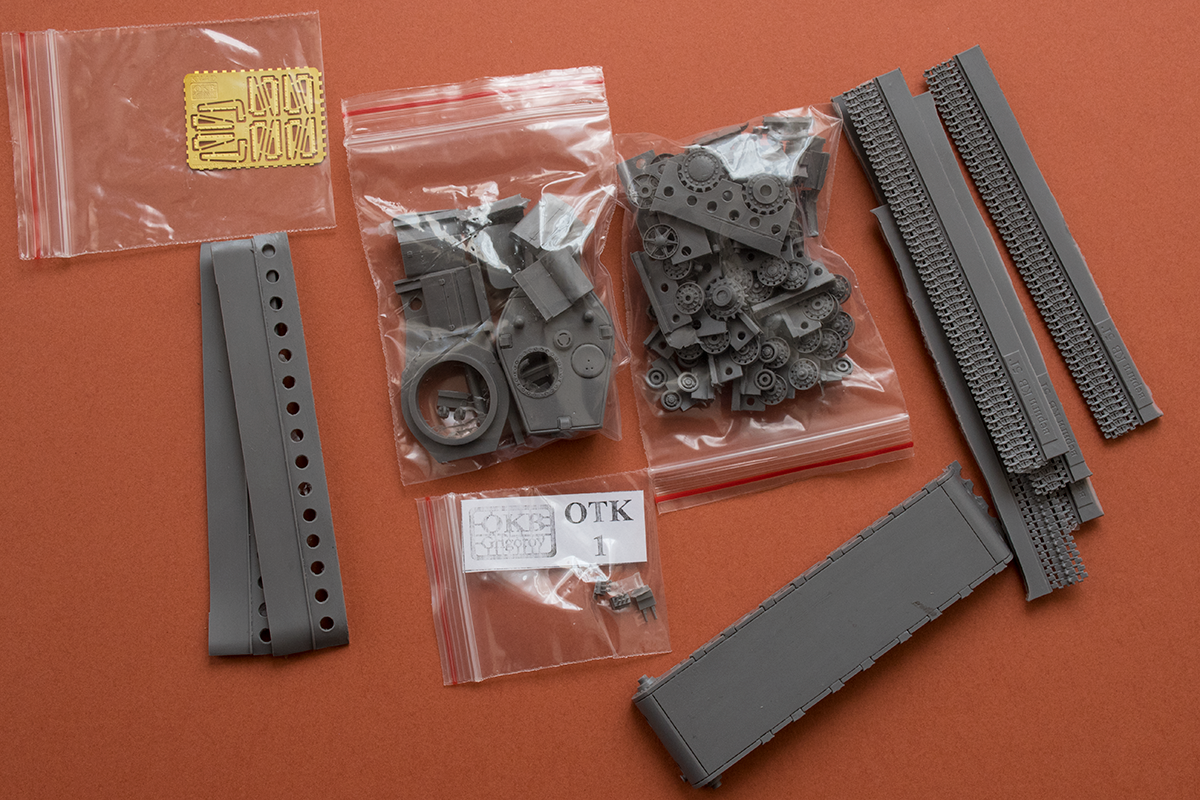
On to the sturdy cardboard box keeping the parts safe.
Boxart for Duhov’s KV-4 from OKB Grigorov
Inside you will find zip-lock bags with parts, all neatly tucked into a large sheet of bubble wrap, and the typical minimalistic instructions on a single folded sheet.
While the kit is not branded as “heavy metal” or “Hard-o-big” as e.g. the SU-122-54, this KV-4 can’t be considered not as “simplified” either. The kit fenders alone are nearly 11cm long, and with 8 road wheels per side, separate suspension arms, bump stops, return rollers and what have you, there’s still some 150 parts in the trademark grey resin.
Parts for KV-4 (Duhov) by OKB Grigorov
Something I am not used to in OKG kits is the minimal number of PE parts – just 12 of them in a small shiny fret, all supports for the fenders with hex bolthead detail. Naturally – you will need to fold them 🙂
PE fender supports for KV-4 (Duhov) by OKB Grigorov
These are glued to the sides of the 1-piece upper hull, which has the driver, engine and transmission hatches molded shut. It is by far the largest and longest part in the kit.
There are openings for the main turret and the engine air intakes, which are supplied as separate parts.
KV-4 (Duhov) engine intakes
There is no mesh or PE parts to cover the openings in the intakes themselves.
Next in line is the hull pan with numerous openings and locations for various parts on the sides, and positions for the tow hooks at either end.
Admittedly I have no idea what could tow the 80+ ton behemoth other than another such tank with no turret – or a “Russian troyka” of 3 turretless KV-1s, attached to a monstrous tow bar.
One-piece fenders for each side – nothing to bend here. You are already familiar with the 6 lengths of highly detailed 700mm KV tracks.
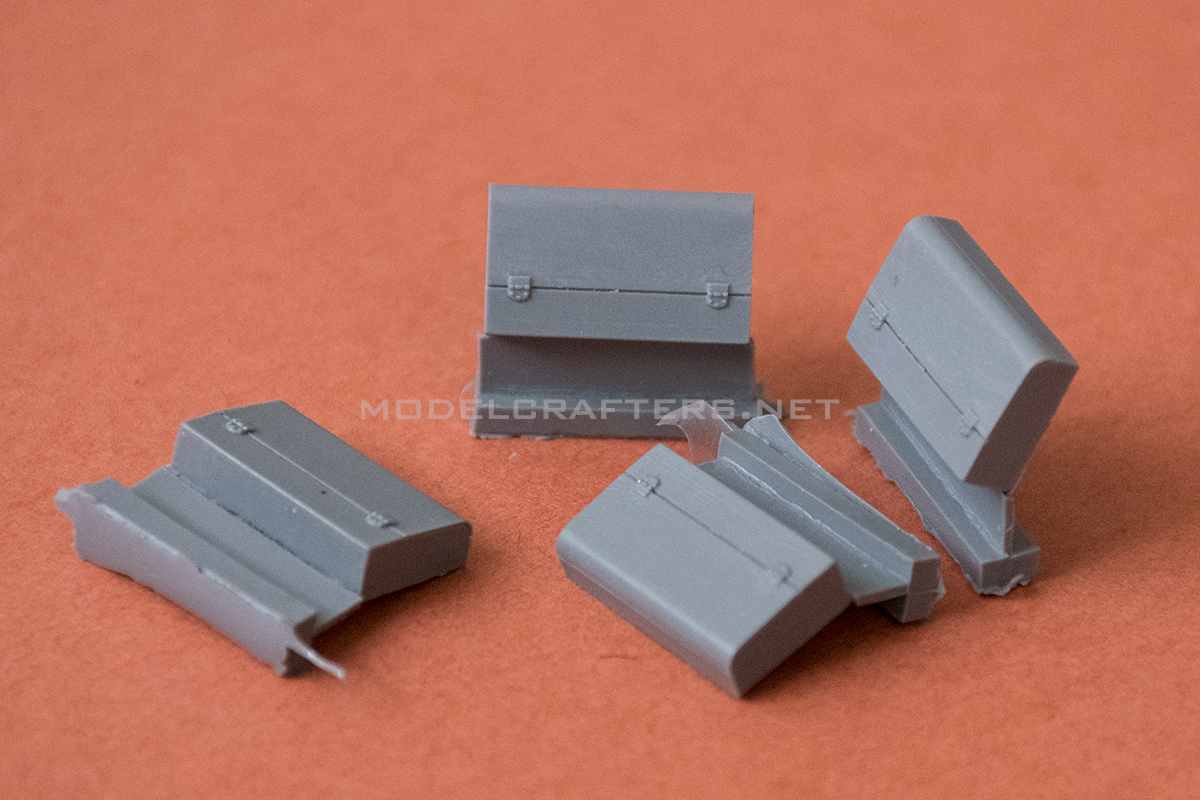
There are 4 equipment bins that sit on top of the fenders. They are cast hollow, but closed, and are supplied as individual parts with raised hinge detail and recessed hinge line:
KV tool boxes
An item you can’t miss is the monstrous main turret, complete with periscopes, fan detail, armored gun sight housings, detailed hatches.
Nice detail on the mantlet, too: the armored bolts with conical heads are beautifully reproduced.
You’ve already noticed the turret is hollow. The large circular opening on the top is the base for a secondary turret armed with a DT machine gun. The smaller turret completely covers the ring bolt detail when installed, but you’ll know it’s there 😉
The kit includes the secondary turret with a DT machinegun, as well as open-bore resin barrels for both the 107mm and the 45mm gun.
While the 1-piece resin casting already looks good enough and will require minimal cleanup due to the minimum attachment points to the casting stub, OKB Grigorov offers a machined brass 107mm ZiS-6 gun barrel as well. The turned barrel is smooth inside and out, no visible tracks from the lathe knife’s point, and is a drop-fit replacement of the resin one. OKB has already offered several opportunities to get the metal barrel for free with your KV-4 order.
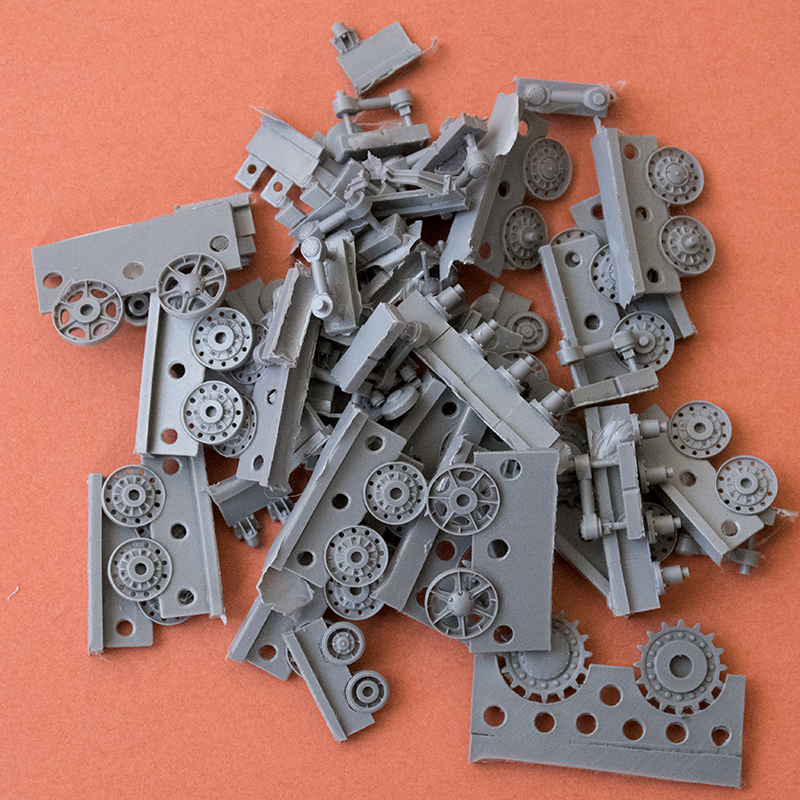
The running gear of the kit is where the bulk of the parts is. Behold:
Running gear parts for the KV-4 (Duhov) kit by OKB Grigorov
The suspension arms for the roadwheels are separate parts. Note the arms are handed (different parts for left and right side of the hull), so do check the fit before gluing these in place. The circular pin obviously fits in the wheels themselves, while the square key is intended to lock the arm into position in the hull.
Suspension arm for KV-4 (Duhov)
Of curse you can simply drill out the opening for that key and have the running gear posed.
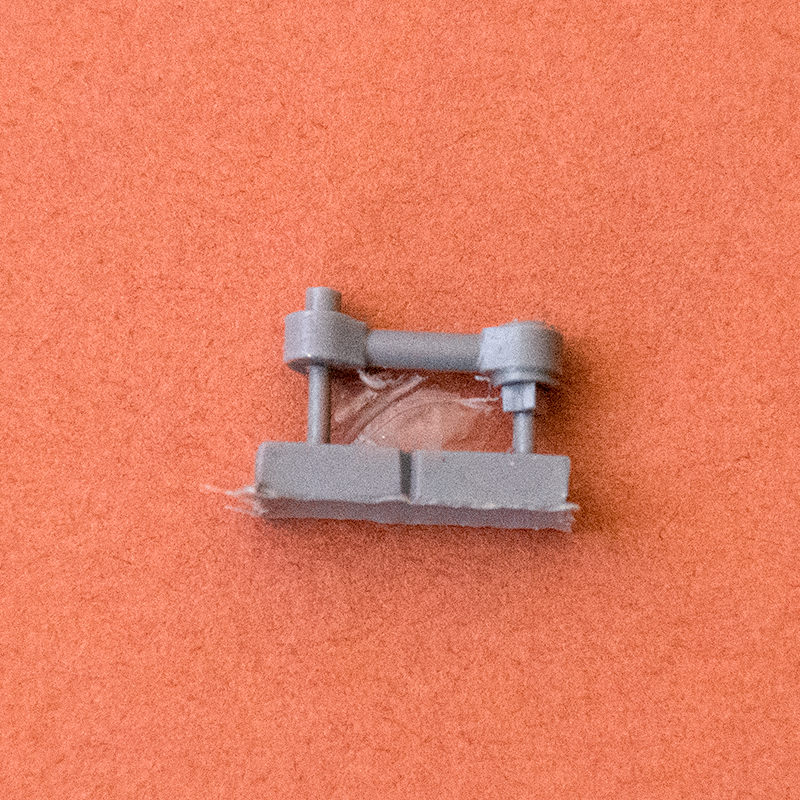
Other than the suspension arm each roadwheel corresponds to a bump stop – an assembly that is intended to limit the travel of said arm so the tank does not lie flat on its belly. Parts are delicate and highly detailed, take a look:
Next you have the return rollers, 4 on each side, as well as their bases that need to be glued to the hull tub first.
You can clearly see the bolt detail on both part types.
Sprockets – your usual large KV two-part affair with a massive center cap and a lot of bolts on the perimeter.
The parts on the second image are the mud scrapes – these were intended to remove the mud deposits accumulating inside the massive sprocket.
Next are the idlers, the track tension adjustment mechanisms and their bases. You can actually see the bolt thread on the tensioner parts.
Additional details: towing and lifting hooks, opened KV exhaust.
DT machninegun tips (one for the bow gunner, and another for the small turret up top), lifting hooks for the engine and transmission decks (that will need some work on their openings), transparent resin headlight.
DT machnineguns, lifting hooks, headlight
Basically you have everything you need to build this Soviet “paper” super heavy in the box. This is an impressive, very well detailed release, and with the excellent properties of the medium OKB uses it should pose no problem for an experienced modeller to obtain an excellent result.read more
The PzKpfw IV is a popular machine in the modelling community, and many companies have produced kits in 1/72. The weak point on the majority of those sets are the tracks and wheels.
OKB Grigorov produces over 30 different sets for the Pz III and IV family of vehicles. There are tracks, road wheels, idlers, return rollers and sprockets. With the recent additions to my collection I was looking to replace the vinyl and DS tracks with a more detailed, durable, and easier to work with option, so below you will see images of
You get the regular zip-lock bag with paper header, and 6 lengths of track inside:
Then you start looking at the detail, and there’s a lot of it to enjoy:
The steel wheels can be used on the front bogeys on Pz IV ausf H and J, and related late-war vehicles like Jagdpanzer IV, Brummbär, or any other damaged & repaired, imaginary, etc. vehicle on the chassis you can equip with those wheels in random positions or hang on the spare rack.read more
Using OKB Grigorov’s resing parts has been very easy. In fact with the help of a hair drier I was able to bend the track run around the wheels and get some sag on the track. The track run retained its shape so well it could hold the wheels in place with no glue whatsoever!
After the track was painted I started weathering the wholes assembly, and added some “volumized” mud on the hull, which requires some pigment powders to look like the real deal (dry mud).
A small detail – Albion Alloys copper tube used for the exhaust pipes:
Copper tube exhausts
Despite being relatively soft, I would still recommend that you anneal the copper tube by holding the section you want to bend over a gas cigarette lighter. This will help further soften the metal, and of the tube got squashed/flattened in the process of being bent – you will be easily able to fix this using an awl. The unruly edges were used to hold the pieces for painting and weathering and were later trimmed to ease insertion in the exhaust guards (which as you remember were hollowed out in the beginning).
Next – some paint and weathering over the vehicle.
Mudguards are made from aluminum baking pan, painted and scuffed to show some metal underneath.
The finished article, now complete with Elf headlights.
Well, even though it is not really accurate, and is missing a lot of details, building and finishing this kit was certainly fun 🙂
OK, after showing what’s in the box let’s see how to build this beast of a kit.
First, I glued together the hull halves and added the main fenders. They are way too thick for the scale and after being measured were chopped off.
Next step – fill the trenches where the former fenders join the upper hull, and sand the sides down until they are smooth.
Hull filled and sanded
Details will have to be restored…
Fabricate the new fenders from scrap metal – here 0,1mm brass sheet cut to size and bent. The bend is sort of uneven, which is fine considering this is a tank.
Replacement fenders from 0,1mm brass scrap
The turret, ah the turret as the Russians say “is a different song”. It’s split VERTICALLY, with the roof and the main hatch being separate pieces. What this results in are two prominent sinkholes on either side of the gun trunnion, a 1mm step at the top of the turret, and a bad seam at the back end. Off with Mr. Dissolved Putty.
Turret prepared for mods
As you can notice there is a nasty trench around the perimeter I cut using a circular saw. Its purpose (once cleaned up) is to accept some stretched sprue to simulate the weld used to add the flat roof piece to the otherwise cast cupola. I would later go on to cut off the armored fan cover, glue a plastic disc and re-glue the cover on top of it to simulate the “mushroom” side view of said cover. The armor for the sight was replaced with a piece of brass tube.
The wheels are pathetic. Not only is the disc detail very soft, the rubber-like material for the bandages is known for its ability to melt plastic. Wheels were therefore replaced with OKB Grigorov’s set, eloquently named named Wheels for T-34,10 bolts, early production with reinforcement ring, bandage with pattern and 42 holes cat. no. S72011. A sample wheel can be seen below coated with Mr. Surfacer 1200:
The wheels are finely detailed, the correct diameter and correct shape. All you need to do is drill the wheels so the thinner UM axles fit snugly in the wheels.
Since the track run in the kit appears to be from a later period, and too thick, I picked up another resin set from OKB: the Tracks for T-34 mod.1940, third variant, coded S72008.
Very fine detail, scale thickness, strong and flexible enough to allow me to shape them over the wheels, glue and paint them separately, then simply slip them on the model.
Some details on the hull:
Some putty and weld detail applied
– Stretched sprue from Zvezda’s Panther, softened with Humbrol Liquid Poly, and poked with a hypodermic needle.
– Same treatment around the MG position in the upper front glacis. Also added were two armored plugs for the electrical wires to the front lights.
– Thin strip of Tamiya tape was added and covered in superglue to simulate the mounting flange of the gun mask (seen in yellow below).
– Stretched sprue simulates the mounting bolts for the mask.
– The rear turret wall was rebuilt using a 0,5mm plastic sheet. The armored bolt heads are 0,6 and 1,2 mm Lion Roar plastic rod sanded to shape.
– The stock PE mesh over the radiator was removed; only the frame was left. The mesh was simulated with coffee filter mesh.
– Two radiator cover locking clasps were simulated with thin plastic sheet (they were lost during the hull sanding).
– Two toolboxes for the left fender were built from scrap plastic.
– A shovel was shaped from a piece of brass and given a stretched sprue handle.
– The handles of the saw were improved with pieces of network cable insulation.
– The gear-retaining hoops were made from thin copper wire.
Then the whole thing was giver a primer coat and a number of greens followed:
Hull and turret after basic paint
I then glued the painted wheels and tracks, and formed the front and rear fenders out of a Aluminum baking dish. Next the whole model was weathered and a couple of details were added – stay tuned.read more