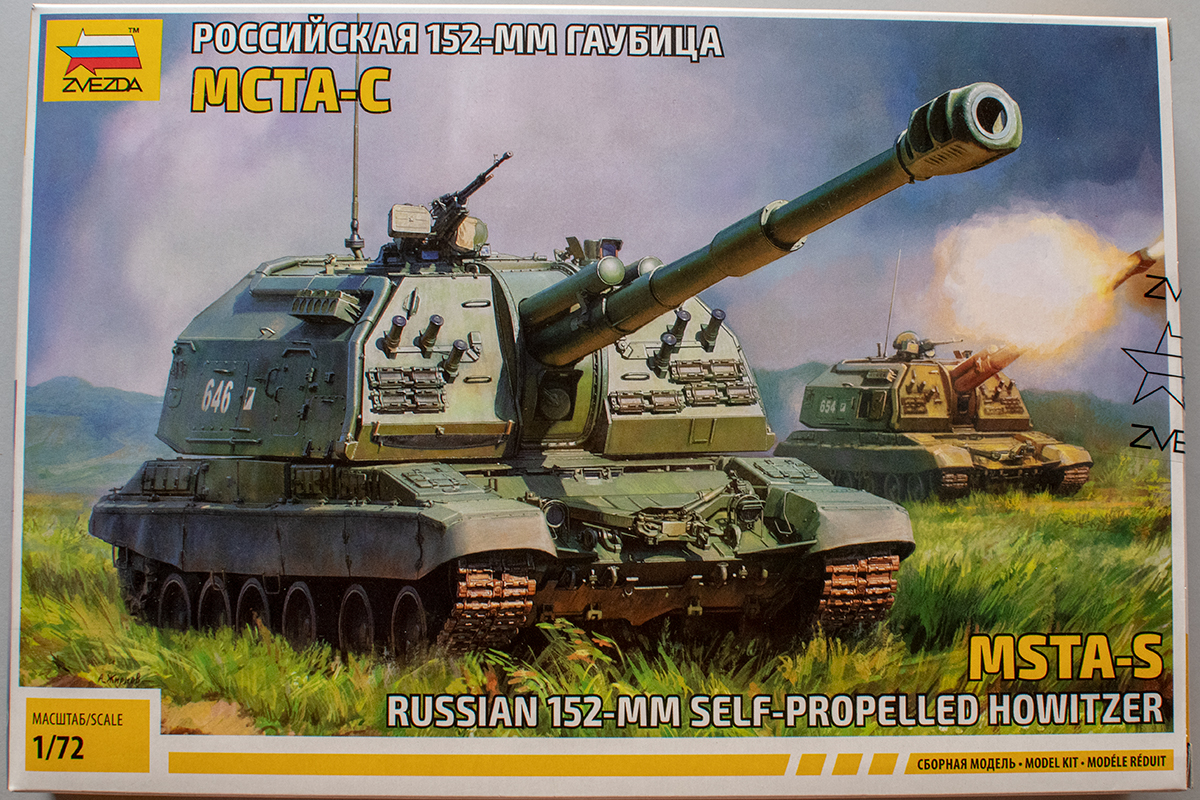
The king of battle (artillery) is not well represented in this blog, and I plan to rectify this starting with the (relatively) recent Msta-S kit from Zvezda in 1/72. The 2S19 self-propelled howitzer was developed during the 1980s to replace the aging 2S3 “Akatsiya” SPG of the same caliber (and much shorter range + lower rate of fire). It uses a modified T-72 hull as well as torsion bars, wheels and track from T-80 to carry a large turret with a 7 meter-long barrel. The resulting product finally brought the level of Soviet SPG up, nearer to the then-current M109 variants in NATO armies. An interesting feature at the back of the turret is an elevator for transporting shells and propellant charges from the ground up into the turret. This means the howitzer can be continuously fed from the ground instead of relying on the limited ammo supply stored onboard alone. Zvezda has already produced an 1/35 kit which proved popular among modellers. Despite knowing the 1/72 kit is expected a year in advance and the official announcement came on June 1, 2019 – picking the actual article up was exciting.
Below is the galery of the completed model. It’s painted in a number of Revell enamel greens – various mixtures of ##48, 65-69 and 361 to simulate faded paint, areas where water of fuel accumulated, crew walked (or couldn’t, e.g. around the edges of the hatches and the hinges). Edges and certain areas were highlighted with green pastel chalks, then some Promodeller washes to pop the details. Decals do silver, because I did not gloss the surface underneath them.
Bronco have done a fantastic job on the kit, which does not have any assembly issues, or serious problems with accuracy. Building is very easy for such a large and well-detailed kit thanks to clever engineering; assembly process is supported very well by the instruction booklet (although several views of the completed steps wouldn’t have hurt). Outside the erroneous “cast surface” effect on the superstructure and the ejector pin marks on the fenders I don’t really have anything to complain about this kit. If I have the opportunity – I would build another one without any hesitation.
Looking for references for the SU-152 brought about the conclusion that this SPG was indeed a rare beast, and is even harder to find today. While there’s a lot of ISU-152 that were remanufactured to the M and K standards, the KV-based subject was not as lucky: there are very few survivors, even fewer are in presentable condition, and none appear to be able to move on its own.
Books on the “Beast killer” are also few and far between. I was able to find Wydawnictwo Militaria’s “SU-152” (332). Beside the examples pictured in the book (pretty devoid of any fittings, really) there’s another survivor in Kubinka, but since it cannot be photographed from all sides you’d need to rely on a very few images with scarce detail that keep repeating in all books on the subject.
Even after building several 35th scale Dragon kits, this Bronco offering seemed a bit intimidating. The sheer number of sprues and parts turned into a bg question mark in my head – will I be able to build the kit as it deserves? There are many parts parts that can moved, or be posed open/closed (tracks, hatches, gun), which further added to the confusion. I took some time to plan my building and painting sequence to ensure I could pose the parts, and from then on it was dry-fit, dry-fit, dry-fit.
Naturally I started with the hull tub, adding details on the outside – suspension arm travel blocks and track tension adjustment mechanism. 6 torsion arms locks per side – no surprises at all. Same goes for track tension adjustment mechanism, which is on the idlers in the front.
The plastic in the kit is very easy to work with, yet there’s some minimal mold shift and many parts exhibit seam that has to be cleaned up. The amorphic properties of the plastic are most noticeable when you add the suspension arms – no two are aligned the same way. On the last two pictures above you can see the early (right) and late (left) type of suspension arms. Note the opening for the torsion bar opening on the early example is visibly bigger – I used strips of 0,25mm plastic to shim them so they sat properly.
Below you can see the basecoated suspension, the conical supports for the return rollers, the final drive covers and the mudscraper on the right side. The mudscrapers are made up of a single detail each. Two types are provided in the kit, and they both need careful cutting out of the sprues to prevent damage to their fine details.
The hatch in the second image is used for ammo loading.
There’s little interior detail beyond the suspension. The driver’s seat is something you will never see again after closing the hull, so don’t bother with detail painting it.
There’s an engine included in the kit. Thanks to the separate engine hatch you will be able to display it. It’s easy to build, although parts require some dry fitting, and some scratch-built detail to actually turn into an engine – especially the wiring/plumbing. As you can see the exhausts simply end nowhere, there’s no gearbox and final drives either.
Despite the mesh-covered intakes there is nothing inside them. The mesh screens themselves are an intricate multi-layered construction, made of a piece of PE mesh and three layers of PE frames. This entire sandwich is draped over a plastic frame with three ribs. Good news: you can shape the mesh as if it was walked over countless times. Bad news: PE parts can be easily torn because of the thin material they are made of, especially the mesh itself.
The rear part of the engine deck is occupied by the two circular hatches. There are working hinge parts, that act just like on the real deal – you can pose them as long as you have something to put something underneath them. The last image of the batch shows all the bolt detail at the hull tub.
Onwards to the gun. The barrel is a single casting that also includes the two guides for the cradle, which greatly helps with alignment! There is a nicely detailed breach assembly at the back and a recoil recuperator below the barrel.
The entire barrel assembly is them slid onto the gun cradle. If you elect to not glue the barrel you can display the ML-20S in action. See below 🙂
To attach the ML-20S to the vehicle, a sort of collar assembly is used, that helps with elevation/depression and side deflection. The gunsight and the gun laying mechanism are all attached to the “collar”. Bronco does have most of the parts for the gunner’s station in place. There is also a gear that matches the teeth of the semi-circular rack – when you elevate or depress the gun barrel the gear will actually rotate.
A significant letdown of the kit is the simulated raw cast texture of the superstructure. The casemate of the SU-152 was actually welded together from rolled armor sheets rather than cast as the turrets of T-34/85 and IS-2 tanks. I filled the holes on the sheets with Mr. Dissolved Putty, filed it down (admittedly the result is far from perfect) and primed it with Mr. Surfacer 1200.
The complete assembly fits with no issues to the hull, so I took to dry-fitting the big gun. I had to split the lower lip of the mantlet to make the cradle go through. The smaller cast armor piece is then simply slid into place, fitting over the pyramid-like shape at the extreme tip of the gun cradle, seen under the barrel on the last two pics. You can also note the extended driver’s vizard with the rain guard over it, the electrical horn next to it, as well as the plug for the gunsight opening above them.
There is a noticeable effect on the armor sheet edges: Bronco has simulated the traces from the gas cutter, used to cut the armor to shape. With a bit of highlighting this can bring up the raw nature of the prototype into the model as well.
Some work in the wheels and tracks dept.
On the images below you can see the sprocket halves with detail on both inside and outside surfaces. The outer half in the kit also holds a plug that the sprocket shaft fits into, allowing the wheel to rotate. There is a circular cover just like on the real deal.
The return rollers and idlers can also be rotating freely if the modeller so wished.
Next are the roadwheels, which are also made up of two halves each, and an axle, too.
The tracks in the kit are made up from individual links. Every 2 links are connected via two pins, one on each side. There are actually 2 pin types on each pin sprue (there are 13 of them). I just went ahead and used all pins one after the other, regardless of type. Below is the result.
You’ve already seen the partly painted model, so here are a few more shots.
Bronco has released two versions of the legendary Zveroboi SPG (popular nickname for the SU-152): early (the subject of this review) and late production. Confusingly the kit of the late variety appeared first, and this kit was released a few months later – in the beginning of 2013.
The sprue count alone is staggering: there are 59 sprues, including 1 with clear parts and the hull tub. A PE fret, decal sheet and two lengths of braided copper wire complete the kit.
Sprue A contains parts that are applicable to the entire KV-1 line and derivatives. Fenders and engine deck are marked “Not for use” in the parts plan.
Sprue A
Sprue B caters for the main gun, and let me tell you casting on the ML-20S is some of the best I’ve seen to date.
Bronco 1/35 SU-152 Early CB35113 Sprue B
Note the single-piece barrel and a separate one-piece muzzle brake.
These are parts of the elevation mechanism.
Elevation gear
The gear below locks into the teethed rake in the previous picture and actually moves if you elevate or depress the gun.
Bronco 1/35 SU-152 Early Details
The two side panels of the gun cradle, studded with rivets just like the real deal.
Bronco 1/35 SU-152 Early CB35113 Gun cradle detail
The barrel and the two halves of the breech; the part on the lower right is the antenna base, which sits atop the casemate.
Bronco 1/35 SU-152 Early CB35113 Barrel tip and breech
Some magnificent casting right there – slide-molded single piece muzzle brake.
Bronco 1/35 SU-152 Early CB35113 Muzzle brake
The rear ends of the gun tube and muzzle brake, and the business end of the headlamp.
Headlamp, muzzle brake, gun tube rear
Parts for the traversing/elevating frame and mechanism.
Bronco 1/35 SU-152 Early CB35113 Traversing mechanism
Engine bay parts (sprue Ca). Sprue Cb is one of six providing suspension and return roller parts.
Sprue Ca (engine parts) and Cb (suspension x6)
This is the V-2K 12-cylinder diesel. No transmission is provided.
Sprue Ca – details
Cb sprues again (both sides) plus a view of the copper cable. You’d need to prime these in order to get the paint to sit right there…
Sprue Cb – top and bottom
Roadwheels with some excellent details and cast texture around the wheelhub.
Roadwheel halves – details on outer faces
Next come the inner faces of either half, and who would’ve thought he’d find such a maze in there 🙂
Bronco 1/35 SU-152 Early CB35113 Roadwheels – inner faces
13 copies of sprue Cd hold the track pins. There are two types present – on at each half of the sprue.
Sprue Cd – track pins
Sprue D holds various details for the superstructure and some rudimentary interior details.
Sprue D
Most notable are (of course) the details for the gun mask, both the fixed “collar” and the mantlet that moves together with the gun. Lovely cast texture there.
Gun mask detail
You’ve also noticed the hatches – which can all be posed open, closed, or be left moveable – have details on either side to help the vision of the complete model.
Sprue D reverse
The fenders used in the build are on the Eb sprue. Also visible are the new suspension arms and the ends for the external fuel tanks (kit contains both the early and late varieties).
Sprues Eb (fenders) and Ge (late fuel tanks)
Clear parts, decals, and PE mesh screens. There are parts for the hot air outlet at the back of the KV-1S chassis the SU-152 is built upon, and the intake screens. The latter are made into a multilayer construction that also has to be bent around an injected plastic frame with 3 support ribs.
Sprue F, PE fret and Decals
A look inside the external tanks.
Fuel tanks inside
More fuel drums, sprockets, idlers various tow eyelets (2 types), handles, etc.
Sprues Ga, Gb (idlers, sprockets), Ge (early fuel tanks)
Other side of the same sprue group. Note lock detail on the inside of the circular transmission access hatch.
Reverse
The boltheads and ribs on the inside of the drive sprocket.
Sprocket detail
Idlers – clever part design so you don’t fumble it…
Idler inside detail
Closer look on tow cable ends and circular hatch.
Tow cable ends and transmission hatches
Casemate and engine deck used as per instructions. You can see there are no mesh screen molded on this one as opposed to the deck on Sprue A.
Sprues Ka (hull details) and Kb (casemate)
Bronco has erroneously molded detail that makes the superstructure look like it’s cast – which it isn’t. It was welded together from rolled sheets of armored steel, which were surface hardened, so no that big blemishes could exist on them in real life. Well if they sat 50 years out in the open – maybe such defects would appear with time, however…
Superstructure detail
Right side – the only hatch left unopened….
Casemate right side
Rear end. You have already noticed the jagged edges of the individual sheets making up the superstructure, simulating the scars left from the gas cutter.
Rear wall
Notice the pistol port plug, and the locating holes for the periscopes and their armored covers.
Engine deck displaying raised bolt head details, as well as carefully mastered weld seams.
Engine deck
Slide molded exhausts will save you some work hollowing them out. To the right is a part of a hatchway hinge.
Exhausts
Intake screen frames to support the PE mesh, and optional injected plastic substitutes with molded-in sag.
Sprues Kc (frames only) and L
Hull tub with staggered suspension ports.
Hull tub
Hull bottom with escape hatch, oil drains and bolt details for the engine mount.
Hull tub bottom
The sprues holding the two track types.
Spues R and L
Closer look at the tracks. Note cast structure.
Track pattern
Details on the inside.
Track detail – reverse
Note teethless tracks are of the split type as is correct for the KV-based SPGs of the period.
Diffenece between the two track types
This little guy is the biggest helper in the kit, as it aligns the separate track, helping create sections of 8 tracks to join and make up the complete track run for each side.
Part T – track assembly jig
Well that’s about it. Next installment shall be of building this beast. From what I see in the sprues this is a great kit, and although the instruction is a big scary in terms of volume – construction steps are logical and easy to follow, pretty far from the crowded (and often misleading) Dragon ones.


 and Cb (suspension x6)")


 and Ge (late fuel tanks)")


, Ge (early fuel tanks)")


 and Kb (casemate)")


 and L")


