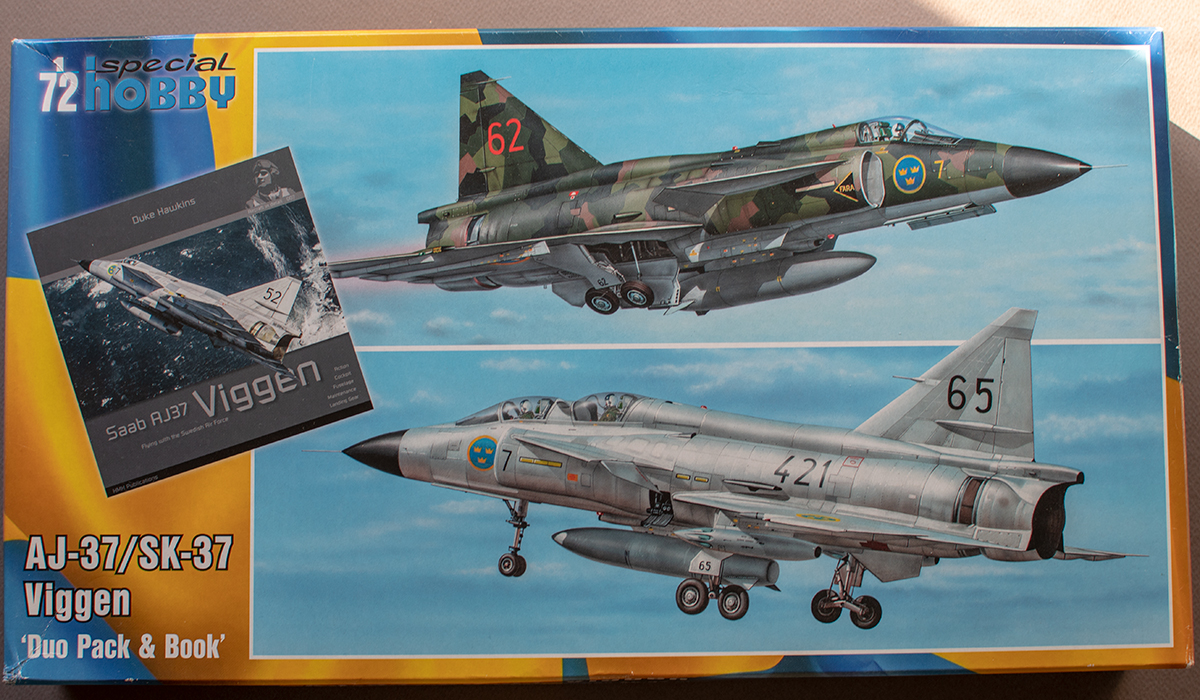
Sweden has always been a very special country in my book with its peculiar machines, and the Viggen is no exception. For the longest time the only kit in the scale has been the Heller one, so when Special Hobby announced their joint project with Tarangus I was excited. As I had seen a two-seater flying some time before that – and was suitable impressed by both appearance and performance – I opted to purchase the twin pack, attracted by the number of versions AND the photo book.
The box is BIG, in fact it is bigger than most 48th kits I have, as well as some 35th scale kit boxes in my collection. There are 2 transparent bags with parts, 2 instruction booklets (1 for each the single and double seater), a decal sheet, and the book. The last 2 items are fixed within the box with cardboard inserts, stapled to the box sides. Except for the instructions all items are packed in separate plastic bags.
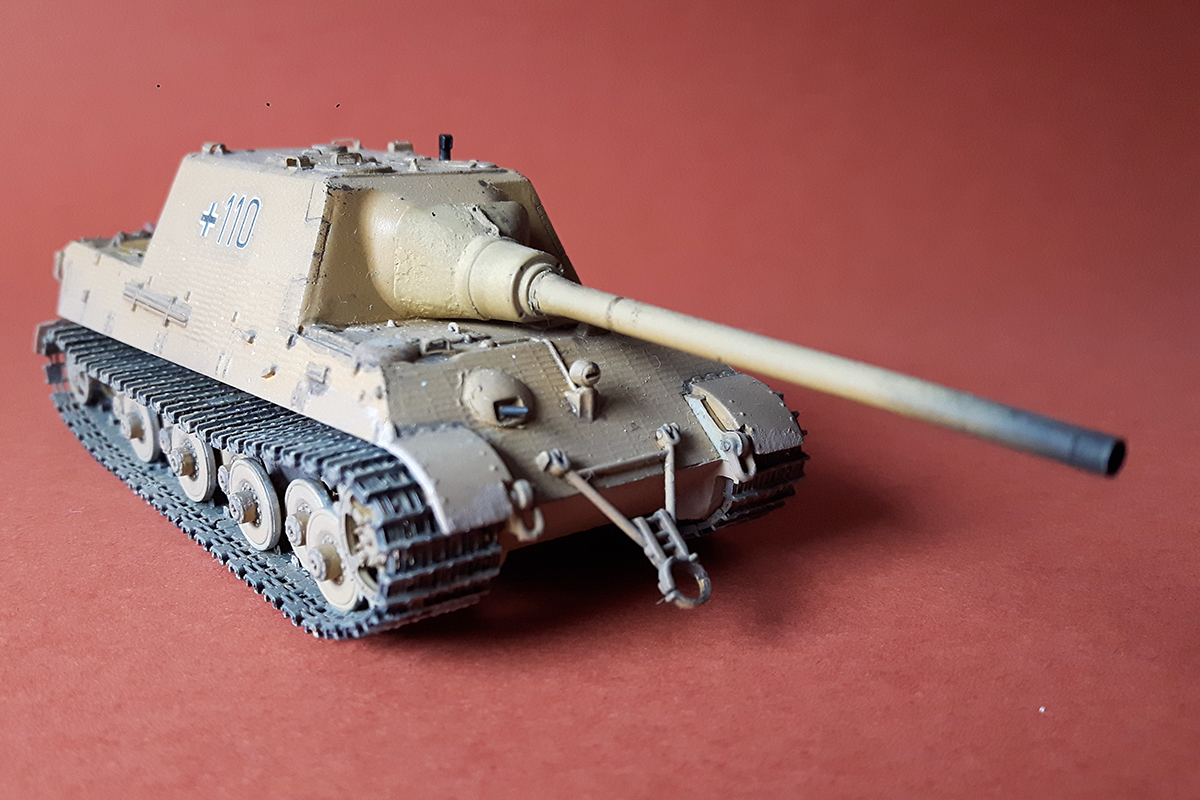
The Jagdtiger was a last-ditch weapon, a self-propelled anti-tank bunker, that had zero impact on the outcome of WWII. Regardless, a lot of model companies offer both variants of this machine. My main reason for getting the Trumpeter set with Porsche suspension was the small number of parts and the related ease of construction. It promised a rather uninvolved build as I imagined a straight OOB project done over the weekend. Yeah, right 😀
The first session was promising, I managed to remove the main components from the sprues, clean up and assemble the bogies in a couple of hours. Instead of going full AMS I decided to plug the locating holes for the spare track hangers, and go “bald”.
After toying with the idea of replacing the molded-on tools I decided against it, as that would severely affect the Zimmerit coat. I really wasn’t impressed by the molded-on Zim either, but elected to keep it. Still, I cut off the vision blocks/guards (molded solid) and built new guards instead.
The gun mantled was stippled with diluted Basic Tamiya putty to simulate the cast texture, then lightly sanded. The gun barrel was replaced with a turned aluminum one from RB models.
My first thought about the Trumpeter tracks was “That’ll do for a quick build.” But then I looked up some build reviews and wasn’t so convinced anymore. Comparison with the OKB Tiger II tracks is below.
As you can see the kit track is missing the internal set of guide teeth, plus the level of detail on the resin one is… a bit higher dare I say?
I also used the corresponding sprocket set to save myself some trouble on adjusting the kit sprocket to fit the aftermarket tracks. I was rather pleased with how the replacements look. To add a bit more character I split out the gun support ring, and re-glued it as if the entire suport was just dropped rather than neatly stowed around the front light (as directed in the instructions).
I used some of the mesh screens from the Flyhawk King Tiger PE detail set on the engine deck to at least partially cover the inverted grills Trumpeter provides.
Continuing with the “KISS” approach I went for the monochromatic Dunkelgelb paint job, and the decals from the Revell Hummel. A bit of mud using colorized wood putty, and a simulated stripped paint in the area where the gun support would wrap around the barrel complete the build.
Details are highlighted with a dark brown wash.
Overall the Trumpeter Jagdtiger has been an easy, even pleasant build. The parts fit well, and if you go with the spare tracks on the superstructure – it will require no filling at all. Unless you decide to replace parts/details I am sure it can be built and finished in a day. Its main weakness are the tracks, which – even on a weekend build – are worth replacing with an aftermarket set. This will add a bit more detail and character to the rather boxy appearance of this massive machine.read more
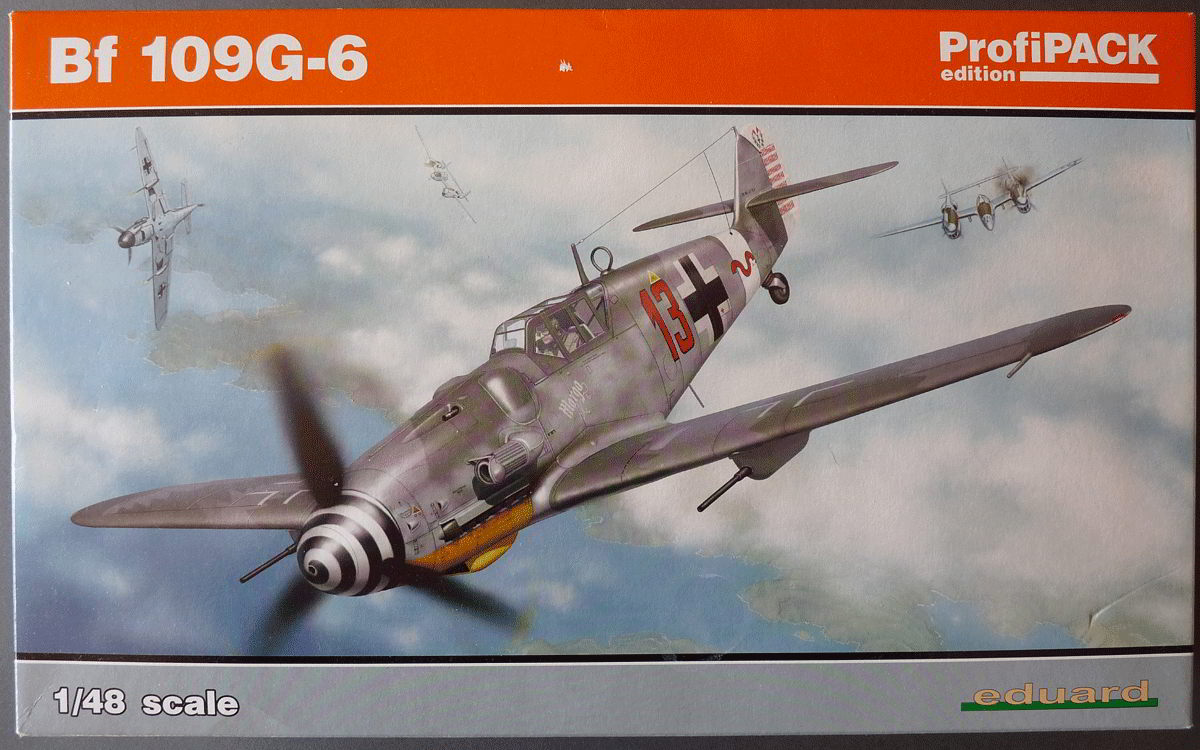
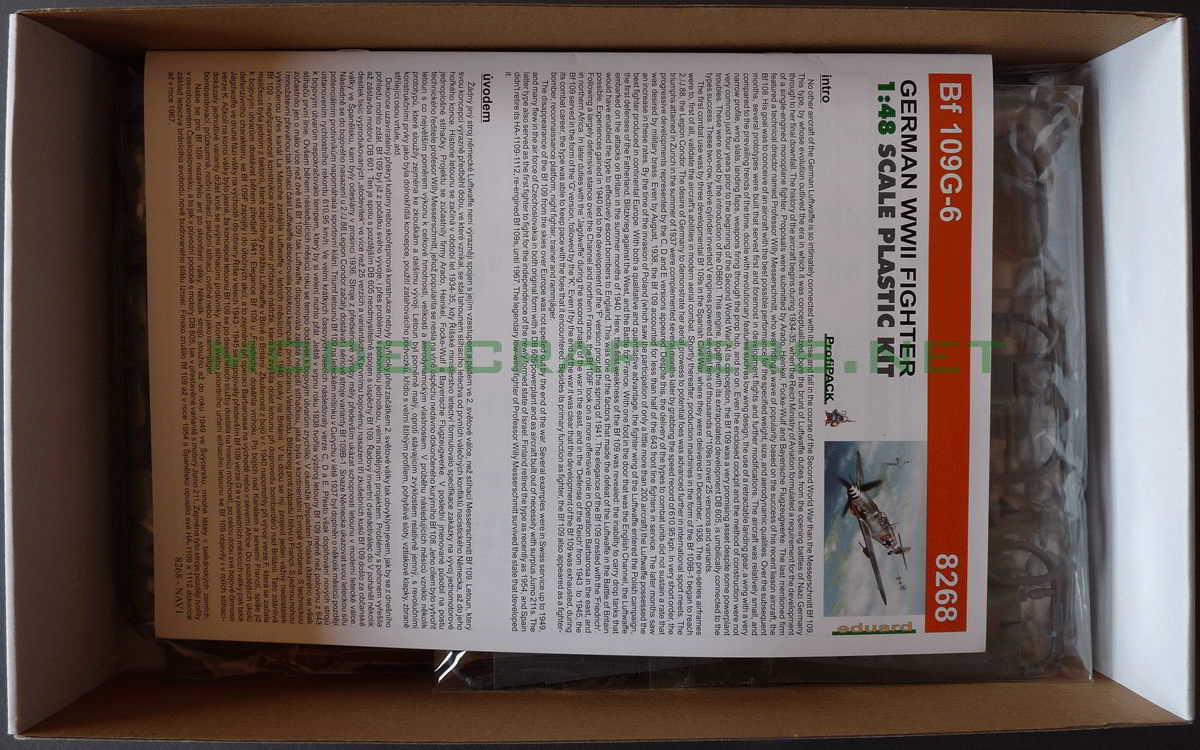
The Bf (or Me) 109 needs no introduction. It is such an important aircraft in the history of aviation (and the world) that I am unable to think of a mainstream modelling company that has NOT offered a version of the 109. In 2014 Eduard unsurprisingly extended their product line with a G-6, the most numerous of the WWII versions.
There are just 4 sprues in the standard box (used for most 1/48 scale aircraft the company produces AND the Royal Class editions), so contents will rattle about as you’re taking it home. Thankfully all frames are tightly packed in sealing bags and there is little to no chance parts will be damaged.
opening the box
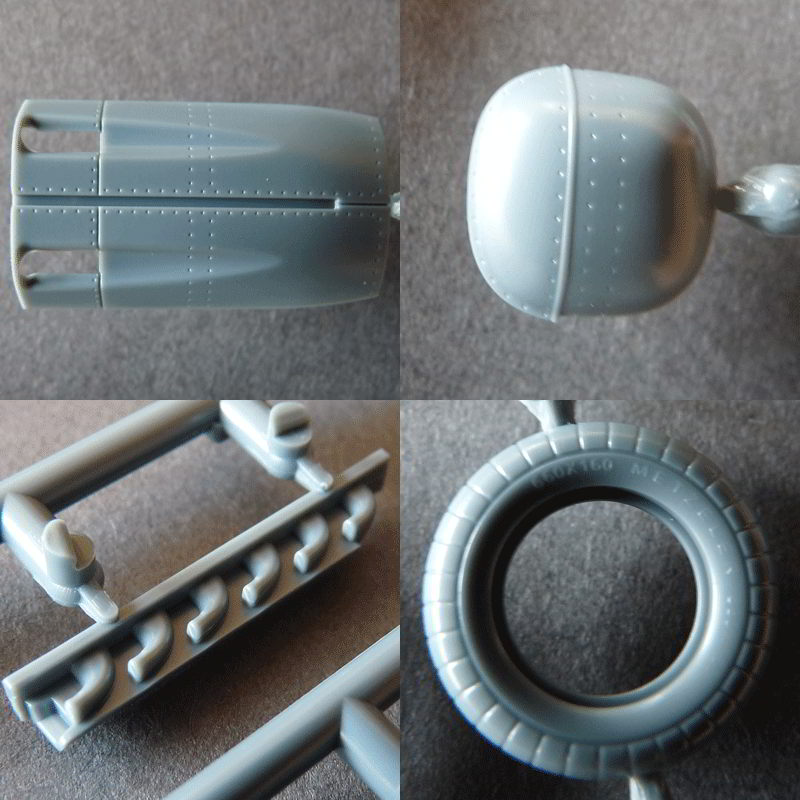
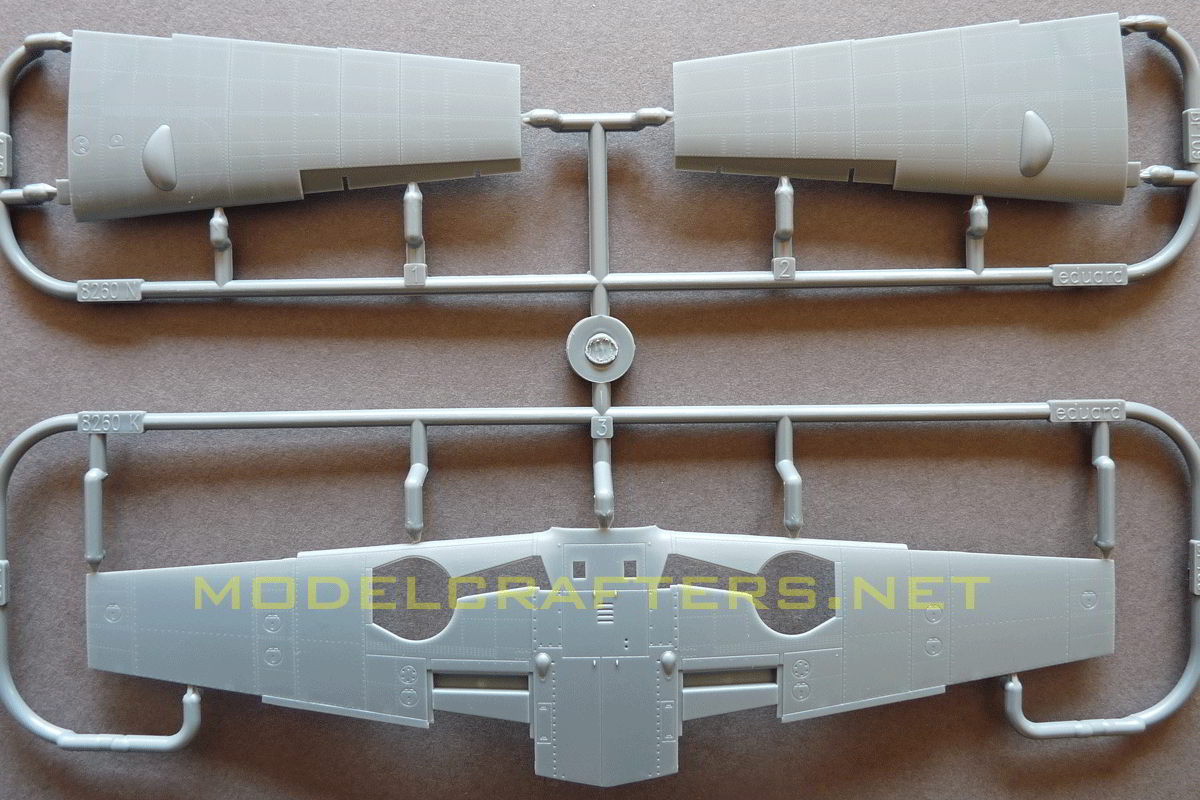
The level of detail and the mold quality are pretty high by even today’s standards – just a teaser below.
molding quality
4 grey sprues and a single transparent one are included.
Few aircraft have served in as many roles as the Focke Wulf 190, the famous Butcherbird. the charismatic German WWII superfighter. Intended as a Bf-109 replacement, the 190 served alongside it till the very last day of the war.
Nearly every company that has done a model of WWII aircraft has a FW-190 in its catalog. As is customary decal variants are between 1 and 4, and most feature aircraft of certain ace pilot – e.g. Josef Priller or Hans-Ulrich Rudel. This sheet is no different, and it does feature TWO options for Priller’s mount, but it’s got a few more tricks up its sleeve.
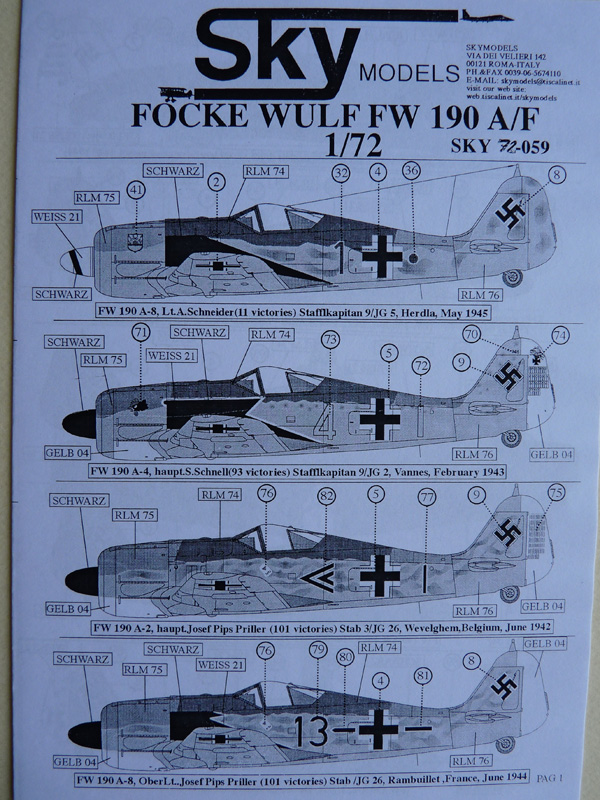
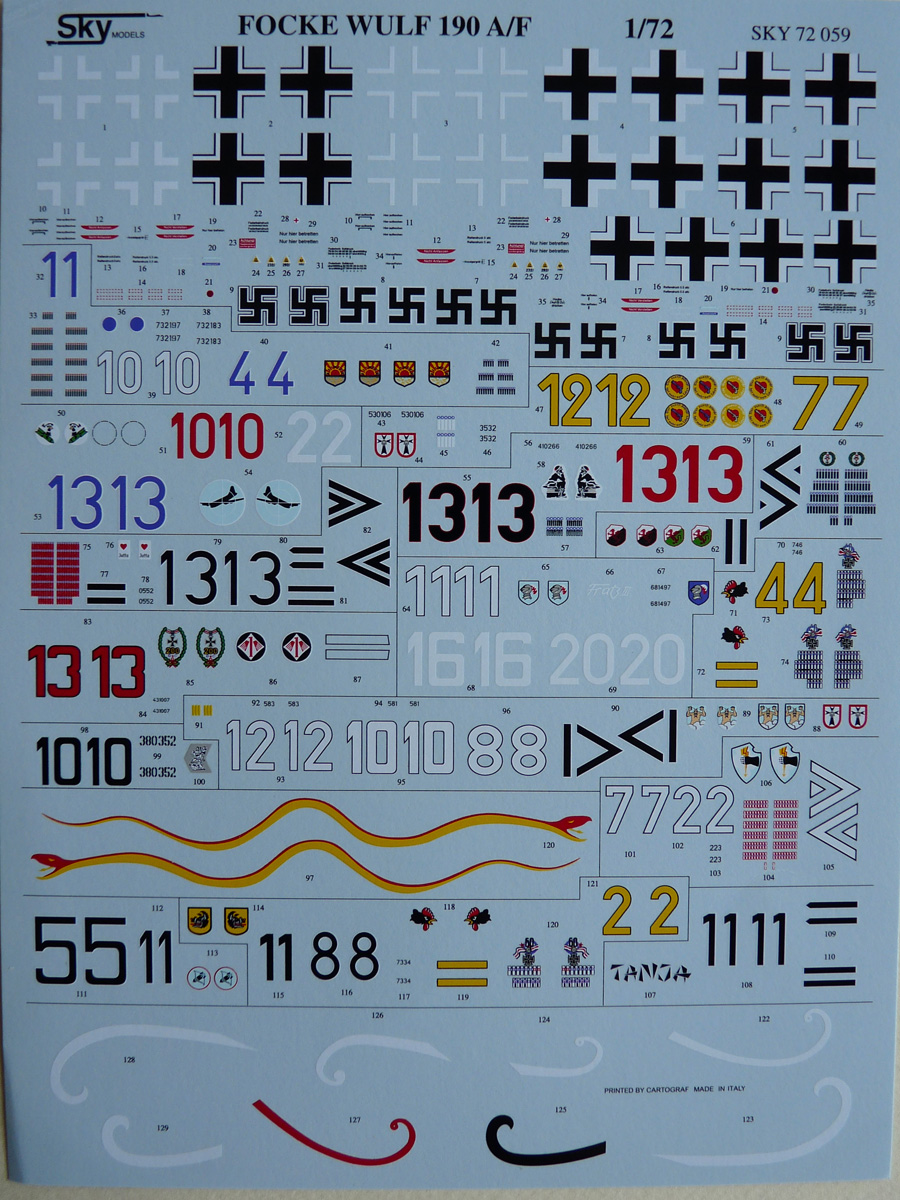
Skymodels decals 1/72 FW-190A and F, SKY72059
The Italian company generously supplies markings for 24 DIFFERENT aircraft from A-2 and up to A-8 inclusive. You can actually mix and match with your stock (or other) sheet and get nearly any aircraft. Aside from the marking options for 15 (!) different units you get
– 24 balkenkreuze (straight-arm crosses), or 4 complete aircraft,
– 12 of the always useful hakenkreuze (“hooked cross”) for the tail (which most companies conveniently skip) to fit 6 aircraft,
– complete stenciling for 2 (two) aircraft,
– 8 (!) different types of spinner spiral.
Hidden amongst the spirals is the lettering “Printed by Cartograf”, which translates as “really high quality decal” 😉
Skymodels decals 1/72 FW-190A and F, SKY72059
The following machines are featured on the sheet:
1. FW-190 A-8, blue 8, Lt. Schneider, Staffelkapitan 9/JG5, May 1945.
17. FW-190 A-8, white 10, feldwebel Rudolf Artner, 9/JG5, May 1945.
18. FW-190 A-3, black 1, hauptmann Strakeljahn, 14 (jabo)/JG5, June 1943.
19. FW-190 A-8, black 11, lt. Heym, Stabstaffel JG 51, September 1944.
20. FW-190 A-5/U-12, black 13 (red outline), lt. Hondt, staffelkapitan 2/JG11, October 1943.
21. FW-190 A-6, white 7, major Bacsila, Sturmstaffel 1, January 1944.
22. FW-190 A-3, yellow 7, 9/JG1, spring 1943.
23. FW-190 A-4, yellow 12, unteroffizier Guthenke, 9/JG1, spring 1943.
24. FW-190 A-4, yellow 7, unteroffizier Guthenke, 3/JG11, spring 1943.
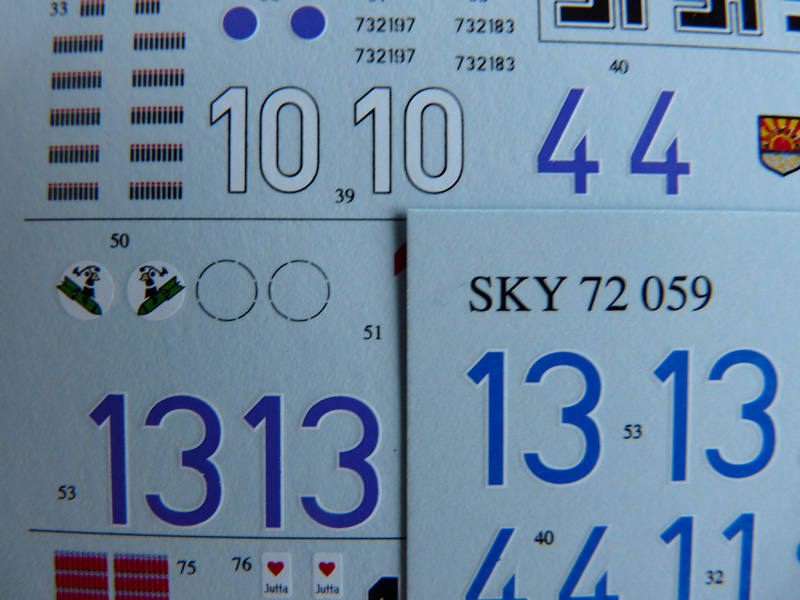
Below I will show you a few examples of how well the sheet is printed. The stenciling and unit and personal badges are virtually 100% legible, even the thinnest borders are in register, and the rudder victory markings are just incredible! The best part is there are several options that offer alternative decals for optional archive image interpretations – this concerns both numbers and unit insignia.
You’ve noticed that there are some oddly-colored numbers in the sheet; their purple color is better suited to Gundams rather than FW-190s. Skymodels has taken care of that with a smaller correction sheet, where numbers, lines and dots are printed in blue – see below.
Correction sheet
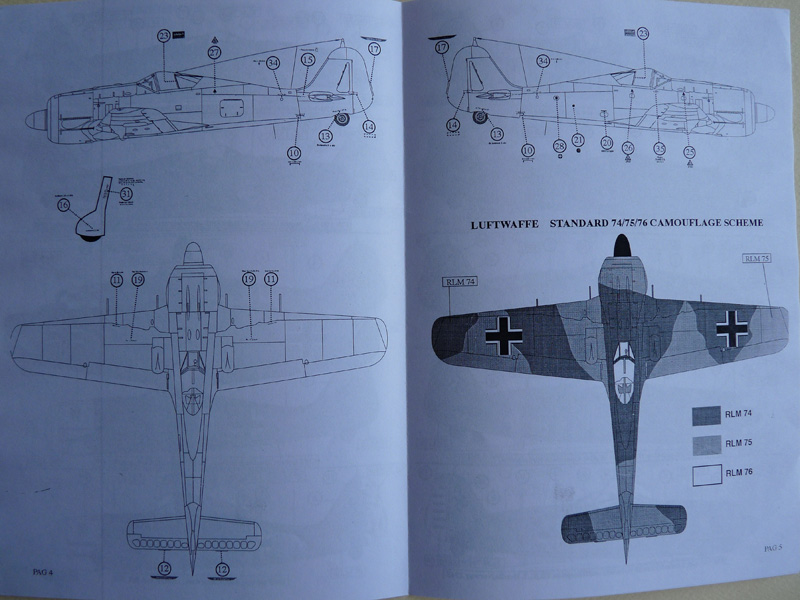
There’s even more 🙂 Beyond all the profiles the booklet contains a standard painting guide for the 190’s color scheme with color callouts.
Color scheme and stencil placement guide
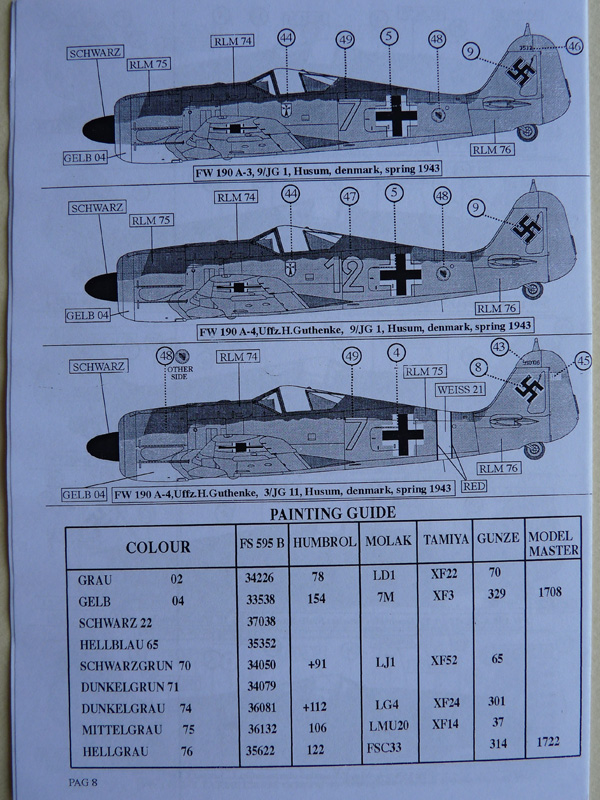
To make it even easier on you, the people in Skymodels have also printed a reference color chart to match the RLM nomenclature to FS numbers, as well as some of the more popular model paint brands – a touch I personally do appreciate.
Paint reference chart
In all – this is an excellent decal sheet, which will be put to good use on my FW-190s, Ta-152s and Bf-109s.read more
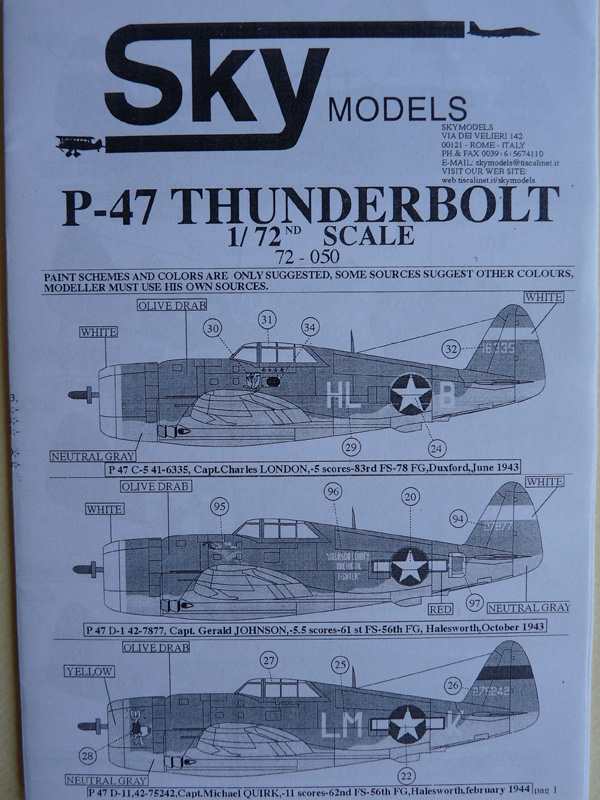
P-47 was the heaviest single-seat fighter of WW2 and a popular modelling subject. There have been numerous decal sheets, but none of them offer as many options as this one.
Skymodels decals 1/72 Republic P-47 Thunderbolt, SKY72050
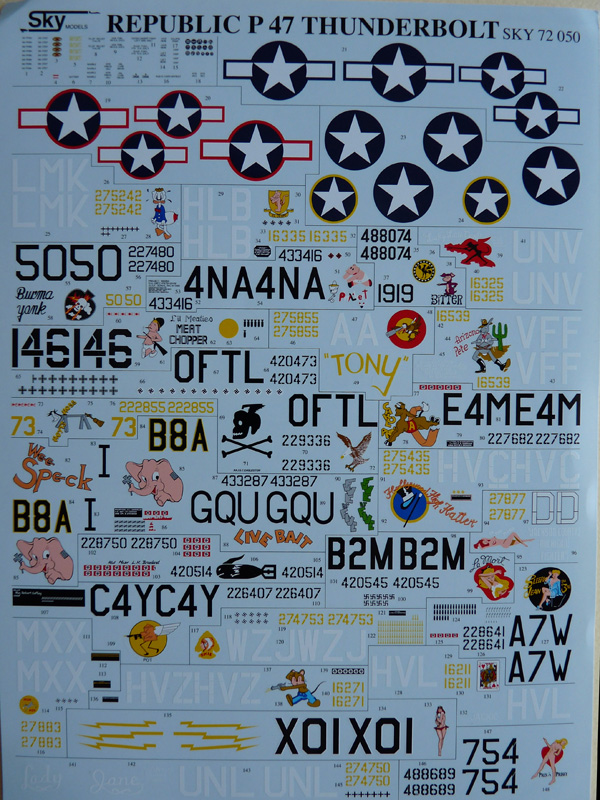
Skymodels’ sheet for the mighty Jug offers 30 (!) different options from C to the N models, from all war theaters.
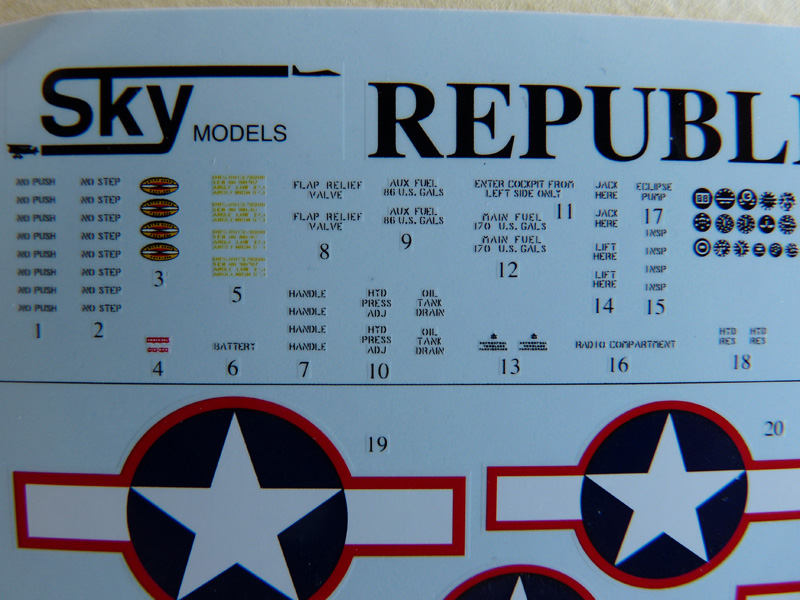
The various options comprise radio codes, nose art, serial numbers, victory markings, etc. In addition there are THREE types of national insignia, the full stenciling AND an instrument panel decal available.
Stencils, prop stickers, instrument panel decal
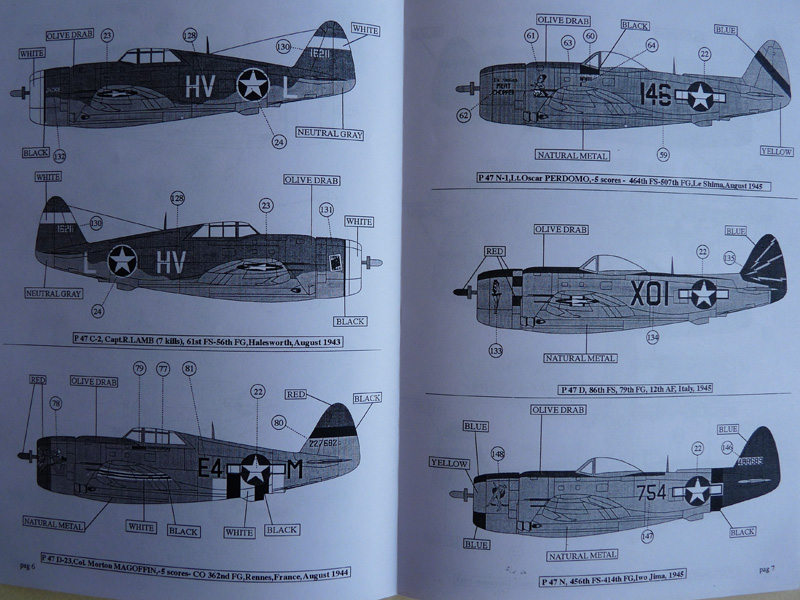
There is a marking and painting guide for each option in the accompanying booklet.
Skymodels 72050: instruction booklet sample
At the back of the instructions there is also a paint reference chart for FS (Federal Standard) and several popular paint brands.
Color reference chart in instructions back cover
To give you a bit more understanding of the value of Skymodels sheets – they are being printed by Cartograf, which means excellent color saturation and in-register printing. Here are a few samples:
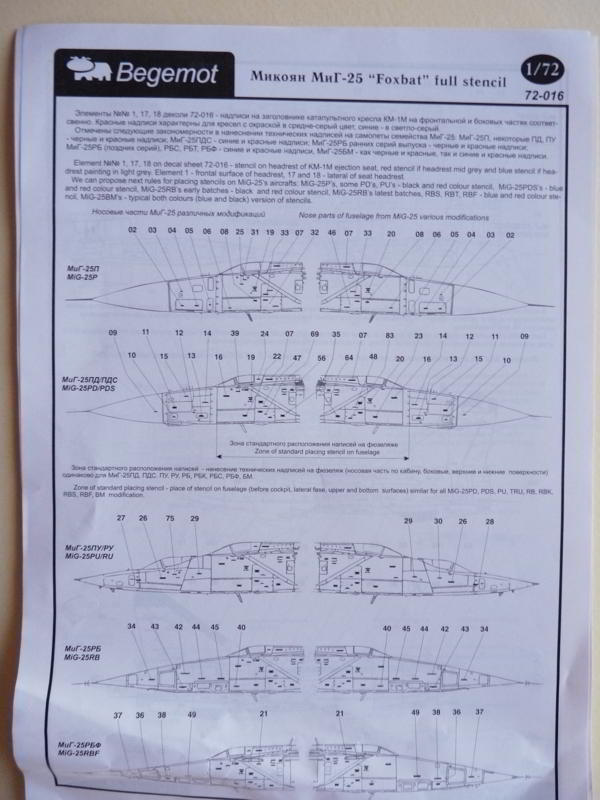
The MiG-25 was a wonder aircraft in terms of technical solutions, aerodynamic scheme and application versatility for an airframe this big and this fast.
For an aircraft this influential and famous its very odd we have less than 10 kits available in all scales. Just 3 of them in the 72nd scale:
– the old Hasegawa kit (reissued and poorly copied countless times though that wouldn’t count),
– the Berkut family of single- and two-seater (the sole kit of the U training version AT ALL),
– the much more recent ICM kit.
All of the kits above feature decals consisting of little more than red stars and bord numbers, but in reality the Foxbat was covered in stencilling! Begemot to the rescue with this beautiful set, covering all major versions of the aircraft + the stuff they slung underneath.
Begemot Decals MiG-25 Foxbat full stencil, 72-016
Close to 150 individual transfer designs are presented, 2/3 of them for the airframe itself. A sheet is enough for 1 aircraft in 1/72.
Begemot Decals MiG-25 Foxbat full stencil, 72-016
As is usual with the Begemot decals the carrier film around the print is minimal, very clear (no yellowing), a significant portion of the texts are readable.
For any of you out there that have had issues with decals not conforming to model surfaces companies would offer all kinds of magical potions. My favorite since the beginning of this year is Gunze Sangyo’s Mr. Mark Softer.
Mr. Mark Softer
This magical clear liquid comes in 40ml bottle, complete with a built-in application brush.
So far it has been successful in subduing Cartograf decals on Eduard’s MiG-21MF, DML’s own decals on the 1/72 amphibious vehicle seen here:
Left bow ID decal
– the Academy decals for their F-8 Crusader here:
Port side front quarter
and a set of Revell decals I placed onto a model more than 2 years ago, but didn’t flatcoat.
I use a little Mr. Mark Softer on the spot where the decal is supposed to be placed before putting the transfer on the model. Then I place the decal there, and apply Mr. Mark Softer AGAIN.
If the surface includes protrusions and/or compound curves – I wait for a few seconds till the liquid attacks the decal, then use a paper towel to press the decal into the surface. Next I add a little little more Softer so it can continue “pulling” the decal down – remember the towel absorbed the previous portion. Depending on the decal and the underlying surface details I might repeat this several times with short pauses for letting the solution work its magic.
Be careful not to flood the decal you are applying the solution to, and to have its position adjusted within a few seconds after application – after that it will become extremely vulnerable to ANY moves as it gets dissolved by the Softer. Remove the excess liquid very carefully with a paper towel, then leave the decal alone overnight. It might wrinkle, and bubbles may form up, but in the end will dry following the surface. In case bubbles are still there in the morning – you can cut through them with a sharp blade and reapply the Softer.