I called The Bad Cat completed some time ago, yet I never posted photos of her all dirtied up. Here we go!
All posts by pgp000
A co-ed pair – Dragon M1114 w/ M2 and Mk.19 in color
Well, some painted M1114s mod.2003 finally make it to The Web. Paints are mixes “by eye”. The green color is intended to simulate the green found on US military hardware, of whose official name I am totally clueless. I wanted to imitate replacement parts – such “patchy” machines can be seen on images across the web.
Revell 1/72 F6F5 Hellcat build, part 3 – nearing completion
Here’s the hellcat with most details glued on, painted, decalled and partially weathered. “Chipping” is attained via removing paint layers – I am using a Q-tip, moistened in 90% spirit. Panel lines highlighted with diluted brown paint. Exhaust streaks are airbrushed. I mixed matt lacquer (Revell 02) with dark grey (Revell 78) for the first layer and earth/rust (Revell 37 + 83).
Fuselage stars’n’bars are obviously oversized. Decals in general weren’t really cooperative, so I used Agama’s Hypersol decal solution to affix them. Related to this – one more mistake is evident on the last pic – I masked the exhaust streaks using blue tack, which pulled one of the decals. Now a nice angular patch of “clean airframe” interrupts the streak…
Revell 1/72 F6F5 Hellcat build, part 2
Masking the bottom. Revell Basic Paint used as a filler/primer in order to make the wing-fuselage joint flush (it has a noticeable step if left by itself). Work also done on the cowling as my riveting attempts left it damaged…
Also, notice my first attempt at filling the giant step left behind by Revell in the gear wells in pic 2. The “spur” on the right wing is already missing – three attempts to restore it would follow.
Image 3 shows the kitty hidden from the Revell spray, which was used to cover the puttied-up self-made casing chutes – they were too uneven and not really aligned.
Revell 1/72 F6F5 Hellcat build and paint, part 1
This one will be shorter, because if I delved into detail and the number of repaints, failed experiments that had to be puttied and sanded over and over in the course of three (!) years I’d have to write a 500-page long book.
So, what did I do to kit 04140?
– Drilled engine cylinders, got it wired (incl that ring around the crankcase) and painted.
– Cut off the MG barrels from the part, measured lengths, replaced with needles. Glued wing parts together.
– Tried to shave off detail from cockpit backwall, failed, broke the detail, used plastic packaging and made the detail anew, glued two needles as support for the pilot’s seat and the seat itself. Painted cockpit, applied decals and glued it in the fuselage halves. Added sloped armored with headrest and that bar, which the shoulder straps pass over.
Bulding Dragon’s M1114 w/ M2/Mk.19
Well, after taking my time to describe the kit parts in as much detail on their own I’ll now try to shed some light on how the kit actually is building – something that is quite obviously missing in most kit reviews, filled with happy voices of how detailed and accurate those are.
As you will undoubtedly notice no kit part is present in the finished article un-altered. Truth is modifications to parts were not needed because I am such a great accuracy hunter, or because I was willing to display how much ignored the fit factor is these days. I had to alter the parts so they could actually FIT and the final article looks like a vehicle, and not a pile of parts thrown together.
Dragon M1114 with M2 and Mk.19
I bought this double kit (kits of two vehicles are included) in 2007 from a trade section in a forum. Up-armored Humvees were in fashion back then, featured daily in the news – seen on patrols, guarding “The Green Zone” and all that. So when the opportunity came for me to try a Dragon kit of a wheeled vehicle with all the bells and whistles in the box I jumped in. So what’s under the cover of kit number 7295?

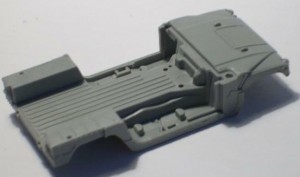
The first thought when looking at the kit parts was “Whoa, that’s nice!”. The precision of the molding on the new parts for the armored version were something I was seeing for the first time. Basically you get the whole lower portion of the vehicle (sans frame and suspension) in a single, separately bagged grey plastic part – “sprue” B. The additional armor on the chassis appears to represent the prototype vehicle configuration properly. The nuts and boltheads that keep the upgraded armor on the vehicle sides are also present – joy to rivetcounters and brushpainters’ nightmare.
Revell’s late production Sd.Kfz. 165 Hummel in early camo
Below is my rendition of Revell’s 1/72 Hummel, shown in an early camouflage I once saw in a Russian (back then Soviet) magazine. The vehicle profile featured an interesting scheme of Panzergrau with wide hand painted (or sprayed) green “spaghetti”. When a model of the SPG showed up in a local store I decided to recreate the camo as close as my abilities allowed.
Since the build was going to be a kind of sentimental journey I decided to do the Hummel justice and use the opportunities I believed the kit offered – give it a little extra “character” than the box and instructions suggested it might have. I studied the kit reviews and a few build articles, so no surprises were expected. Out were my cutting tools and so – the build began.