Last night I shared some details of the test shot. Tonight I am posting a few images of the build process.
As you have already noticed this is a complete kit, not a short run one, with a lot of parts and excellent detail. Despite being a test shot the set that I have fits very well. What you see here is bare plastic and glue with the minimal cleanup required so parts fit. No filler or primer was used.
I started with the turret. The locating pins and the shape of the guiding surfaces helped mate the upper and lower part nearly perfectly. I used a bit too much glue, so needed to clean up a bit.
This post is a special treat, as it’s the first time I am getting a kit that is not available in the market yet. In fact I am lucky to have been the first to get a copy of OKB Grigorov’s Chaffee outside the factory and OKB themselves.
Part overview
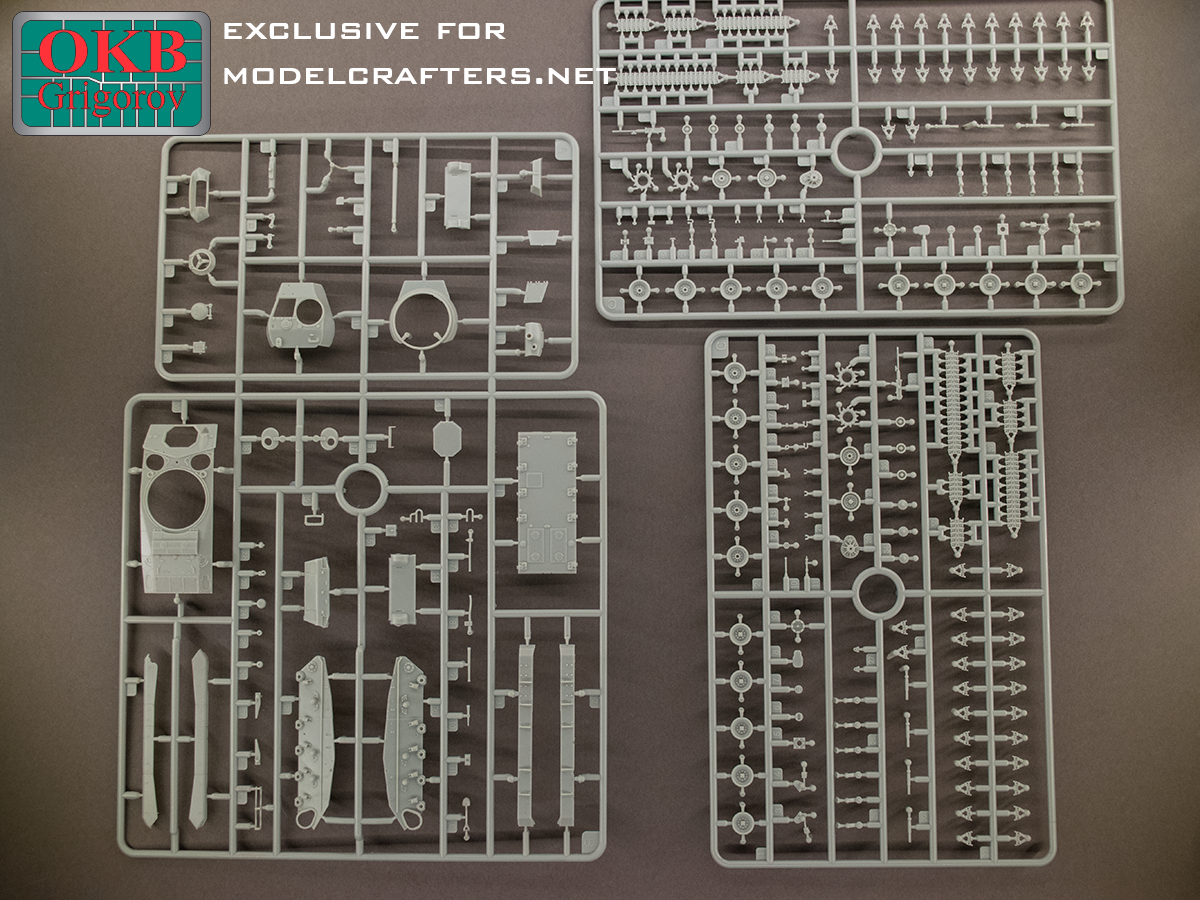
Onto the shots. 4 grey sprues, well over 200 parts, some great detail, all hatches open, separate OVM tools and a lot more!!!
Let’s start with the hull parts.
Note detail on the conical return roller bases, the suspension arm sockets and bump stops, the shock absorber attachment points. The suspension arms are separate parts as are the final drive housing covers.
T-72B in Sofia, National Museum of Military History
The T-72 main battle tank is one of the most recognizable combat machines very much thanks to the mass of real-time broadcast conflicts it’s participated in during the past 3 decades. A lot of companies have released model kits, including in 1/72 scale.
Two types of roadwheels have been used during the 72’s production run: the “8-hole” (early) and the “6-hole” (late) types. They were identical in diameter and rim width – 750mm and 190mm respectively. This scales down to approx. 10,4 and 2,6mm in 1/72.
Using OKB Grigorov’s resing parts has been very easy. In fact with the help of a hair drier I was able to bend the track run around the wheels and get some sag on the track. The track run retained its shape so well it could hold the wheels in place with no glue whatsoever!
After the track was painted I started weathering the wholes assembly, and added some “volumized” mud on the hull, which requires some pigment powders to look like the real deal (dry mud).
A small detail – Albion Alloys copper tube used for the exhaust pipes:
OK, after showing what’s in the box let’s see how to build this beast of a kit.
First, I glued together the hull halves and added the main fenders. They are way too thick for the scale and after being measured were chopped off.
Next step – fill the trenches where the former fenders join the upper hull, and sand the sides down until they are smooth.
Hull filled and sanded
Details will have to be restored…
Fabricate the new fenders from scrap metal – here 0,1mm brass sheet cut to size and bent. The bend is sort of uneven, which is fine considering this is a tank.
Today I received two of OKB’s latest releases – their Winterketten and Ostketten resin tracks for the Pz III/IV family of armored vehicles. I was impressed with the casting and level of detail, so I am in a hurry to show you what the fuss is all about.
First thing about the track sets is that they are provided in 4 bands per set, each about 102mm long, like so:
OKB Grigorov Ostketten set S72057
Considering you need about 175mm per vehicle side for the lenghtened III/IV chassis on which a Hummel or Nashorn was based – you’re pretty well catered for in terms of spares.
Since I needed decals in order to complete the model I had to raid the kit collection and source some. The victims were an Italeri M113 and a Revell (Matchbox) M40 SPG. I also used the lettering from their sheets to make up a code for a 5-16th Artillery machine (but sans the yellow weight class sign). Mr. Decal Softer helped the markings get grip and conform to the model surfaces.
The decals were sealed, and I used minimal amount of pigments to add to the dusty appearance. Diluted H2Oils (Burnt Umber and Paynes Grey) were used to simulate the leaks. Mixed with some dry pigments they helped create the mud buildup on the front upper sheet.
Alright – so why do I keep labeling articles using the full kit name and number? Because most companies “milk” their designs and have multiple releases using the same basic kit (or some of it). OKB Grigorov has already released the A1 and A2 versions of the M109, kits No 72004 and 72005, respectively.
Back to our initial SPH variant.
What’s the first thing we usually do? Dry fit major components so we’re able to judge size and get motivated by the upcoming result! I sanded the turret base and the hull recess that is intended to accept it a bit. The model is pretty small, yet rather heavy for its size.
Alright, another resin + PE monster from OKB Grigorov, and despite it’s lower Cat. No. (the AT-T was 72007) I got it in the beginning of this year to build for a review.
I must say I liked the kit from first sight. Relatively small number of parts that will make for a detailed, compact model of a vehicle that has a bunch of modifications still in use today, 50 years after its introduction.
So – onto the kit.
All the parts are packaged in zip-lock bags, all protected by bubble wrap and a sturdy white cardboard box. There are
– windows in the doors, attempted imitating seals with acrylic gel and paint;
– weathering, and a lot of it. An experiment with a new technique went so far as to lead to completely strip-down of the paint on the hull/cargo bed assembly.